Author: admin

  • Bash Snippet: Luhn Algorithm

    Bash Snippet: Luhn Algorithm

    I like Bash, but it isn’t well suited for some tasks. For fun I sometimes ignore that. Occasionally people seem to find this useful.

    In that spirit, here is my implementation of the popular Luhn / mod10 algorithm used in credit card, IMEI, and other number sequences.

    download [luhn.zip]

    # Returns Luhn checksum for supplied sequence
    luhn_checksum() {
            sequence="$1"
            sequence="${sequence//[^0-9]}" # numbers only plz
            checksum=0
            table=(0 2 4 6 8 1 3 5 7 9)

            # Quicker to work with even number of digits
            # prepend a "0" to sequence if uneven
            i=${#sequence}
            if [ $(($i % 2)) -ne 0 ]; then
                    sequence="0$sequence"
                    ((++i))
            fi

            while [ $i -ne 0 ];
            do
                    # sum up the individual digits, do extra stuff w/every other digit
                    checksum="$(($checksum + ${sequence:$((i – 1)):1}))" # Last digit
                    # for every other digit, double the value before adding the digit
                     # if the doubled value is over 9, subtract 9
                    checksum="$(($checksum + ${table[${sequence:$((i – 2)):1}]}))" # Second to last digit
                    i=$((i – 2))

            done
            checksum="$(($checksum % 10))" # mod 10 the sum to get single digit checksum
            echo "$checksum"
    }

    # Returns Luhn check digit for supplied sequence
    luhn_checkdigit() {
            check_digit=$(luhn_checksum "${1}0")
            if [ $check_digit -ne 0 ]; then
                    check_digit=$((10$check_digit))
            fi
            echo "$check_digit"
    }

    # Tests if last digit is the correct Luhn check digit for the sequence
    # Returns true if valid, false if not
    luhn_test() {
            if [ "$(luhn_checksum $1)" == "0" ]; then
                    return 0
            else
                    return 1
            fi
    }

    To maximize the enjoyment I’ve optimized the script a little bit in two ways:

      1) Normally every other digit of the sequence to be computed is multiplied by 2. If that result is greater than 9, then 9 is subtracted. There are only 10 single digits in base-10, so it seemed reasonable to precompute these values. This saves not only the multiplication step, but also the conditional branch (on greater/less than 9), and the occasional subtraction operation (when values were greater than 9).
      2) I prepend a 0 to the submitted sequence if there are an uneven number of digits in the sequence. The leading 0 doesn’t affect the end result, but being assured of having pairs of digits available in the while loop of our luhn_checksum() function saves us from needing to keep track of which digits should be added directly and which should be handled as described in optimization #1 above.

    If for some reason you are actually using this script, you probably will be most interested in luhn_checkdigit() and luhn_test().

    Here is an example of how this can be used:

    #!/bin/bash
    source luhn.sh


    # Example IMEI number from Wikipedia
    sample_imei="352152097374972"
    if luhn_test "$sample_imei"; then
            echo "$sample_imei might be a valid IMEI"
    else
            echo "$sample_imei is an invalid IMEI"
    fi

    # Same number with the last two digits transposed
    sample_imei="352152097374927"
    if luhn_test "$sample_imei"; then
            echo "$sample_imei might be a valid IMEI"
    else
            echo "$sample_imei is an invalid IMEI"
    fi

    # Creating a check digit for a set of numbers
    echo "35215209737497 would be a valid looking IMEI if you added a $(luhn_checkdigit "35215209737497") to the end"

    # Many credit card types also use this checksum
    sample_mastercard="5105105105105100"
    if luhn_test "$sample_mastercard"; then
            echo "$sample_mastercard might be a valid card number"
    else
            echo "$sample_mastercard in an invalid card number"
    fi
    user@host:~$ ./demo.sh
    352152097374972 might be a valid IMEI
    352152097374927 is an invalid IMEI
    35215209737497 would be a valid looking IMEI if you added a 2 to the end
    5105105105105100 might be a valid card number
  • Retro-Joystick to USB Keyboard Adapter

    Retro-Joystick to USB Keyboard Adapter

    Project Introduction

    I made an adapter to take classic video game controllers for Sega, Atari (2600, 7800) and Commodore (VIC20, C64, C128) and adapt them to work as a 5 button USB keyboard (4 directions and a fire/trigger key).

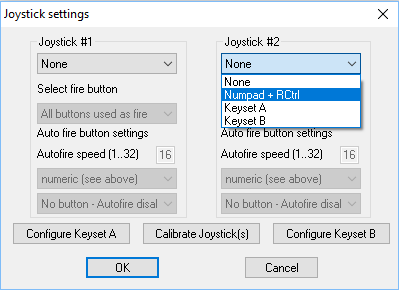
    The joystick now works like an external numeric keypad. Pressing the fire/trigger button will act like pressing the right-hand Control/Ctrl key. This was all written in the Arduino IDE, and can be easily changed (if for example you prefer using W,A,S,D for direction and space bar to fire, or the arrow keys for movement, it’s a quick change to make.

    I picked this configuration mostly because the C64 emulator VICE has it as an option.

    Hardware

    For the brains I used a board with an Atmel ATMega32U4, similar to the Arduino Pro Micro (see parts list below).

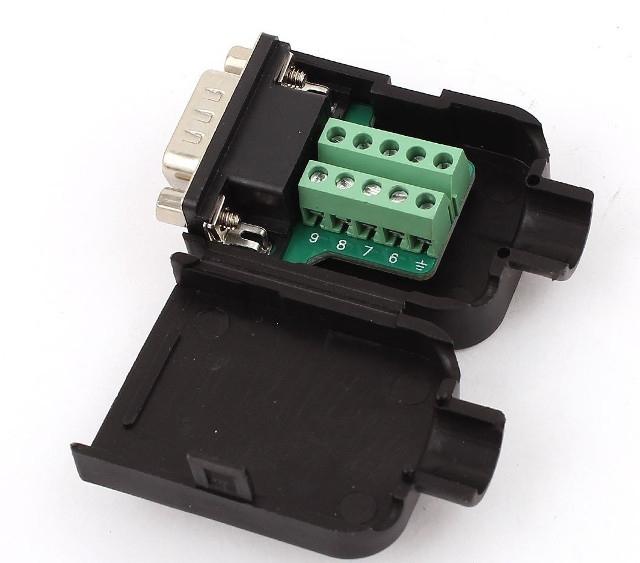
    As an enclosure I used a DE-9 adapter housing. This one had terminal blocks for quickly throwing cables together, which I removed to make room.

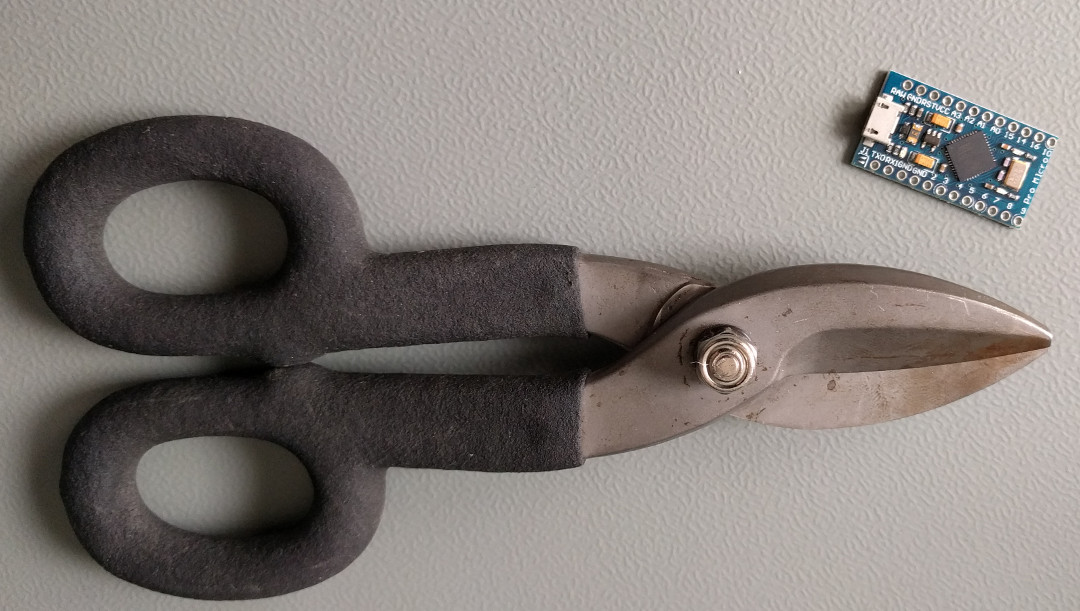
    I chose this particular DE-9 adapter because it looked like it might be roomy enough to put the microcontroller into, however it wasn’t quite long enough. So, with some heavy duty cutters I use for chomping up bits of PCB I cut the last two pin holes off the microcontroller board.

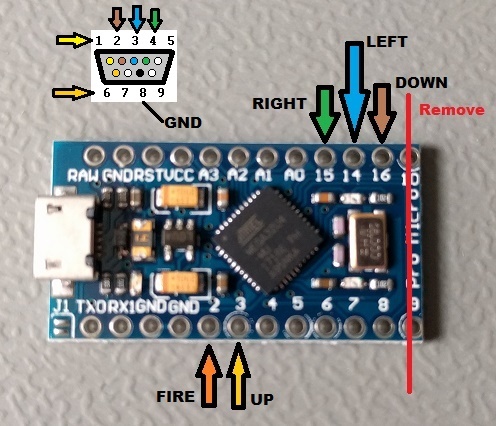
    After cutting I sanded the edge and visually inspected to try to make sure no obvious unexpected connections between layers were being made. Cutting this down gave me enough room to fit it into the enclosure. I’ve shown this modification in the microcontroller PCB image below as a red line through the PCB.

    I soldered up some wires between the DE-9 PCB and the microcontroller PCB. The silk screen of the DE-9 PCB made it easy to quickly identify which pins were which. The I/O pins I chose on the microcontroller were really just a matter of convenience to get the cables to cooperate nicely with the DE-9 PCB and leave enough room to close the adapter enclosure. I didn’t annotate it very well in the image below, but the DE-9 ground (GND) pin should be wired to any one of the available microcontroller GND pins.

    To prevent accidental electrical connections between microcontroller PCB and the DE-9 PCB I wrapped the microcontroller in some Kapton tape, but hot glue or something would probably work fine. The end result looks like a big mess, thankfully I don’t have to look at it with the enclosure closed.

    I ended up needing to use a hobby knife to carve out a little of the cable opening of the DE-9 enclosure to widen it for the USB micro connector end.

    Software

    To find the numeric keypad directional key values I referenced the USB HID Usage Tables found here:
    http://www.usb.org/developers/hidpage/Hut1_12v2.pdf

    A quirk of the Arduino USB keyboard report handling requires you to add 136 (decimal) to the value you find in the usage table. This value is later removed by other code in the USB library, but helps the source make some kind of determination on how to handle the key event (it seems pretty crazy to me too, but whatever, it works).

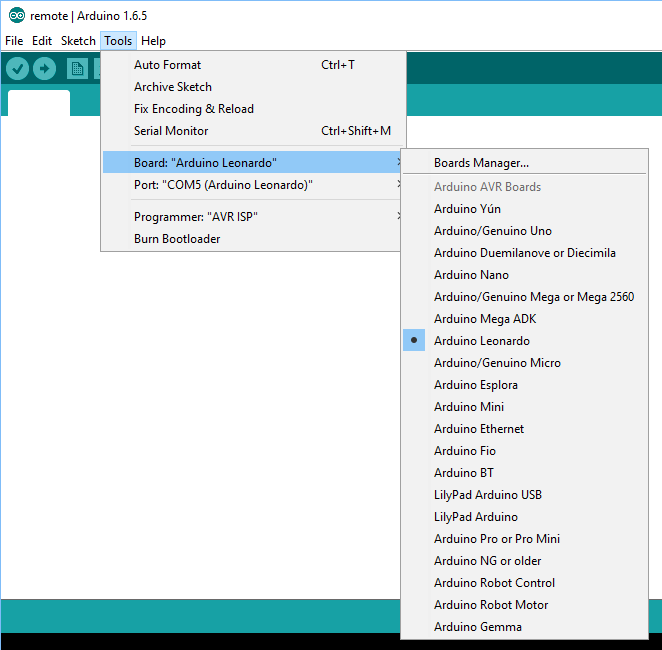
    Because the board I’m using has an ATmega32U4 with an Arduino bootloader it shares enough in common with the Arduino Leonardo that “Arduino Leonardo” should be selected as the target board in the Arduino IDE to properly compile and flash the software.

    download joykey.ino

    // Some more meaningful names for referencing applicable I/O pins
    #define FIRE_PIN  2
    #define UP_PIN  3
    #define DOWN_PIN  16
    #define RIGHT_PIN  15
    #define LEFT_PIN  14

    // Arduino-friendly (value+136) keyboard values of direction keys of numeric keypad
    #define KEY_PAD_UP 232
    #define KEY_PAD_DOWN 226
    #define KEY_PAD_RIGHT 230
    #define KEY_PAD_LEFT 228

    // Map a keyboard value to the input pin. First Pins[] value is first Keys[] value, etc
    byte Pins[] = {FIRE_PIN,        UP_PIN,     DOWN_PIN,     RIGHT_PIN,     LEFT_PIN    };
    byte Keys[] = {KEY_RIGHT_CTRL,  KEY_PAD_UP, KEY_PAD_DOWN, KEY_PAD_RIGHT, KEY_PAD_LEFT};

    void setup() {
      // pullup all button input pins to high
      for (int i = 0; i <= sizeof(Pins); i++) {
        pinMode(Pins[i], INPUT_PULLUP);
      }
     
      Keyboard.begin();
    }

    void loop() {

      {
        int keyStates = 0;
        for (int i = 0; i <= sizeof(Pins); i++) {
          if (digitalRead(Pins[i]) == LOW) {
            Keyboard.press(Keys[i]);
            keyStates = 1;
          }
        }
        if (keyStates == 1) {
          // pause a moment to give any pressed keys a chance to report,
          // and possibly ignore some joystick bounce as well
          delay(10);
        }
      }

      // Release any keys that need to be released
      for (int i = 0; i <= sizeof(Pins); i++) {
        if (digitalRead(Pins[i]) == HIGH) {
          Keyboard.release(Keys[i]);
        }
      }

      // If no buttons are being pressed, releaseAll() to ensure no keys are stuck down
      {
        int pinStates = 1;
        for (int i = 0; i <= sizeof(Pins); i++) {
          pinStates = pinStates & digitalRead(Pins[i]);
        }
          if (pinStates == HIGH) {
            Keyboard.releaseAll();
          }
      }

    }

    Here is a description of what the code is doing.

    #defines
    The source defines some names for the pins that connect to the corresponding DE-9 pins (see the “Hardware” notes above for clarification) and some names for the keypad values. The right-hand Ctrl key value(KEY_RIGHT_CTRL) is already defined in the Arduino USB library.

    setup()
    The connected pins are internally pulled high, and are considered activated when connected to ground through the normal use of the joystick. The pins to be monitored for these state changes are put into the Pins[] array and the corresponding key values to send in the USB report are put in the Keys[] array at the respective array index position.
    The function setup() gets ran at device power-up and loops through all the pins listed in Pins[] to configure the internal pullup to high state. Keyboard.begin() prepares the Arduino keyboard library.

    loop()
    The main loop() iterates through each pin in Pins[] looking for a low state and applicably sets the corresponding key. If any keys are found to be pressed a ~10ms pause occurs to allow the operating system ample time to see the USB report, but not offer too much delay as to cause the joystick to feel unresponsive to rapid changes. This delay also helps remove sporadic changes in pin state due to imperfect contact between the joystick internal connection plates. Another iteration through the Pins[] array occurs to remove the appropriate data from the USB report for any keys no longer being held down. A final (possibly unnecessary) check occurs which calls Keyboard.releaseAll() when no positions of the joystick are active (low). I had some issues during initial develop with keys getting stuck “down” and found it very irritating to have to physically unplug the adapter in order to resolve the problem. This check was added to make life a little easier, but may no longer be required. Keyboard.releaseAll() only removes reports from memory on the microcontroller and won’t cause the USB host to ignore held keys on other connected keyboards, so it seems harmless enough to leave in place.

    Bill of Materials

    Arduino Pro Micro-like board
    https://www.amazon.com/gp/product/B012FOV17O

    “DB9” / DE-9 9 pin adapter module (terminal blocks will need to be removed)
    https://www.amazon.com/gp/product/B00YM3W7OI

    Micro USB cable
    https://www.amazon.com/gp/product/B003YKX6WM

    Resources

    USB HID Usage Tables
    http://www.usb.org/developers/hidpage/Hut1_12v2.pdf

    -Have fun!

  • Arduino Leonardo (ATMega32u4) USB Power Button

    Arduino Leonardo (ATMega32u4) USB Power Button

    Project Introduction

    For fun I made this USB power button with an Arduino Micro/Leonardo-like board (by which I mean one using the Atmel ATMega32u4 MCU with USB controller).

    The project details are below in case you should want to read or watch how I did it.

    I used an ATMega32U “arduino”-like board from Amazon.com although there is an official Arduino Micro that should work just as well. For development/testing I used the Arduino Leonardo. Any of those could work in a similar project, the only notable difference being size and available I/O pins.

    I put mine inside of an “Emergency Stop” button. I decided to get a red USB cable too because hey, why not?

    USB HID control of desktop power management features is possible using the Generic Desktop / System Control Collection (Usage Page: 0x01Generic Desktop Page“, Usage Id: 0x80System Control“) with the Usage 0x81System Power Down“. For more details consult the USB HID Usage Tables.

    Software

    Initially I planned to use the Arduino USB Keyboard functions, but I came to realize the USB HID keyboard device doesn’t contain the power management buttons. Similarly media keys such as Play/Pause, Next, Previous, Volume Up/Down, are also not handled in the same way as other keyboard input. Most examples of using the Arduino Leonardo to send media key events to the computer reference some work by Stefan Jones. Following his blog post I updated my Arduino libraries to include his modifications. With his changes and a couple of small tweaks, I was able to send a system power down request over USB.

    I used the Arduino IDE version 1.6.5, I think the USB libraries were changed a lot in 1.6.6, so if you are using a later version things may require substantial adjustments.

    I left Stefan’s additions to the file hardware/arduino/avr/cores/arduino/USBAPI.h unchanged.

    As shown below, inside of the file hardware/arduino/avr/cores/arduino/HID.cpp I commented out the “Consumer Devices” (0x05, 0x0c) value and the “Consumer Control” (0x09, 0x01) value and added the “Desktop” (0x05, 0x01) and “System Control” (0x09, 0x80) values. Next I commented out the “Mute” value (0x09, 0xe2) and added the “System Power Down” value (0x09, 0x81), hijacking the Remote.mute() function to work as my “System Power Down” function.

    //—————————————————————————–

        /* Cross-platform support for controls found on IR Remotes */

        //0x05, 0x0c,                    // Usage Page (Consumer Devices)
        0x05, 0x01,                    //   Usage Page (Desktop)
        //0x09, 0x01,                    // Usage (Consumer Control)
        0x09, 0x80,                    //   Usage (System Control)
        0xa1, 0x01,                    //   Collection (Application)
        0x85, 0x04,                    //   REPORT_ID (4)
        0x15, 0x00,                    //   Logical Minimum (0)
        0x25, 0x01,                    //   Logical Maximum (1)

        0x09, 0xe9,                    //   Usage (Volume Up)
        0x09, 0xea,                    //   Usage (Volume Down)
        0x75, 0x01,                    //   Report Size (1)
        0x95, 0x02,                    //   Report Count (2)
        0x81, 0x06,                    //   Input (Data, Variable, Relative)

        //0x09, 0xe2,                    // Usage (Mute)
        0x09, 0x81,                    //   Usage (System Power Down)
        0x95, 0x01,                    //   Report Count (1)
        0x81, 0x06,                    //   Input (Data, Variable, Relative)

    The Arduino sketch is taken from Stefan’s example for using Remote.mute, (which I’ve re-purposed above). I’ve added a couple of extra lines to wait for the button press before sending the shutdown report to the USB host.

    void setup() {
      pinMode(2, INPUT_PULLUP);
    }

    void loop() {
      while(digitalRead(2) == HIGH) {
        // nop nap
        delay(1);
      }

      Remote.mute ();
      Remote.clear();

      delay(5000); /

    }

    In the Arduino IDE I selected “Arduino Leonardo” from Tools->Board menu and select the correct com port under Tools-Port, and flashed the new software to my board.

    Hardware

    With that done all that was left was soldering up some wires and connecting them to the button.

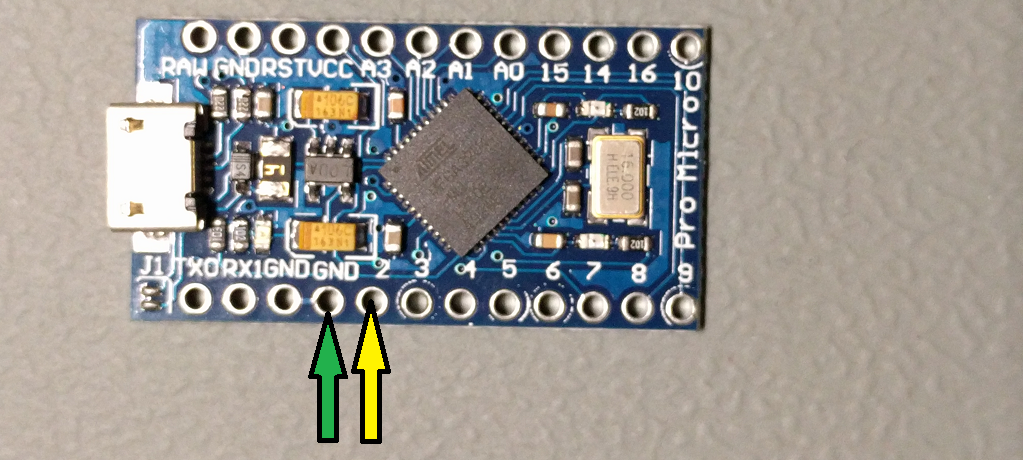
    I soldered a piece of yellow wire to pin 2 of my board and a piece of green wire to the near by ground pin as shown below.

    Then I just had to attach an exposed section of the other side of the wires to the screw terminals on the switch. On the switch I bought there was a side labeled “A” and a side labeled “B”.

    Using a multimeter set on continuity test I determined the conditions of the connections between terminals with the switch depressed and released. On my switch the two terminals within the green side labeled “A” were closed when the push button was pressed, and the two terminals on the orange side labeled “B” were opened once the button was pressed.

    Usage Notes

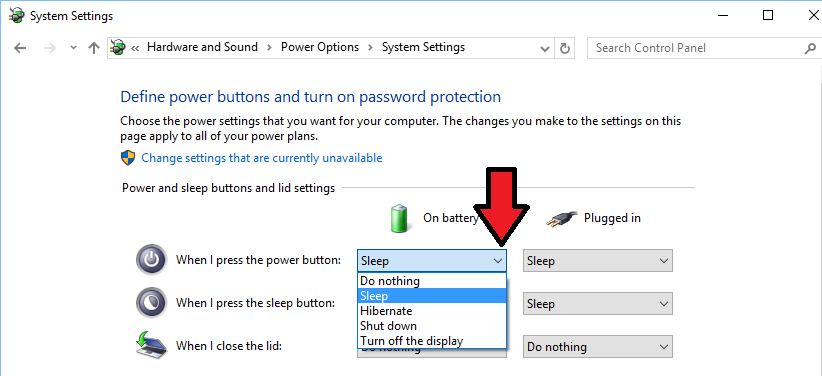
    The effect of the power button can be changed in the OS. In Windows 10 you can get to this under Power Options as shown below.

    I have mine set to sleep, which looks a bit cooler/quicker on the video above, and was less time consuming during testing and troubleshooting.

    Bill of Materials

    “Emergency Stop” Push Button
    https://www.amazon.com/gp/product/B00MJVMV32

    Red USB cable
    https://www.amazon.com/gp/product/B013DO561W

    “Pro Micro” ATmega32u4 “arduino Leonardo”-like board
    https://www.amazon.com/gp/product/B012FOV17O

    Resources

    Sending HID Media Key (modified this)
    http://stefanjones.ca/blog/arduino-leonardo-remote-multimedia-keys/

    USB HID Usage Tables
    http://www.usb.org/developers/hidpage/Hut1_12v2.pdf

  • Raspberry Pi RTS / CTS Flow Control

    Raspberry Pi RTS / CTS Flow Control

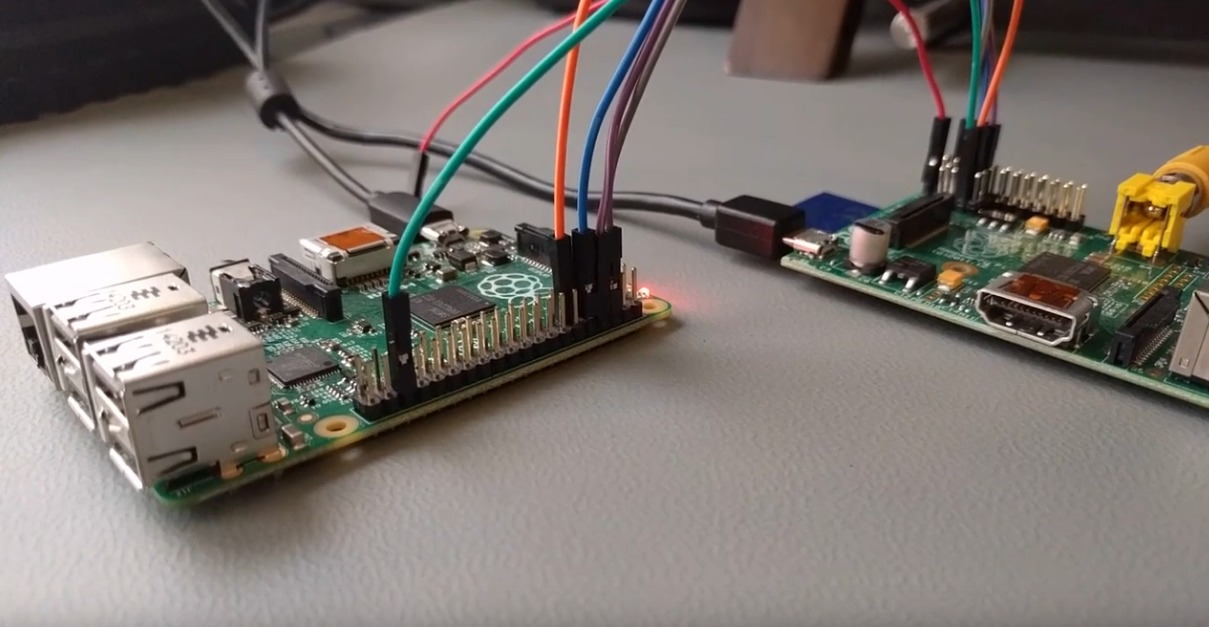
    I had need of a 3.3v TTL serial interface to reprogram a device I was working on. Looking around I realized I had mostly 5v logic USB to serial adapters. I figured the Raspberry Pi would work well enough, but I also needed hardware flow control. As it turned out the Pi can do RTS / CTS flow control, so I documented my notes on the subject here in case I or someone else might find them useful in the future.

    What is flow control

    In serial communications occasionally we need a way to tell the device or computer on the far-end of our serial connection that we need it to shut up for a bit while we collect our thoughts. Flow control exists for this purpose, although it is not a requirement of serial communication. Modern devices are fast, with large buffers for collecting incoming data, and often times flow control is omitted, particularly if data loss isn’t critical.

    Flow control can be done in software (Xon/Xoff) by sending special control characters to say stop or start the data flow. This creates some hassle since, particularly in the transmission of binary data, those control characters might come up naturally without the intent to change the flow of data. If you’ve ever accidentally frozen your Linux terminal (^s / ^q) you know what I’m talking about.

    Flow control can also be done out of band of the data transmission using dedicated signal pins/wires, we call this hardware flow control. Serial communications are old, there are a lot of variations so it probably isn’t much of a surprise to learn that there are multiple ways of doing hardware flow control. The most common are RTS / CTS and DTR / DSR. We are focusing on RTS / CTS, although DTR is still useful to know about (it gets used for example in programming the Arduino, to trigger a reset of the Arduino before programming). Because we can arbitrarily set the state of RTS and DTR via software we can abuse them to signal all sorts of stuff to connected hardware beyond just flow control.

    RTS stands for “Request to Send”, and in the current common use it is a terrible name for what it actually does. The name implies that it signals a request to send data to the equipment on the other side of the serial connection. CTS stands for “Clear to Send”, and as we might (correctly) assume it is a signal being sent to us from the far-end that indicates we are cleared to send our data. The problem with this is that it is only half-duplex (it goes just one way). How could we tell the far-end that we aren’t ready to receive data? Originally this was actually how it worked, it was intentionally half-duplex and it was designed with some rather old modem technology in mind.

    RTR or “Request to Receive” is probably a better name for RTS as it is used today, and some people prefer to use this term instead. We, or rather the UART controlling our communication doesn’t actually change the state of RTS when it wants to transmit data. RTS/RTR gets changed when the UART is unable to receive any more data from the far-end. This probably indicates that our hardware receive buffer is full and hasn’t been read and emptied out by software on our system yet.

    On the Raspberry Pi RTS is set low (0v) as long as the Pi’s UART is ready to receive data. If it can’t handle more incoming data it sets RTS high (3.3v). Our Pi should only send data to the far-end when the state of our CTS pin reads low and we should stop sending data if our CTS pin is high. So now we’ve got a working plan for bi-directional flow control. Our RTS goes to the CTS of the far-end and the far-end RTS goes to our CTS (and hopefully we both agree on the logic levels).

    In our serial connection RTS and TX are our outputs, and CTS and RX are our inputs.

    Where are the RTS / CTS pins?

    On older versions of the Raspberry Pi with 26-pin GPIO header, you need to solder on an additional 2×4 section of dual row male 0.1″ (2.54mm) header pins on the unpopulated “P5” header.

    On early Pi’s like the original version B, this header isn’t there, and so if you are still using one of those devices you’ll probably need to work something else out.

    The P5 header is actually intended to be mounted on the bottom of the Pi board (opposite to the 26 pin GPIO). That seemed pretty crazy to me, because the thing would obviously never lay flat or fit in standard cases that way. I think the intent is to avoid interfering with Raspberry Pi hats that sit on top of the 26-pin header, but even with P5 populated on the reverse side of the board (same side as the 26-pin headers) I was able to put the one hat I have on my Pi. Your miles may vary of course. If you do put the P5 header on the same/sane side of the board as the 26 pin header keep in mind that many of the pin-outs you run into online might be mirrored.

    To remove ambiguity I’ve just colored the correct pins below rather than giving pin or GPIO numbers:
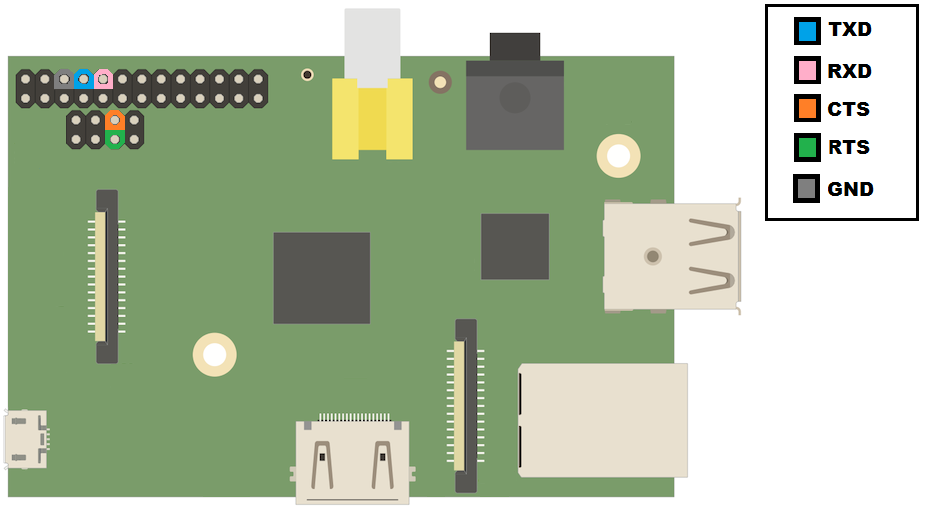
    On newer Raspberry Pis with the 40-pin header, this is much easier, there is nothing to solder first:
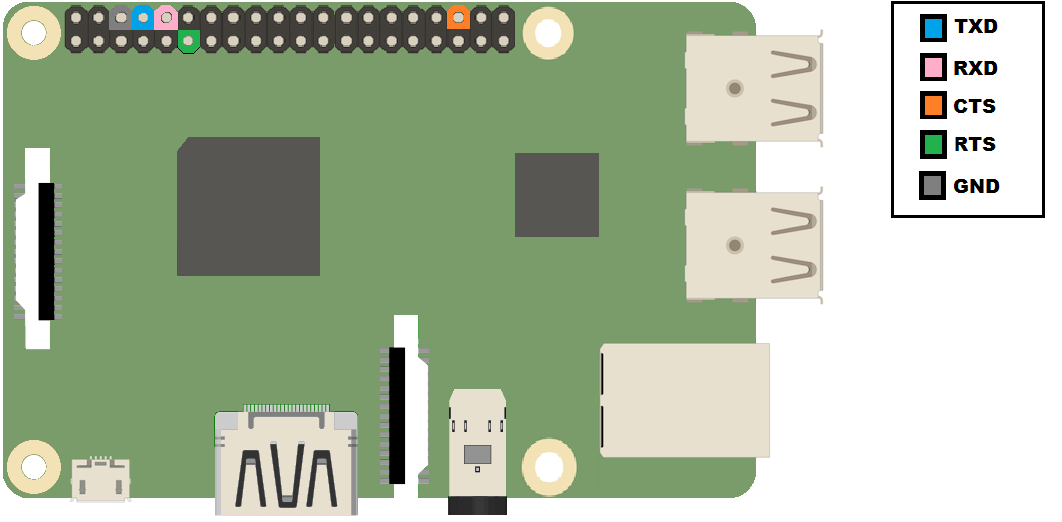
    Enabling RTS / CTS flow control

    OK, so now we’ve got the physical connections handled, but we still need to enable the RTS/CTS mode of these pins. As you might know several (most) of the Raspberry Pi GPIO pins live double (or triple) lives. By instructing the Broadcom SoC to enable the alternate functions we can get additional hardware features, I2C, hardware flow control for our UART, etc.

    We need to change a bit of memory to inform the Broadcom SoC which function of the GPIO we want. An easy way to do this for RTS / CTS is to use Matthew Hollingworth’s rpirtscts utility:

    https://github.com/mholling/rpirtscts

    root@raspberrypi:~# rpirtscts
    Version: 1.5
    Usage: rpirtscts on|off
    Enable or disable hardware flow control pins on ttyAMA0.

    For 26 pin GPIO header boards:
    P5 header pins remap as follows:
        P5-05 (GPIO30) -> CTS (input)
        P5-06 (GPIO31) -> RTS (output)

    For 40 pin GPIO header boards:
        P1-36 (GPIO16) -> CTS (input)
        P1-11 (GPIO17) -> RTS (output)

    You may also need to enable flow control in the driver:
        stty -F /dev/ttyAMA0 crtscts

    The last little note about stty in the rpirtscts help message is useful to mention. If you are using software that is aware of hardware flow control (i.e. will use the ioctl syscall to enable / disable it) you don’t need to worry about setting the stty option. If you are sending input/output from programs over serial that are not specifically intended to be sent over a serial line, then you will probably want to tell stty to tell the system to enable RTS / CTS. The rpirtscts utility sets the Broadcom SoC to use the RTS / CTS alternate functions of the applicable GPIO pins, but it doesn’t tell Linux to enable RTS / CTS flow control.

    Current versions of rpirtscts can detect which Raspberry Pi you are using and take the appropriate action for that hardware.

    Using rpirtscts on the 26-pin Pi looks like this:

    root@raspberrypi:~# rpirtscts on
    26-pin GPIO header detected
    Enabling CTS0 and RTS0 on GPIOs 30 and 31

    The 40-pin Pi is set with the same command, but uses the (different) correct GPIOs for that hardware:

    root@raspberrypi:~# rpirtscts on
    40-pin GPIO header detected
    Enabling CTS0 and RTS0 on GPIOs 16 and 17

    As an alternative to rpirtscts, if you’d like the CTS / RTS alternate function to be the usual function of your particular Pi (and persist across reboots) you might instead consider configuring a device tree overlay:

    https://www.raspberrypi.org/documentation/configuration/device-tree.md

    Also note that the Raspberry Pi 3 uses the ttyAMA0 port for driving Bluetooth, so there are some additional considerations to deal with. Thankfully Weave has this is all well documented here:

    http://www.deater.net/weave/vmwprod/hardware/pi-rts/

    Good luck!

    Check out http://www.pighixxx.com/ for great art of popular electronics.