I’m not sure what electronics manufacturers are thinking by making devices with batteries soldered into circuit. I guess they are thinking “this is a rechargeable battery”, but eventually those batteries quit recharging. This is a problem that users of older generation iPods and iPhones are probably becoming very aware of.
Anyhow, since I like keeping things out of the landfill when I can, I have a soldering iron handy. I’m using a 3.7 VDC Li-Ion 120 mAh battery marketed for this purpose. I think I paid about $5 for it. There are more expensive versions of the same replacement online, and given the proclivity of cheap lithium batteries to burst into flame and the proximity of this device to human heads it might not be a bad idea to spring for the more expensive variety. I’m not sure if more money means more safety, and it’s not my head in danger, so I went with the cheapest battery I could find. I would have thought being a $200 headset system and all that Plantronics would have an official battery to buy as a replacement, but I wasn’t able to find one.
Start with removing the one screw at the base of the ear piece. The silver shell should separate from the black portion that sits on the ear.
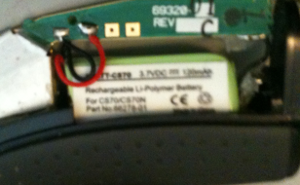
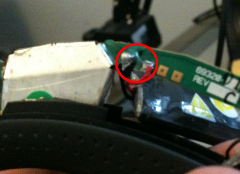
Here are the two solder joints connecting the battery to the printed circuit board. There was also a bit of glue that I pealed off at this point before soldering.
Carefully work the battery out of it’s comfortable little nook without bending the PCB too severely.
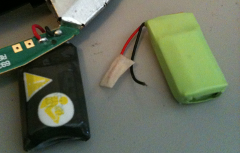
Here is the new battery (green) next to the old (still connected) battery. Notice how the new battery has a bit of tape covering the red (postive) wire. This is probably a good idea as it prevents the two wires from potentially shorting and causing a fire. You should probably throw a bit of tape on the end of the red wire on your old battery (once removed) for safer storage before you can get around to recycling it. Incidentally, Batteries Plus has many locations across the United States and they’ll take your old junk batteries without a fee.
After the new battery is soldered on, carefully tuck it back into place and then reassemble the headset.
..And that’s it. You can be done with the whole process in under 5 minutes if your soldering iron heats up fast enough.
9 thoughts on “Replace Battery in Plantronics CS70 Headset”
Mark Sikorski ·
The replacement battery for this headset shows 3 wires and the diagrams in this picture shows two wires. Can you identify the difference
Chris ·
The difference is probably one of the following:
1) You bought (or were sold) the wrong battery
2) You are looking to replace the battery in something other than a Plantronics CS70
It is possible that there is some CS70/C70N model out there that uses a different battery, but I haven’t ran in to it yet (I’ve done a few of these now). The batteries that came in my CS70 units (as well as the replacement batteries I purchased) only came with 2 wires (positive, and negative). Some battery packs on other devices use additional wires when charging, for example a third wire might be used to monitor a temperature sensor. If your original battery only has two wires, and your replacement battery has three, you might be able to hook up the positive and negative wires and leave the third wire disconnected, of course that arrangement would bypass the safety feature of the sensor. Watching youtube videos of exploding batteries has left me a little leery about doing unapproved things with electronics near my head, but when it comes to your head I leave the choice (and liability) entirely up to you. Good luck Mark, I hope you get something worked out.
Brit ·
Just wanted to say thanks for the writeup. I got my battery swapped in a matter of minutes.
Amber Jiang ·
I sell replacement battery of Plantronic CS50 CS55 and CS70. But I just know how to replace CS50 and CS55 , because CS50 battery has a connector and we just need to plug the connector in, but CS70 ,I have no idea howto replace before.~~~~~
Majpjr ·
Thanks…going to attempt today. How did you remove the solder from the board? Plunger or braid?
Can you actually take a photo of that process and the soldering you did to put everything back in place?
Chris ·
Sorry Majpr, I no longer work with that headset, so I won’t have a good opportunity to take any further pictures. I usually use a plunger to take care of the bulk and braid for the remainder, particularly for cleaning the through-holes. I don’t recall which I used with this repair, but I think braid alone would be a better choice than plunger alone.
Joanna Vang ·
CS70 headset. bought batteries to replace but it looks like original batteries wires have been saudered with metal to keep wires in place. What is the purpose of replacement batteries if I cannot easily replace? Please assist.
Thank You!
Chris ·
It really is irritating that so many people view technology as quickly obsolete and disposable. This is probably nice for manufacturers, as it keeps new sales coming in. As to why Plantronics didn’t make the CS70 more serviceable, I’m not sure, but they are not alone in that unfortunate choice. Learning some basic electronic repair skills will help keep usable electronics out of the dump and money in your pocket. For a good place to learn such skills, see if you have a local hacker space http://hackerspaces.org/wiki/List_of_Hacker_Spaces they are usually full of knowledgeable and helpful people if you are a receptive audience.
Russell ·
Worked like a charm. Thanks.