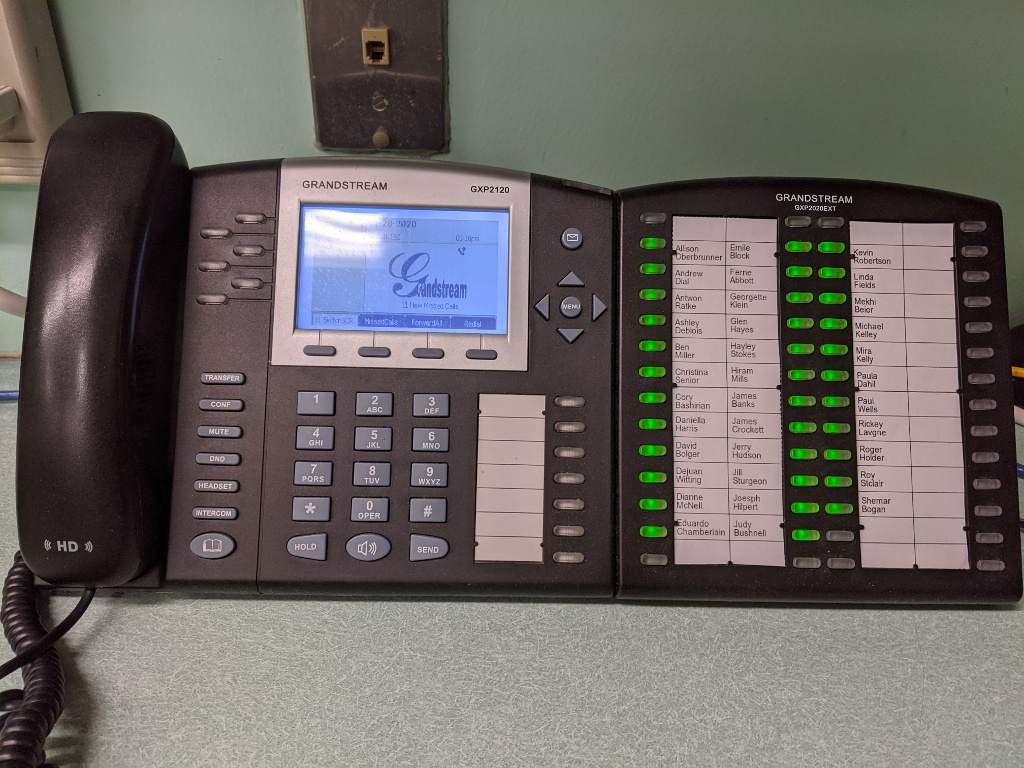
Installing Tomato USB on Asus Routers (RT-N16 etc) in Windows

Why Tomato USB? For USB support. What is Tomato USB? It’s a USB enable version of Tomato. It’s similar to DD-WRT. a third-party firmware for your router to give you advanced features not normally found in a consumer router (VPN, captive portal, etc). Why from Windows? There is already a good write-up on doing it from Linux. The ASUS RT-N16 is a pretty good little router, but for $75 USD you’d hope it would be. According to Wikipedia the RT-N16 sports a Broadcom BCM4718 SoC running at up to 533MHz with 128MB of RAM and 32MB of flash memory.

WARNING: Following these instructions may result in turning a perfectly good router into a useless brick. If you chose to continue, you do so at your own risk.

Start by downloading a copy of Tomato USB. Since the RT-N16 has a (relatively) big 32MB of flash you might as well go for the gusto and get the “VPN” version which is the “Ext” version with VPN support added. the “Ext” means “Extras”, so either Ext or VPN will give you plenty of bells and whistles.

Download Tomato USB here, I chose the “VPN” version under the heading “Kernel 2.6 (experimental) for MIPSR2 Routers”

http://tomatousb.org/download

Specifically I downloaded tomato-K26USB-1.28.9054MIPSR2-beta-vpn3.6.rar, but you’ll probably want whatever is most recent. You’ll also need a program to unRAR the archive, 7-zip is a fine choice.

Once unpacked you should have a file with the extension “.trx”, in my case my file is named “tomato-K26USB-1.28.9054MIPSR2-beta-vpn3.6.trx

Once you’ve downloaded the file, plug your computer into the LAN1 port on the RT-N16.

Change your Windows settings to (or add) an IP in the 192.168.1.0/24 subnet.

In Windows XP, click “Start“, then go to “Settings” and chose “Control Panel

Find the network icon, if you can’t see it you may have to switch into “Classic view” from the options in the left-hand side margin. Windows Vista, and 7 have the ability to set settings similarly, but the menus are buried in other locations.

Find your Local Area Connection, right click and choose Properties. Then scroll down to “Internet Protocol (TCP/IP)” and click “Properties

Now put the RT-N16 into recovery mode, to do this press and hold the “Restore” button on the back of the router while you plug the router into a power outlet.

The “Power” light should be flashing if you did it right, if not try again.

Open a command prompt, click the Windows “Start” button again and go to “Run” (or hit the windows key on your keyboard and ‘R’ at the same time). At the “Open” prompt type “cmd.exe” and click “OK“.

Test to see if you can ping the router in recovery mode, you should see “Reply from…” not “Request timed out“.

C:\Users\chris\>ping 192.168.1.1

Pinging 192.168.1.1 with 32 bytes of data:

Reply from 192.168.1.1: bytes=32 time=11ms TTL=64
Reply from 192.168.1.1: bytes=32 time<1ms TTL=64
Reply from 192.168.1.1: bytes=32 time=1ms TTL=64

Ping statistics for 192.168.1.1:
    Packets: Sent = 4, Received = 4, Lost = 0 (0% loss),
Approximate round trip times in milli-seconds:
    Minimum = 0ms, Maximum = 11ms, Average = 3ms

Move to the location where you extracted the “.trx” file from the RAR archive. If this is your Desktop then “cd Desktop” might do it.

C:\Users\chris\>cd Desktop
C:\Users\chris\Desktop\>

Flash the router with the new firmware using the tftp client built into Windows.

C:\Users\chris\Desktop\>tftp -i 192.168.1.1 PUT tomato-K26USB-1.28.9054MIPSR2-beta-vpn3.6.trx
Transfer successful: 6602752 bytes in 14 seconds, 471625 bytes/s

It’s very important that you include the “-i” after “tftp”, this switches the transfer into binary mode, it will mung your transfer otherwise and potentially brick your router.

Wait a minute after the transfer has completed to let the router apply the firmware. If everything worked right, the router should no longer be responding to ping requests

C:\Users\chris\>ping 192.168.1.1

Pinging 192.168.1.1 with 32 bytes of data:

Request timed out.
Request timed out.
Request timed out.
Request timed out.

After waiting, reboot the router by unplugging it from power and then plugging it back in again. After a moment you should be able to connect to the router using a web browser at http://192.168.1.1. The default username and password are “admin” (for both username and password).

Posted in General Nonsense | Leave a comment

Install Asterisk 1.8 from source on Ubuntu 11.10

After a fresh install of Ubuntu 11.10 I needed to install asterisk again, so I figured I’d make some notes for the next time I have to do it.

I’m using Asterisk 1.8 rather than the latest bleeding edge because 1.8 has long term support until 2015-10-21 where as the 10.x branch is end of life 2013-10-12. I have too many other things to do these days than reconfigure asterisk, figure out which of my third party add-ons work, etc every time there is an update.

Since this is a new install, I’m updating the package list and all my files that might be out of date

apt-get update
apt-get upgrade

Make sure kernel headers are installed

apt-get install linux-headers-`uname -r`

Grab a bunch of packages for building asterisk, dependencies, compilers, etc

apt-get install build-essential # Compiler
apt-get install libxml2-dev # Required
apt-get install libncurses5-dev libreadline-dev libreadline6-dev  # Termcap stuff
apt-get install libiksemel-dev # For Google Talk support
apt-get install libvorbis-dev  # For Ogg Vorbis format support
apt-get install libssl-dev # Needed for SIP
apt-get install libspeex-dev libspeexdsp-dev  # For speex codec
apt-get install mpg123 libmpg123-0 sox openssl wget subversion openssh-server # Odds and ends

Switch into /usr/src directory as a place to build the source from

cd /usr/src

Downloaded and untar DAHDI. I don’t have any Digium hardware in this computer, but I wanted the DAHDI pseudo timing source for MeetMe conferences.

wget http://downloads.asterisk.org/pub/telephony/dahdi-linux/releases/dahdi-linux-2.6.0.tar.gz
tar -zxvf dahdi-linux-2.6.0.tar.gz

Move into the build directory, compile and install DAHDI

cd dahdi-linux-2.6.0/
make
make install
cd ..

Download and untar Asterisk

wget http://downloads.asterisk.org/pub/telephony/asterisk/releases/asterisk-1.8.10.1.tar.gz
tar -zxvf asterisk-1.8.10.1.tar.gz

Move into the build directory

cd asterisk-1.8.10.1/

Add mp3 support

./contrib/scripts/get_mp3_source.sh

Run the configure script

./configure

If everything works out, you should get the ascii art Asterisk logo

               .$$$$$$$$$$$$$$$=..      
            .$7$7..          .7$$7:.    
          .$$:.                 ,$7.7  
        .$7.     7$$$$           .$$77  
     ..$$.       $$$$$            .$$$7
    ..7$   .?.   $$$$$   .?.       7$$$.
   $.$.   .$$$7. $$$$7 .7$$$.      .$$$.
 .777.   .$$$$$$77$$$77$$$$$7.      $$$,
 $$$~      .7$$$$$$$$$$$$$7.       .$$$.
.$$7          .7$$$$$$$7:          ?$$$.
$$$          ?7$$$$$$$$$$I        .$$$7
$$$       .7$$$$$$$$$$$$$$$$      :$$$.
$$$       $$$$$$7$$$$$$$$$$$$    .$$$.  
$$$        $$$   7$$$7  .$$$    .$$$.  
$$$$             $$$$7         .$$$.    
7$$$7            7$$$$        7$$$      
 $$$$$                        $$$      
  $$$$7.                       $$  (TM)    
   $$$$$$$.           .7$$$$$$  $$      
     $$$$$$$$$$$$7$$$$$$$$$.$$$$$$      
       $$$$$$$$$$$$$$$$.

Optionally choose asterisk components to be installed

make menuconfig

Build the binaries

make

Copy the files to the right places

make install

Optionally copy the sample configs into /etc/asterisk

make samples

Copy the init startup scripts to make asterisk start on boot

make config

And you’re done.

Posted in General Nonsense | 4 Comments

Camera Fodder

About 6 months ago I setup a motion activated webcam to snap pictures of the backyard wood pile after business hours. We’ve had some trouble with someone tearing up the lawn with their truck and stealing wood. The system sends me an email whenever it thinks something is going on.

No thieves yet, but plenty of woodland critters.

A lightning storm last night spammed my inbox, here are a few picks out of the bunch, including one apparently close by. The red thing is the reflection of an emergency exit light off the window (the camera is inside).

Posted in General Nonsense | Leave a comment

Fix SABnzbd+ on Ubuntu to work with Newzbin2.es

The NZB index service Newzbin is no longer available at Newzbin.com. They have moved to a new domain name not controlled by VeriSlime (and presumable therefore not subject to the same unethical seizures we’ve seen with recent ICE take-downs). Silencing free speech on the Internet to serve the business interests of private corporations is bad enough, but imposing this on sites in countries outside U.S. jurisdiction is just plain too far for my tastes. This seems like a very reasonable move on Newzbin’s part, after all why do we covet the lame versign TLDs in the first place (‘.com’, ‘.net’, ‘.org’)? Those are top level domains for people’s grandparents, the ones that assume everything ends in ‘.com’. Like having a toll free number in the age of unlimited long distance, there prestige is no longer warranted. .. but I digress

The new domain for Newzbin is newzbin2.es, but the SABnzbd+ in my Ubuntu repository doesn’t seem to reflect that. Here’s how you can manually update it.

Note: This will only have an effect when passing Newzbin report IDs or URLs to SABnzb. If you download files by uploading the NZB file to SABnzbd+ it is not required.

They say it’s a good practice to prefix ‘sudo’ to things rather than su’ing to root, but I just can’t bring myself to break the habit. The following was all done as root.

sudo su -

Stop sabnzbd+ if it’s running

service sabnzbdplus stop
 * Stopping SABnzbd+ binary newsgrabber                                  [ OK ]

Change into the directory where Ubuntu keeps the SABnzbd+ files we want to edit

cd /usr/share/sabnzbdplus

This will do a recursive case-insensitive search (the grep part) for ‘newzbin.com’ inside all the files and directories under our current location. It lists the files and then hands them (the xargs part) over to be edited (the sed part). Notice I left off the ‘n’ from Newzbin.com inside of sed, this was done intentionally to preserve the correct casing (i.e. Newzbin2.es, newzbin2.es).

grep -ril newzbin.com * |xargs -n1 sed -i 's/ewzbin.com/ewzbin2.es/g'

Start SABnzbd+ again

service sabnzbdplus start
 * Starting SABnzbd+ binary newsgrabber                                  [ OK ]

On my system this affected the following files:

/usr/share/sabnzbdplus/interfaces/wizard/four.html
/usr/share/sabnzbdplus/interfaces/smpl/templates/config_newzbin.tmpl
/usr/share/sabnzbdplus/interfaces/smpl/templates/history.tmpl
/usr/share/sabnzbdplus/interfaces/Plush/templates/config_newzbin.tmpl
/usr/share/sabnzbdplus/interfaces/Plush/templates/history.tmpl
/usr/share/sabnzbdplus/interfaces/Classic/templates/config_newzbin.tmpl
/usr/share/sabnzbdplus/language/sv-se.txt
/usr/share/sabnzbdplus/language/de-de.txt
/usr/share/sabnzbdplus/language/us-en.txt
/usr/share/sabnzbdplus/language/nl-du.txt
/usr/share/sabnzbdplus/language/fr-fr.txt
/usr/share/sabnzbdplus/sabnzbd/newzbin.py
/usr/share/sabnzbdplus/sabnzbd/newzbin.pyc
/usr/share/sabnzbdplus/sabnzbd/__init__.pyc
/usr/share/sabnzbdplus/sabnzbd/database.py
/usr/share/sabnzbdplus/sabnzbd/database.pyc
/usr/share/sabnzbdplus/sabnzbd/interface.py
/usr/share/sabnzbdplus/sabnzbd/nzbstuff.py
/usr/share/sabnzbdplus/sabnzbd/interface.pyc
/usr/share/sabnzbdplus/sabnzbd/__init__.py

Now if you’ll excuse me, I’m going to go back to enjoying some nice downloaded public domain movies.

Posted in General Nonsense | Leave a comment

Access an APC AP5456 IP Gateway for Analog KVM in Linux

I recently wrote about running an ActiveX component without Internet Explorer. I used that technique to come with a shell script front-end for downloading, unpacking and running an executable in Wine for accessing an APC IP KVM (model AP5456). Here is the results of that effort.

At a minimum the script requires Wine and curl, but to do everything without manually downloading and extracting the cabinet file yourself, you’ll also need cabextract. Some less exotic stuff from coreutils: basename and dirname are needed, but you probably have those already.

You can download the script here.

#!/bin/bash

# A script to access an APC brand model AP5456 IP Gateway for Analog KVM
# In Linux, using Wine

USERNAME="apc"
PASSWORD=""
KVM_SERVER=""

VIEWER_PATH=""

while [ -z "$KVM_SERVER" ]
do
    echo -n "FQDN of KVM Server (not including https://): "
    read KVM_SERVER
done

while [ -z "$USERNAME" ]
do
        echo -n "Username: "
        read USERNAME
done

while [ -z "$PASSWORD" ]
do
        echo -n "Password: "
        tput invis
        read PASSWORD
        tput sgr0
done

get_cab_name () {
    while read line
    do
        if [ "${line/'OBJECT CODEBASE'/}" != "$line" ]; then
            cab_name="${line##*'<OBJECT CODEBASE="'}"
            cab_name="${cab_name%%'"'*}"
            echo "$cab_name"
        fi
    done
}

get_cmd_args () {
    while read line
    do
        if [ "${line/PARAM/}" != "$line" ]; then
            ipaddr="${line##*'<PARAM NAME="ipaddr" VALUE="'}"
            ipaddr="${ipaddr%%'"'*}"

            sessionkey="${line##*'<PARAM NAME="sessionkey" VALUE="'}"
            sessionkey="${sessionkey%%'"'*}"

            encryptionkey="${line##*'<PARAM NAME="encryptionkey" VALUE="'}"
            encryptionkey="${encryptionkey%%'"'*}"
        fi
    done
    if [ -n "$sessionkey" ] && [ -n "$encryptionkey" ] && [ -n "$ipaddr" ]; then
        echo "-k $sessionkey -e $encryptionkey $ipaddr"
    fi

}

wine="`which wine`"
if [ -z "$wine" ]; then
    echo "Wine was not found, but is required.  Can not continue without it." >&2
    exit 1
fi

cd "`dirname $0`"
#If a path to vpclient.exe wasn't specified, and we can't find it, use /tmp
#as a place to download it to
if [ -z "$VIEWER_PATH" ] && ! [ -f "vpclient.exe" ]; then
    mkdir -p "/tmp/vpclient"
    VIEWER_PATH="/tmp/vpclient"
fi

#If a full path wasn't specified, prepend current working directory
if [ "${VIEWER_PATH:0:1}" != "/" ]; then
    VIEWER_PATH="`pwd`/$VIEWER_PATH"
fi

if ! [ -f "$VIEWER_PATH/vpclient.exe" ]; then

    cab_url="`curl -s --insecure --user "$USERNAME:$PASSWORD" "https://$KVM_SERVER/launch.asp" |get_cab_name`"
    cab_url="https://$KVM_SERVER/$cab_url"

    cabextract="`which cabextract`"
    if [ -z "$cabextract" ]; then
        echo "vpclient.exe was not found in $VIEWER_PATH" >&2
        echo "cabextract was not found either, so we can't download">&2
        echo -e "and extract vpclient.exe from it's CAB archive.\n" >&2
        echo "Error: user intervention required." >&2
        echo "----------------------------------" >&2
        echo "Download $cab_url" >&2
        echo "Unpack `basename $cab_url` into $VIEWER_PATH" >&2
        echo " -- OR -- " >&2
        echo "Install cabextract" >&2
        exit 1
    fi

    if ! [ -d "$VIEWER_PATH" ]; then
        echo "WARNING: Viewer Path specified is not valid." >&2
        echo "Path: $VIEWER_PATH" >&2
        echo -e "-------------------------------------------\n" >&2
        echo -n "Would you like me to create it? (y/N)?" >&2
        read answer
        shopt -s nocasematch
        if [ "$answer" = "y" ]; then
            mkdir -p "$VIEWER_PATH"
            if ! [ -d "$VIEWER_PATH" ]; then
                echo "Couldn't create: $VIEWER_PATH" >&2
                exit 1
            fi
        else
            exit
        fi
        shopt -u nocasematch
       
    fi

    cd "$VIEWER_PATH"
        curl -s --insecure --user "$USERNAME:$PASSWORD" "$cab_url" >"`basename $cab_url`"
        $cabextract -q "`basename $cab_url`" 2>/dev/null
fi


cmd_args="`curl -s --insecure --user "$USERNAME:$PASSWORD" "https://$KVM_SERVER/launch.asp" |get_cmd_args`"

cd "$VIEWER_PATH"

#Sanity check
if [ -f "./vpclient.exe" ]; then
    $wine "./vpclient.exe" $cmd_args
else
    echo "Failed, do it yourself: $wine vpclient.exe $cmd_args"
fi
Posted in General Nonsense | 5 Comments

De-ActiveX-ifying an ActiveX Component

Some ActiveX components add “enhancement” to the browser by dropping in custom controls for forms or other fanciness. Those types of components require the browser, because they augment the user’s experience within the browser. Other ActiveX components are little more than a standalone executable that can get it’s command line arguments from the web page that serves it. This article is about my experience separating out such an executable from it’s ActiveX constructs and using it without Internet Explorer.

I have an old APC AP5456 IP Gateway for Analog KVM, it’s a neat little device other than it’s insistence that I use Internet Explorer. It uses an ActiveX component to view the remote consoles. It’s based on VNC, and has some encryption of the RFB data added in. The device listens on port 80 (http) and 5900 (VNC). If I had any doubt after seeing the port number, it was cleared up in the “About…” dialog.

Unfortunately, I couldn’t just use a regular VNC client to connect. The authentication process has been removed from the VNC-side of things and moved to the web page. When you authenticate to the web page of the IP KVM, it gives the ActiveX component an authentication token which is used to view the console of the computer it’s connected to.

When you first login using a web browser you’re shown several options. The one we’re interested in is “Connect Video”

After clicking “Connect Video” we’re taken to another screen where the ActiveX component should normally be launched. I’m using Firefox in this screenshot so it fails. Most browsers other than Internet Explorer have no idea what to do with ActiveX (and rightfully so).

This page will meta refresh back to the previous page, so view the source quickly.

I searched the page for the <OBJECT> tag that normally holds the ActiveX details. Here is the relevant portion.

<OBJECT CODEBASE="vpclient4187.cab" width=0 height=0  CLASSID="clsid:09D6F55E-F235-4187-9C60-1D09CFD9FAFF">
  <PARAM NAME="ipaddr" VALUE="172.20.10.171">
  <PARAM NAME="sessionkey" VALUE="0688565E0688565EFA72032A87995D28" >
  <PARAM NAME="encryptionkey" VALUE="68F0585E68F0585E6BBA4AE3E6EF95FA">
</OJBECT>

The first thing to notice is the vpclient4187.cab cabinet file. Unpacking the cab file gives us AvocentHTTP.dll, vpfilexfer.dll, launchEXE.dll, vpclient.inf, vpclient.exe, and vpclient.dll. Awesome! It’s probably just that vpclient.exe I need to run right?

Well, no, unfortunately typing in the IP address of our IP KVM appliance into the dialog doesn’t result in a connection. We need that authentication token and encryption key to be included in the picture. It still seems very likely that vpclient.exe is what we want, but there’s more configuration that it clearly needs. Since there is no other settings in the dialog of vpclient.exe to adjust, we’ll be optimistic and hope that the additional info it needs are passed to it by the command line. The information could be passed to it by Windows messages, after all it’s not the first thing that gets called from the web browser. Looking at the contents of the INF file shows that launchEXE.dll matches the CLASSID of our object codebase. That dll probably gets all the details and hands it off to vpclient.exe. Before we freak out, lets try to keep it simple.

I wrote a little program to display a message box with the contents of any command line arguments it receives. From a Windows XP computer with Internet Explorer I connect to the IP KVM as normal, and then close the KVM application and Internet Explorer. This causes the ActiveX object to get downloaded and cached. Cached in %WINDIR%\Downloaded Program Files to be specific. I replaced the vpclient.exe with my own application (keeping the name the same). You will need to do this from the command line however, as Windows treats the %WINDIR%\Downloaded Program Files directory in a special way, which blocks you from seeing the actual files contained in it.

When I reopen Internet Explorer and attempt to connect with the IP KVM again, I see that my speculation was correct.

The Session Key and the Encryption Key change frequently, and require the vpclient.exe connection to come from the same IP address that authenticated to the web browser, but if we act quickly we can start a session using the information available in view source as command line arguments to vpclient.exe.

C:\Documents and Settings\Administrator\Desktop>vpclient.exe -k [Session Key] -e [Encryption Key]  [IP Address]

Of course the reasonable thing to do at this point is to make a front-end client to connect to the IP KVM web page, parse out the required content, and launch vpclient.exe with our argument. I’ll leave that up to you, but if you’re interested in doing it under Linux I’ve got you covered.

Posted in General Nonsense | Leave a comment

You’ve Reached the End of the Internet

I was unable to reach php.net, the official home page of PHP. I was surprised by this, as PHP is a very large project used by millions of websites, including this one. I then jumped over to the popular website reachability tester DownForEveryoneOrJustMe.com to see if php.net was down for everyone or just me. To my horror DownForEveryoneOrJustMe.com was also down.

I certainly feel more comfortable about moving all things to the cloud.

Posted in General Nonsense | Leave a comment

The Best Time for a Terrorist Attack: November 9th 2011, 2:00 PM

EAS is a neat system. From a hacker perspective it’s interesting to think of the cascading effect that some well placed broadcast signal intrusion could do.

While I think it’s a good idea to test this system from the top down, versus at the station level as done in the weekly tests, the work to get the word out about ignoring the upcoming test undermines the system. We’ve essentially created a small window at a predetermined time, in which the system will be busy relaying test messages, and to which people have been prepared to ignore. Of course, this is all a bit of a moot point since we’ve never actually used the emergency alert system for anything terrorist related before anyhow.

Several interesting things can be gleaned from the Wikipedia article on EAS incidents. Based on the September, 2010 incident, it sounds like in-band signalling is used for activation, and that the system allows for replaying of messages. Based on several of the incidents, it would seem like people don’t really pay attention to the system anyhow.

Posted in General Nonsense | Leave a comment

Fax.com Ripping Script

Here’s a quick and dirty little script I wrote to rip fax.com. I had a bunch of faxes that I wanted to download so I put this together for my own use, and then added a little bit of extra stuff to make it potentially useful to someone else. My apologies in advance, as it’s pretty rough and will likely break at some point in the future. Fax.com will email you incoming faxes, which is great for archival going forward, unfortunately I hadn’t been saving my emails. Fax.com charges an overage fee of $0.05/page for faxes stored over 30 days. They have a nice feature to automatically purge faxes older than 30 days for you, but if you have already been paying an overage fee and would like to archive your faxes, you might find this handy to run before enabling the auto-purge feature. My settings are set to display 25 faxes per page (within the general settings for my account), you’ll need to tweak that (as well as the username and password fields) before running this script. I probably could have made this look up how many faxes per page you are set to, but I was lazy.

Download faxcomrip.zip

#!/bin/bash

USERNAME=""
PASSWORD=""
ARCHIVE_DIR="./archive"
FAXES_PER_PAGE="25"


curl_check="`whereis curl`"
if [ -z "${curl_check##'curl:'}" ]; then
        echo "Sorry, couldn't find curl"
        exit 1
fi

if ! [ -d "$ARCHIVE_DIR" ]; then
        echo "Making Archive Directory"
        mkdir "$ARCHIVE_DIR"
        exit_code="$?"
        if ! [ -d "$ARCHIVE_DIR" ]; then
                echo "Error: couldn't create $ARCHIVE_DIR" >&2
                exit "$exit_code"
        fi
fi

if [ -z "$USERNAME" ]; then
        echo -n "Fax.com username: "
        read USERNAME
fi
if [ -z "$PASSWORD" ]; then
        echo -n "Fax.com password: "
        stty -echo
        read PASSWORD
        stty echo
        echo ""
fi

cd "`dirname $0`"

if [ -f cookies.txt ]; then
        rm cookies.txt
fi

page_results="`curl -s -3 -L -c cookies.txt -b cookies.txt -d "username=$USERNAME&password=$PASSWORD&shadow=&login=Login" https://secure.fax.com/UnifiedLogin.serv`"

pages="${page_results##*Item(s) of}" ; pages=${pages%%<*} ; pages=$((pages / $FAXES_PER_PAGE)) ; ((++pages))
echo "Total pages: $pages"

fetch_pdf () {
        while read line
        do
                fax_name=${line#*name=\"} ; fax_name="${fax_name%%\"*}"
                fax_name=${fax_name%.pdf}

                echo "$fax_name"

                fax_pages="${line#*$fax_name}" ; fax_pages="${fax_pages#*$fax_name}"
                fax_pages="${fax_pages#*sOut();\">}" ; fax_pages=${fax_pages%%\<*}

                csid="${line#*CSID=}" ; csid="${csid%%\&*}"
                csid="${csid//-/}" ; csid="${csid//+/}"

                caller_id="${line#*ANI=}" ;  caller_id=${caller_id%%\"*}
                caller_id="${caller_id//-/}" ; caller_id="${caller_id//+/}"

                fax_date=${line##*<td} ; fax_date="${fax_date#*>}"
                fax_date="${fax_date%%</td*}" ; fax_date="${fax_date//&nbsp;/}"
                year="${fax_date##*-}" ; year="${year%%\ *}"
                fax_date="$year-${fax_date//-$year/}"
                fax_date=${fax_date//\<font\ color=\"red\"\>/} ; fax_date=${fax_date//\<\/font\>/}
                fax_date=`date -d "$fax_date" +%s`

                filename="$fax_date-$fax_pages-$caller_id-$csid-$fax_name"
                pdf_url=${line#*href=\"} ; pdf_url="${pdf_url%%\"*}"
                if ! [ -f $ARCHIVE_DIR/$filename.pdf ]; then
                        echo "Saving $fax_name as $filename.pdf"
                curl -3 -L -c cookies.txt -b cookies.txt "https://secure.fax.com$pdf_url" -o $ARCHIVE_DIR/$filename.pdf
                        sleep 1 # Be nice[r] to the server
                #else
                #       echo "$pdf_url already downloaded"
                fi

        done
}

#grab all remaining pages from oldest to newest
while [ "$pages" -ge "0" ];
do
        page_results="`curl -s -3 -L -c cookies.txt -b cookies.txt "https://secure.fax.com/Inbox.serv?folder=Inbox&id=$((pages * $FAXES_PER_PAGE))"`"
        sleep 1
#       echo "New Page" >>broken.html
#       echo "$page_results" >>broken.html
        echo "$page_results" |grep 'EMViewer\.serv' | fetch_pdf
        echo "Processing page $page"
    ((--pages))
done

if [ -f cookies.txt ]; then
    rm cookies.txt
fi

echo "Done"
Posted in General Nonsense | Leave a comment

VirtualBox 4.1 & phpVirtualBox on Ubuntu 10.04 LTS Server

This is a HOWTO on setting up Headless VirtualBox 4.1 (PUEL optional) with a GUI web based front-end using phpVirtualBox on an Ubuntu 10.04 Long Term Support (LTS) Server.

If you haven’t used it, phpVirtualBox is totally slick. It’s very nearly as good as the regular VirtualBox graphical user interface, but without needing all that X-windows fluff to support it.

Unless noted otherwise, I’m doing everything as the ‘root’ user, yeah, yeah, I know that’s “bad”, but I’m lazy, and prefixing “sudo” to everything just gets annoying.

root@vbox:~# sudo su -

Make sure you are running the latest 10.04 LTS release.

root@vbox:~# lsb_release -a
No LSB modules are available.
Distributor ID: Ubuntu
Description:    Ubuntu 10.04.2 LTS
Release:        10.04
Codename:       lucid

We’re not quite up to date, so lets address that first

root@vbox:~# apt-get update
root@vbox:~# apt-get upgrade
root@vbox:~# lsb_release -a
No LSB modules are available.
Distributor ID: Ubuntu
Description:    Ubuntu 10.04.3 LTS
Release:        10.04
Codename:       lucid

OK, good deal. At the time of writing Ubuntu 10.04[.3] is the current LTS release (and will be until around April 2015).

phpVirtualbox is very light weight, it doesn’t even need MySQL, and technically doesn’t even need to run on the same machine as VirtualBox, but I’m going to install all the LAMP stuff just to have anyhow

root@vbox:~# apt-get install lamp-server^

The caret “^” character on the end there isn’t a typo, it’s required for that faux package name to work.

Edit /etc/apt/sources.list (I normally use vim, but I used nano here to be friendly)

root@vbox:~# nano /etc/apt/sources.list

Add the following lines to your sources.list, you can put them pretty much anywhere in the file you like provided they start on a new line.

#From https://www.virtualbox.org/wiki/Linux_Downloads
deb http://download.virtualbox.org/virtualbox/debian lucid contrib non-free

You’ll also want to add VirtualBox/Oracle’s public key to your apt-key ring

root@vbox:~# wget -q http://download.virtualbox.org/virtualbox/debian/oracle_vbox.asc -O- | sudo apt-key add -

Now update, update again, Muhahah!

root@vbox:~# apt-get update
root@vbox:~# apt-get dist-upgrade
root@vbox:~# apt-get install virtualbox-4.1 linux-headers-`uname -r` dkms unzip

Those are backticks around the “uname -r” statement up there, not single quotes. It’s just to make sure you get the linux-headers for the version you’re running is all

Optionally you can download the Extension Pack, this gives you neat stuff like USB 2.0 support and RDP access to your VM’s boot screen. You probably want this if it’s for personal use, if you have a license or if you are “evaluating” the software indefinitely (I have yet to see how long they consider a reasonable evaluation period, but we’re probably supposed to be nice).

Make sure you get the right version of the Extension Pack, double check by looking at https://www.virtualbox.org/wiki/Linux_Downloads

You can see what version of VirtualBox got installed like so:

root@vbox:~# VBoxManage --version
4.1.4r74291

We can probably simliarly grab the needed Extension Pack like we did with the kernel-headers

root@vbox:~# cd ~
root@vbox:~# wget "http://download.virtualbox.org/virtualbox/4.1.4/Oracle_VM_VirtualBox_Extension_Pack-`VBoxManage --version |sed 's/r/-/1'`.vbox-extpack"

That’s a little more confusing, we have the backticks again of course, then the VBoxManage –version we saw gives us the version number, the sed part is to replace the ‘r’ character in “4.1.4r74291″ (or whatever it is your version happens to say) with a hyphen as that’s how the file is named (without the ‘r’).

Now to add the Extension Pack to VirtualBox

root@vbox:~# VBoxManage extpack install Oracle_VM_VirtualBox_Extension_Pack-`VBoxManage --version |sed 's/r/-/1'`.vbox-extpack

Now we should make a user that will run VirtualBox, since the same people that want me to ‘sudo’ everything really don’t want me to run all programs setuid 0.

root@vbox:~# adduser virtualbox
Adding user `virtualbox' ...
Adding new group `virtualbox' (1002) ...
Adding new user `virtualbox' (1002) with group `virtualbox' ...
Creating home directory `/home/virtualbox' ...
Copying files from `/etc/skel' ...
Enter new UNIX password:
Retype new UNIX password:
passwd: password updated successfully
Changing the user information for virtualbox
Enter the new value, or press ENTER for the default
        Full Name []:
        Room Number []:
        Work Phone []:
        Home Phone []:
        Other []:
Is the information correct? [Y/n] y

Now add the ‘virtualbox’ user to the vboxusers group (created by the VirtualBox deb installation)

root@vbox:~# adduser virtualbox vboxusers

Now we’re going to install phpVirtualBox. I’m going to put it right into the main web directory so it’s the default web site, but you’ll want to make a new directory for it if you already have a website on this computer. Also you should go to http://phpvirtualbox.googlecode.com/ and see if there is a newer version of the software instead of the one I use below. Keep in mind that there are currently two branches of the phpVirtualBox code, one for 4.0.x compatible VirtualBox installations and one for 4.1.x compatible. There’s actually one for 3.2.x compatible as well which you’ll probably want if you just ran “apt-get install virtualbox-ose” without following this guide.

root@vbox:~# cd /var/www
root@vbox:~# mkdir backup ; mv * ./backup # this is for dumb people that copy and paste blindly
root@vbox:~# wget http://phpvirtualbox.googlecode.com/files/phpvirtualbox-4.1-4.zip
root@vbox:~# unzip phpvirtualbox-4.1-4.zip
root@vbox:~# mv ./phpvirtualbox-4.1-4/* .
root@vbox:~# rmdir phpvirtualbox-4.1-4
root@vbox:~# rm phpvirtualbox-4.1-4.zip

All that’s left to phpVirtualBox is setting up the config

root@vbox:~# mv config.php-example config.php
root@vbox:~# nano config.php

Find this section and replace with the username and password you created during the adduser step

/* Username / Password for system user that runs VirtualBox */
var $username = 'virtualbox';
var $password = 'passw0Rd is secret and cleartext';

Alright, now we are going to become the ‘virtualbox’ user for a moment, you should only run this script as the ‘virtualbox’ user, and you’ll need to do it after each reboot of the system as well since I’m too lazy to give you a init.d service file right now.

root@vbox:~# sudo su - virtualbox
virtualbox@vbox:~$  nano start_vboxwebsrv.sh

Add the following into the start_vboxwebsrv.sh file

#!/bin/bash
/usr/bin/vboxwebsrv --background
virtualbox@vbox:~$ chmod u+rx start_vboxwebsrv.sh
virtualbox@vbox:~$ ./start_vboxwebsrv.sh
virtualbox@vbox:~$ exit
root@vbox:~#

OK, that should start the vboxwebsrv as the virtualbox user, if you’d rather not have the script, or it’s easier for you, you could have just done this instead:

root@vbox:~# sudo -u virtualbox /usr/bin/vboxwebsrv --background

Alright, that’s it that’s everything, you should be up and running, congrats. Point a web browser (presumably from a workstation on your network) to your virtualbox server and login as
admin with the password admin. You can change this password once your logged in from the “File” menu (File -> Change Password).

To figure out what the IP address is of your virtualbox server (you really should know this already):

root@vbox:~# ifconfig

There ya go, nice and easy, almost copy and paste like.

Enjoy
-Chris

Troubleshooting

If you are using, or have used KVM the Kernel-based Virtual Machine it does not play nice with VirtualBox, and you’ll need to unload the kernel module before using VirtualBox. Provided you aren’t using KVM currently, give the following a try:

root@vbox:~# rmmod kvm-intel
root@vbox:~# rmmod kvm-amd
root@vbox:~# /etc/init.d/vboxdrv setup

If that helps, and you won’t be using KVM, you can add it to the blacklist

root@vbox:~# nano /etc/modprobe.d/blacklist.conf

Then add the following lines:

blacklist kvm-intel
blacklist kvm-amd
Posted in System Administration | 1 Comment