Author: admin

  • PartyTube – YouTube-video powered party jukebox for RPi

    PartyTube – YouTube-video powered party jukebox for RPi

    Last month I had a Halloween party. Many people don’t seem to like the music I like, and I generally don’t like their music either. While planning my party it occurred to me that the music selection should be a collaborative process that included the guests. I spent the next few hours making my “Partytube” script, a collaborative Youtube-video powered jukebox for the Raspberry Pi. It’s just a series of quick and dirty little scripts that glue existing projects together for my purpose.

    A pygame based display shows the song queue momentarily before the next music video begins playing.

    partytube_playlist_small

    You can download the project from GitHub: https://github.com/ethertubes/partytube

    Install

    Installation requires a few important third-party programs. First start with a copy of Raspbian, this will include most of the python/pygame stuff, the omxplayer and other things presumed to be in the working environment.

    You’ll need the youtube-dl youtube ripping script available at https://github.com/rg3/youtube-dl, but it’s quicker just to download it from yt-dl.org (see below). It’s a fairly large and complex script, and not really knowing what is in it, I decided against running it as root. I made a dedicated youtube user on my Pi for the purpose of running the youtube-dl script.

    root@raspberrypi:~# adduser youtube
    Adding user `youtube’ …
    Adding new group `youtube’ (1004) …
    Adding new user `youtube’ (1001) with group `youtube’ …
    Creating home directory `/home/youtube’ …
    Copying files from `/etc/skel’ …
    Enter new UNIX password: youtube
    Retype new UNIX password: youtube
    passwd: password updated successfully
    Changing the user information for youtube
    Enter the new value, or press ENTER for the default
            Full Name []: Youtube Video Fetcher
            Room Number []:
            Work Phone []:
            Home Phone []:
            Other []:
    Is the information correct? [Y/n] y

    root@raspberrypi:~# su – youtube
    youtube@raspberrypi~$ curl https://yt-dl.org/latest/youtube-dl -o youtube-dl
    youtube@raspberrypi~$ chmod a+x youtube-dl
    youtube@raspberrypi~$ ./youtube-dl
    Usage: youtube-dl [options] url [url…]

    I also made some working directories, and downloaded and unpacked my scripts

    youtube@raspberrypi~$ mkdir input
    youtube@raspberrypi~$ mkdir output
    youtube@raspberrypi~$ mkdir archive
    youtube@raspberrypi~$ wget https://github.com/ethertubes/partytube/archive/master.zip
    –2014-11-28 15:11:02–  https://github.com/ethertubes/partytube/archive/master.zip
    Resolving github.com (github.com)… 192.30.252.130
    Connecting to github.com (github.com)|192.30.252.130|:443… connected.
    HTTP request sent, awaiting response… 302 Found
    Location: https://codeload.github.com/ethertubes/partytube/zip/master [following]
    –2014-11-28 15:11:08–  https://codeload.github.com/ethertubes/partytube/zip/master
    Resolving codeload.github.com (codeload.github.com)… 192.30.252.146
    Connecting to codeload.github.com (codeload.github.com)|192.30.252.146|:443… connected.
    HTTP request sent, awaiting response… 200 OK
    Length: unspecified [application/zip]
    Saving to: `master.zip’

        [  <=>                                                                                                                                                                                               ] 247,104      923K/s   in 0.3s

    2014-11-28 15:11:14 (923 KB/s) – `master.zip’ saved [247104]
    youtube@raspberrypi~$ unzip master.zip
    Archive:  master.zip
    361942a1cf79d40976e4e40ad6fab6263fc775fd
       creating: partytube-master/
      inflating: partytube-master/LICENSE
      inflating: partytube-master/README.md
      inflating: partytube-master/YouTube-logo-light.png
      inflating: partytube-master/future_date.sh
      inflating: partytube-master/get_songs_http.sh
      inflating: partytube-master/get_songs_nfc.sh
       creating: partytube-master/output/
      inflating: partytube-master/output/none.jpg
       creating: partytube-master/php/
      inflating: partytube-master/php/get.php
      inflating: partytube-master/php/index.html
     extracting: partytube-master/php/playlist.txt
      inflating: partytube-master/php/save.php
      inflating: partytube-master/run.sh
      inflating: partytube-master/show_playlist.py
     extracting: partytube-master/url.png
      inflating: partytube-master/wood.jpg
      inflating: partytube-master/youtube-thumb.sh
      inflating: partytube-master/youtube-title.sh
    youtube@raspberrypi~$ rm master.zip
    youtube@raspberrypi~$ mv ./partytube-master/* .
    youtube@raspberrypi~$ rmdir partytube-master/
    youtube@raspberrypi~$ exit

    Originally I planned on guests submitting their song selections over the web. I figured it would be nice to have a QR code to save them the effort of typing in a URL on their smartphone. I installed the qrencode package available in Raspbian.

    root@raspberrypi:~# apt-get install libqrencode3 qrencode

    This way I can do something like:

    qrencode -o url.png -t PNG "http://www.example.org"

    to create an image that I can print and display near the television. You’ll probably want to include the text form of the URL in your printed signage as well in case people don’t have a QR reader program. Obviously, replace example.org with whatever your URL is. You’ll want to use a web server capable of serving php content. Upload the content from the “php” directory from partytube to the place you selected on your web server. Make sure that the file playlist.txt is readable and writable by the effective user ID of the web server. I would recommend using public web space rather than a server hosted on the Pi itself, this prevents guests from needing to be part of your local network, but if your Pi is publicly facing I suppose this isn’t an issue. Please keep in mind that there is really no thought put into the security of this hastily created project, and anyone who knows the URL can clear the submissions waiting to be collected by the partytube scripts.

    I showed a friend my script and he suggested it would be cool if I could add NFC support. Many new Android phones have NFC hardware that makes sharing website links as easy as bringing the phone in proximity to another phone or NFC capable device. I actually had a PN532 NFC/RFID controller breakout board from Adafruit.com that I purchased to play with, but never got around to doing anything with, so this sounded like a good opportunity to use it. The Adafruit PN532 breakout board has a 3.3v TTL UART interface that makes connecting it to the Raspberry Pi a straight forward process.

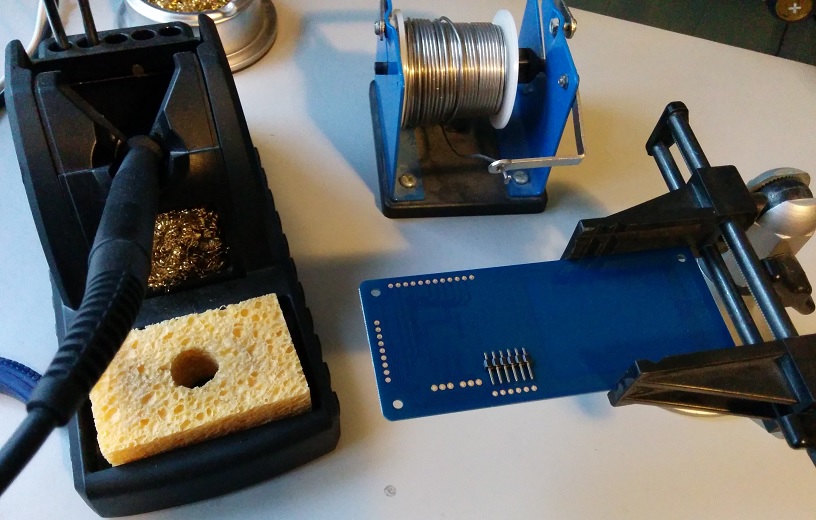
    Solder some header pins on to the board in the area marked “FTDICABLE
    nfc_uart_header

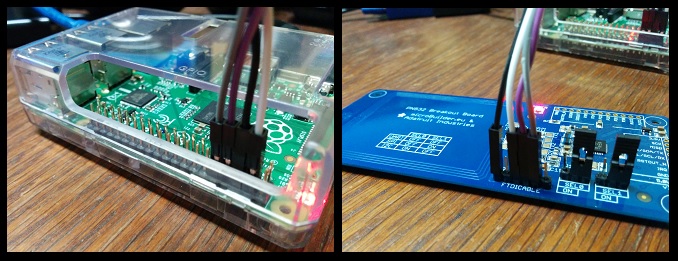
    Then use some female to female jumper wires to connect the the NFC board to the Pi.

    The RXD pin of the NFC board should go to the TXD pin of the Pi, and the TXD pin of the NFC board should go to the RXD pin on the Pi. You’ll also need to connect the ground pin of the NFC board to any of the ground pins available on the Pi, and connect the NFC board 5.0V pin to one of the 5v power pins on the Pi. Make sure to consult the latest documentation for your version of the Raspberry Pi in order to identify the correct pins as these could change with different versions of the Pi.
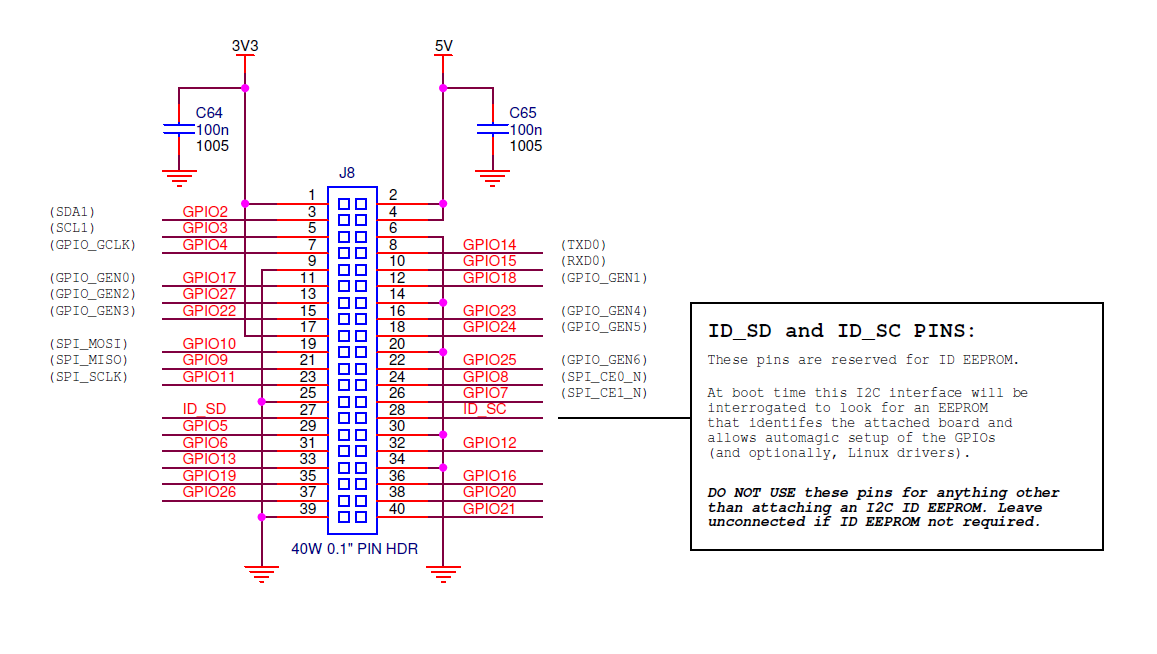
    bplus-gpioSource: http://www.raspberrypi.org/wp-content/uploads/2014/04/bplus-gpio.png

    I also soldered the headers for the jumpers which let me select between operating modes (UART, SPI, or I2C), but this isn’t required since the default mode is UART.

    nfc_pi_uart

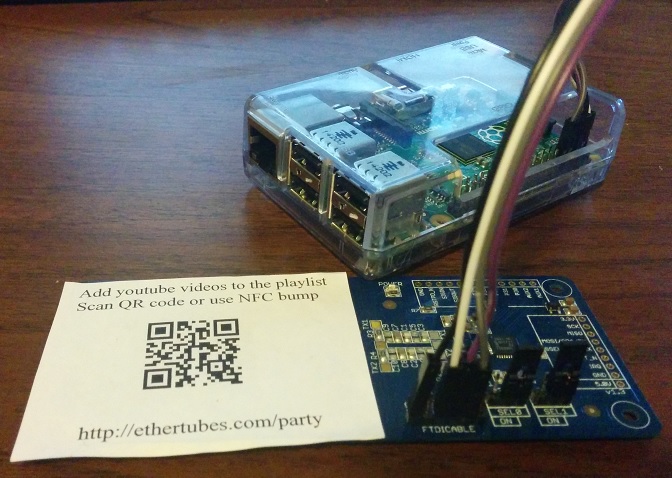
    I printed my QR code and some instructions for guests and adhered it over the antenna area on the NFC board.

    partytube_nfc_label

    So, of course we need a way to be able to get data from the NFC reader now. There is a python module that can interface to this reader available at https://launchpad.net/nfcpy with documentation at http://nfcpy.readthedocs.org/en/latest/. The sample beam.py script that comes with the nfcpy module source seems to do what I want, so I just used that.

    root@raspberrypi:~# apt-get install bzr
    root@raspberrypi:~# cd /usr/local/src
    root@raspberrypi:/usr/local/src# bzr branch lp:nfcpy

    I added the youtube user to the dialout group to give it access to the Pi’s TTL UART port on /dev/ttyAMA0.

    root@raspberrypi:/usr/local/src# adduser youtube dialout
    Adding user `youtube’ to group `dialout’ …
    Adding user youtube to group dialout
    Done.

    You’ll also want to disable the serial console setup on /dev/ttyAMA0 to make sure that doesn’t interfere with the communications to the NFC board. Make sure you have ssh access or some other way to access your Pi besides serial console, and then edit /etc/inittab and comment out the ttyAMA0 line:

    #Spawn a getty on Raspberry Pi serial line
    #T0:23:respawn:/sbin/getty -L ttyAMA0 115200 vt100

    Edit /boot/cmdline.txt and remove the console=ttyAMA0,115200 portion of the line

    dwc_otg.lpm_enable=0 console=ttyAMA0,115200 console=tty1 root=/dev/mmcblk0p2 rootfstype=ext4 elevator=deadline rootwait

    At this point it’s probably a good idea to reboot the Pi. You should be able to test the NFC board by running the command:

    root@raspberrypi:~# sudo -u youtube /usr/local/src/nfcpy/examples/beam.py –device tty:AMA0:pn53x recv print

    Try beaming a URL from your phone over NFC, you should see the URL in the on-screen output.

    All that should be left is to hook the Pi up to an HDMI display with audio support like a television set or multimedia receiver. Omxplayer can be also output through the analog sound port using the -o local command line argument, but you’ll have to edit the script to make use of that if you require it.

    To start the whole thing in motion run the run.sh script as root

    root@raspberrypi:# cd ~youtube
    root@raspberrypi:/home/youtube# ./run.sh

    Songs are played in the order of their unix timestamp. I added a bunch of song selections before the party started because I didn’t want it to be boring and quiet until guests had a chance to figure out the partytube process. I didn’t want my playlist to preempt their choices though, so I modified the time/date of my selections to keep them at the bottom of the playlist queue (setting their dates to the future). Take a look at the future_date.sh script if you’d like to do something similar.

    Explanation

    There are a hodgepodge of shell scripts at work here, so a brief description is probably in order.

    save.php

    This file should be hosted on a web server capable of running php and accessible to party guests. If collects a submitted youtube URL and writes it to the playlist.txt file within the same directory

    get.php

    This displays the contents of playlists.txt and then truncates the file. It should be hosted on a web server capable of running php alongside save.php and accessible to the Raspberry Pi.

    run.sh

    Before running this script, the “URL=” variable should be modified to reflect the location where save.php and get.php are hosted on the web (for example http://example.org/party would be correct if http://example.org/party/save.php and http://example.org/party/get.php are hosted at those locations).

    After starting the run.sh script, the URL specified in that script is turned into a QR code image which will be displayed on screen between songs. The NFC and web-based URL submission collection scripts are started in the background. The web-based collection script is passed (as a command line argument) the URL the user specified with “/get.php” appended. Next the show_playlist.py is ran. After show_playlist.py exists the omxplayer displays the next music video (as determined by timestamp) from the “./output” directory. Once the video is done playing it and it’s corresponding meta data are moved to the “./archive” directory, show_playlist.py is called again and the cycle repeats indefinitely until run.sh receives the SIGEXIT or SIGTERM signal, at which time it attempts clean up by killing all screen sessions owned by the youtube user and the omxplayer before exiting.

    show_playlist.py

    The show_playlist.py script is started which shows the aforementioned QR code as well as any songs currently in the queue. The “queue” consists of files in the “./output” directory. Songs are sorted according to their timestamp, from oldest to newest. All video files should have a corresponding (same base filename) text file containing the video title and a thumbnail image. Show_playlist.py displays the contents of these corresponding files and a list of the next few songs to be played. After a few seconds of displaying this information to the screen the script exits.

    get_songs_nfc.sh

    The get_songs.nfc.sh script runs the beam.py example from nfcpy and parses the output for URLs containing ‘youtube‘. The youtube video ID is parsed out and used as the filename for the video and corresponding files. The youtube URL is handed to youtube-dl which downloads the Youtube video to the “./input” directory. Once the download is complete the video ID is passed to the “youtube-title.sh” and “youtube-tumb.sh” scripts which save the video title and thumbnail image. The title, thumbnail and video file for all videos in “./input” are processed and moved to the “./output” directory. If a file in “./input” is not an mp4 file it is deleted. This process repeats until the script is killed.

    get_songs_http.sh

    The get_songs_http.sh script collects song submissions from a remote website. It takes one command line argument: the web address of a list of youtube URLs (one per line). This address is specified in the run.sh script. For each line in the downloaded list get_songs_http.sh passes the URL to youtube-dl to download the video. Youtube-dl saves the video to the “./input” directory. Once the download is complete the Youtube ID of the downloaded video is passed to the “youtube-title.sh” and “youtube-tumb.sh” scripts which save the video title and thumbnail image. The title, thumbnail and video file for all mp4 videos in the “./input” directory are processed and moved to the “./output” directory. If a file in “./input” is not an mp4 file it is deleted. The script waits 60 seconds before repeating this process. This continues until the script is killed.

    Well, I think this covers everything, it’s a kludge that’s for sure, but it worked well for my party. Maybe I’ll make some updates for my next gathering.

  • Grandstream Simple HTTP Configuration Pusher

    Grandstream Simple HTTP Configuration Pusher

    Here is a simple bash script that logs into the web interface of a Grandstream IP phone and submits some configuration changes, and then reboots the device for the changes to take effect. I wrote this to update a handful of Grandstream phones with a new phonebook XML URL, but it could be used for other configuration changes as well. This was tested with a Grandstream GXP2120 on firmware versions 1.0.1.56, 1.0.1.64, 1.0.1.105, 1.0.4.23, and 1.0.6.7, but might be adaptable for other Grandstream devices as well.

    Grandstream has configuration templates for a number of devices. You can download a zip archive of them from the following URL: http://www.grandstream.com/tools/GAPSLITE/config-template.zip [archive.org]. The configuration is made up of a pair of values, a P-code and the P-codes applicable value, Grandstream calls these P values in some of their documentation.

    My goal was to get my Grandstream phones to periodically download my automatically generated phonebook file discussed in a previous blog post. The applicable configuration details in my case are shown below.

    # Enable Phonebook XML Download. # 0 – No, 1 – YES, HTTP, 2 – YES, TFTP, 3 – Yes, HTTPS. Default is 0
    # Number: 0, 1, 2, 3
    # Mandatory
    #P330 = 0

    # Phonebook XML Server Path
    # This is a string of up to 256 characters that should contain a path to the XML file. It MUST be in the host/path format.
    # For example: directory.grandstream.com/engineering
    # String
    #P331 =

    # Phonebook Download Interval (in minutes)
    # Valid value range is 5-720. Default is 0 for disabled
    # Number: 0, 5-720;
    #P332 = 0

    # Remove Manually-edited entries on Download. 0 – No, 1 – Yes. Default is 1
    # Number: 0, 1
    # Mandatory
    #P333 = 1

    # Sort Phonebook by. 0 – Last Name. 1 – First Name. Default is 0
    # Number: 0, 1
    # Mandatory
    #P2914 = 0

    My Enable Phonebook XML Download method is HTTPS, my Phonebook XML Server Path is “10.0.0.1/phonebook.php“, I want the phone to download on a 30 minute interval and I want it to replace any phone book entries the user might have created.

    My applicable P-values were:
    P330=3
    P331=10.0.0.1/phonebook.php
    P332=30
    P333=1
    I then concatenate these P-values into one long string without any white space using the ampersand as a separator:

    P330=3&P331=10.0.0.1/phonebook.php&P332=30&P333=1

    Example usage

    Here is how I updated a single phone with the P-values discussed earlier. First I set a shell variable containing the values. My device is located on the LAN at 10.0.0.172. I use this IP as the first argument to the script, and the P-values variable in the second argument. If you want to specify the P-values directly to the script without a shell variable, just make sure to quote them so that the ampersands don’t get misinterpreted by your shell. The final argument to the script is the web interface password of the device being updated.

    Pvalues="P330=3&P331=10.0.0.1/phonebook.php&P332=30&P333=1"
    [root@phone scripts]# ./gs_push.sh 10.0.0.172 $Pvalues admin
    Config sent, rebooting…
    Saving User Data…Done
    Blocks Used ( 119 / 1024 )

    Success!

    Only one argument (the IP address) is required, the script will ask for the additional data if it isn’t passed in to it from the command line.

    [root@phone scripts]# ./gs_push.sh
    Usage: ./gs_push.sh <IP Address of Grandstream device> [P-value pairs] [password]

    Here is an example of updating just the phone book URL using a more interactive mode to the script

    [root@phone scripts]# ./gs_push.sh 10.0.0.172
    Enter password [admin]: *****
    Enter the P-code and value pair. Use ‘&’ to separate multiple P-values.
    Example: P330=3&P331=10.0.0.1/phonebook.xml&P332=30&P333=1
    P-values:P331=10.0.0.4/phonebook.php
    Config sent, rebooting…
    Saving User Data…Done
    Blocks Used ( 119 / 1024 )

    Success!

    Here are the commands I used to update all of the Grandstream devices communicating with my Asterisk PBX. I grep for the Grandstream OUI in the list of MAC addresses outputted from the “arp” command. These devices will usually be communicating with the Asterisk server periodically anyhow, and so probably they are already listed in the ARP table. To try and hedge that bet, all the devices are first sent a ping request to generate some new traffic. The output from the gs_push.sh script is suppressed by redirecting it to /dev/null, however in the event of a failure the script should announce via STDERR the IP address of the device it had trouble with.

    Pvalues="P330=3&P331=10.0.0.4/phonebook.php&P332=30&P333=1"
    asterisk -rx "sip show peers" |awk ‘{print $2}’ |grep ‘\.’ |xargs -n1 ping -c1 >/dev/null
    arp |grep -i ’00:0b:82′ |awk ‘{print $1}’ |xargs -i{} -n1 ./gs_push.sh "{}" "$Pvalues" admin >/dev/null

    Download

    #!/bin/bash

    #  +———————————————————————-+
    #  | Grandstream GXP21xx IP Phone HTTP POSTing P-value config pusher      |
    #  | May work with with other Grandstream devices, use at your own risk.  |
    #  +———————————————————————-+
    #  | For the latest P-value descriptions consult the applicable firmware |
    #  | release notes and configuration template descriptions:               |
    #  | http://www.grandstream.com/tools/GAPSLITE/config-template.zip        |
    #  +———————————————————————-+
    #  | The contents of this file are subject to the General Public License  |
    #  | (GPL) Version 2 (the "License"); you may not use this file except in |
    #  | compliance with the License. You may obtain a copy of the License at |
    #  | http://www.opensource.org/licenses/gpl-license.php                   |
    #  |                                                                      |
    #  | Software distributed under the License is distributed on an "AS IS"  |
    #  | basis, WITHOUT WARRANTY OF ANY KIND, either express or implied. See  |
    #  | the License for the specific language governing rights and           |
    #  | limitations under the License.                                       |
    #  +———————————————————————-+

    get_password () {
            saveIFS="$IFS"
            IFS=$‘\n’
            while read -s -n 1 char
            do
                    case $(printf "%d\n" \’$char) in

                    127)
                            if [ "${#passwd}" -gt 0 ]; then
                                    echo -ne "\b \b"
                                    passwd="${passwd:0:${#passwd}-1}"
                            fi
                            ;;
                    0)
                            echo
                            break
                            ;;
                    *)
                            echo -n "*"
                            passwd+=$char
                    esac
            done
            IFS=$saveIFS
    }

    target_ip="$1"
    if [ -z "$target_ip" ]; then
            echo "Usage: $0 <IP Address of Grandstream device> [P-value pairs] [password]" >&2
            exit 1
    fi

    Pvalues="$2"
    passwd="$3"

    if [ -z "$passwd" ]; then
            # If the second argument isn’t a valid P-code pair use it as the password
            if [ "${Pvalues//’=’}" == "$Pvalues" ]; then
                    passwd="$Pvalues"
                    unset Pvalues
            fi
    fi
    if [ -z "$passwd" ]; then
                    echo -n "Enter password [admin]: "
                    get_password
                    if [ -z "$passwd" ]; then
                            passwd="admin"
                    fi
    fi

    if [ -z "$Pvalues" ]; then
            # See if anything is waiting on stdin
            read -t1 Pvalues
            if [ -z "$PValues" ]; then
                    # Or just ask the user..
                    echo "Enter the P-code and value pair. Use ‘&’ to separate multiple P-values."
                    echo "Example: P330=3&P331=10.0.0.1/phonebook.xml&P332=30&P333=1"
                    echo -n "P-values: "
                    read Pvalues
            fi
    fi

    get_sid() {
            while read -r || [[ -n "$REPLY" ]]
            do
                    if [ -n "$sid" ]; then
                            break
                    fi
                    if [ "${REPLY:0:23}" == "Set-Cookie: session_id="  ]; then
                            sid="${REPLY:23}"
                            sid="${sid//;}"
                    fi
                    if [ "${REPLY//’"sid"’}" != "$REPLY" ]; then
                            sid="${REPLY#*’"sid"’}"
                            sid="${sid#*’"’}"
                            sid="${sid%%’"’*}"
                    fi

            done
            echo "$sid"
    }


    post_status() {
            # Old firmware says need to reboot, new firmware says success
            # new firmware doesn’t end with a line break 🙁
            while read -r || [[ -n "$REPLY" ]]
            do
                    if [ "${REPLY//eboot}" != "$REPLY" ]; then
                            echo "1"
                            break
                    fi
                    if [ "${REPLY//success}" != "$REPLY" ]; then
                            echo "1"
                            break
                    fi
            done
    }

    reboot_status() {
            success=0
            headers=0
            while read -r || [[ -n "$REPLY" ]]
            do
                    if [ -z "$REPLY" ]; then
                            # header data done
                            headers=1
                    fi
                    if [ "${REPLY//'{"results":[‘}" != "$REPLY" ]; then
                            if [ "${REPLY//[1]}" != "$REPLY" ]; then
                                    success=1
                            fi
                            break
                    fi
                    if [ "${REPLY//’savereboot’}" != "$REPLY" ]; then
                            success=1
                            break
                    fi
                    if [ "${REPLY//’relogin’}" != "$REPLY" ]; then
                            success=1
                            break
                    fi
                    # fw 1.0.1.56 requires a different reboot action
                    if [ "${REPLY//’The requested URL was not found’}" != "$REPLY" ]; then
                            curl -s -i -b "session_id=$sid" "http://$target_ip/cgi-bin/rs" |reboot_status
                            success=2
                    fi

                    # print extra saving info mixed in the headers, but ignore other bits
                    if [ "${REPLY//:}" != "$REPLY" ]; then
                            unset REPLY
                    fi
                    if [ "${REPLY:0:4}" == "HTTP" ]; then
                            unset REPLY
                    fi
                    if [ "${REPLY:0:1}" == "<" ]; then
                            unset REPLY
                    fi
                    if [ "$headers" == "0" ] && [ -n "$REPLY" ]; then
                            echo "$REPLY"
                    fi

            done
            if [ "$success" == "1" ]; then
                    echo "Success!"
            fi
            if [ "$success" == "0" ]; then
                    echo "Fail. ($target_ip)" >&2
            fi
    }


    if [ -z "$Pvalues" ]; then
            echo "No configuration parameters specified." >&2
            exit 1
    fi

    # Older firmware passed password as "P2", newer firmware passes as "password"
    # <form> action is the same
    sid="$(curl -s -i -d "P2=$passwd&password=$passwd" "http://$target_ip/cgi-bin/dologin" |get_sid)"

    if [ -z "$sid" ]; then
            echo "Login failed." >&2
            exit 1
    fi

    # <form> action for config update is different across firmware versions
    # Try old firmware style first
    status="$(curl -s -i -b "session_id=$sid" -d "$Pvalues&update=Update" "http://$target_ip/cgi-bin/update" |post_status)"

    if [ -z "$status" ]; then
            # Try new firmware config update action
            status="$(curl -s -i -b "session_id=$sid" -d "sid=$sid&$Pvalues" "http://$target_ip/cgi-bin/api.values.post" |post_status)"
    fi

    # Try new firmware way if the last attempt failed
    if [ -n "$status" ]; then
            echo "Config sent, rebooting…"
            # Old firmware used query_string to pass REBOOT, new firmware uses POST data
            curl -s -i -d "request=REBOOT&sid=$sid" -b "session_id=$sid" "http://$target_ip/cgi-bin/api-sys_operation?REBOOT" |reboot_status
    else
            echo "Couldn’t update configuration ($target_ip)" >&2
    fi
  • Grandstream Phone Book Creator for Elastix

    Grandstream Phone Book Creator for Elastix

    Do you run the Elastix PBX management environment to Asterisk? Do you use Grandstream IP Phones? If you answered yes to both of these questions, then this might be helpful to you.

    Grandstream GXP21xx/GXP14xx/GXP116x IP phones (and possibly others) can be configured to automatically download an XML formatted phone book file. The Elastix interface already has a place for naming the users, wouldn’t it be great to use that data for making an always up-to-date phone book file? That is the idea with this script. It was written for use with Elastix version 2.0, but will probably work with others (in the 2.x branch), and maybe FreePBX as well, I haven’t really tested.

    To “install” the script simply put it in the root of your Elastix web directory space.

    The format of the XML output is something like this:

    <?xml version="1.0" encoding="UTF-8"?>
    <AddressBook>
            <Contact>
                    </Lastname>Test User<LastName/>
                    <FirstName></FirstName>
                    <Phone>
                            <phonenumber>1100</phonenumber>
                            <accountindex>1</accountindex>
                            <downloaded>0</downloaded>
                    </Phone>
            </Contact>
    </AddressBook>

    Two versions of the script are presented, you only need one. The first script uses functions included inside of various files that should be present (AFAIK) in your Elastix web root. It is slower and will undoubtedly use more resources during execution. It may also be more flexible and resilient in that it will always use the latest version of the functions available to it. This is a double-edged sword of course, and might end up breaking it as well. Enter the second script, which uses just the applicable parts of the code from those aforementioned functions without needing to include any files. This script will probably work provided the database table stays the same, but your mileage may vary.

    You can download both scripts from here: Download

    The shorter version:

    <?php
    /* vim: set expandtab tabstop=4 softtabstop=4 shiftwidth=4:
      +———————————————————————-+
      | Grandstream GXP21xx/GXP14xx/GXP116x IP Phone XML Phone Book Creator  |
      | For Elastix version 2.0 (maybe others) http://www.elastix.org        |
      +———————————————————————-+
      | Made with recycled code, applicable rights                           |
      | Palosanto Solutions S. A., Coalescent Systems Inc, FreePBX, et al.   |
      +———————————————————————-+
      | The contents of this file are subject to the General Public License  |
      | (GPL) Version 2 (the "License"); you may not use this file except in |
      | compliance with the License. You may obtain a copy of the License at |
      | http://www.opensource.org/licenses/gpl-license.php                   |
      |                                                                      |
      | Software distributed under the License is distributed on an "AS IS"  |
      | basis, WITHOUT WARRANTY OF ANY KIND, either express or implied. See  |
      | the License for the specific language governing rights and           |
      | limitations under the License.                                       |
      +———————————————————————-+
    */

    header("Content-Type: text/xml");

    require_once(‘admin/functions.inc.php’);
    require_once(‘admin/modules/core/functions.inc.php’);
    require_once(‘admin/common/php-asmanager.php’);
    require_once(‘DB.php’); //PEAR must be installed (why?)

    $db_user = $amp_conf["AMPDBUSER"];
    $db_pass = $amp_conf["AMPDBPASS"];
    $db_host = $amp_conf["AMPDBHOST"];
    $db_name = $amp_conf["AMPDBNAME"];

    $datasource = ‘mysql://’.$db_user.‘:’.$db_pass.‘@’.$db_host.‘/’.$db_name;
    $db = DB::connect($datasource);

    $extensions = core_users_list();
    echo "<?xml version="1.0" encoding="UTF8"?>\n";
    echo "<AddressBook>\n";
    $index = 0;
    if (isset($extensions)) {
        foreach ($extensions as $key=>$extension) {
            $index= $index + 1;
            echo "\n\n\t<Contact>";
            echo "\n\t\t<LastName>" . $extension[1] . "</LastName>";
            echo "\n\t\t<FirstName></FirstName>";
            echo "\n\t\t<Phone>";
            echo "\n\t\t\t<phonenumber>" . $extension[0] . "</phonenumber>";
            echo "\n\t\t\t<accountindex>" . $index . "</accountindex>";
            echo "\n\t\t</Phone>";
            echo "\n\t</Contact>\n";
            }
    }
    echo "</AddressBook>\n";
    ?>

    The more monolithic version:

    <?php
    /* vim: set expandtab tabstop=4 softtabstop=4 shiftwidth=4:
      +———————————————————————-+
      | Grandstream GXP21xx/GXP14xx/GXP116x IP Phone XML Phone Book Creator  |
      | For Elastix version 2.0 (maybe others) http://www.elastix.org        |
      +———————————————————————-+
      | Made from 99% recycled code, applicable rights                       |
      | Palosanto Solutions S. A., Coalescent Systems Inc, FreePBX, et al.   |
      +———————————————————————-+
      | The contents of this file are subject to the General Public License  |
      | (GPL) Version 2 (the "License"); you may not use this file except in |
      | compliance with the License. You may obtain a copy of the License at |
      | http://www.opensource.org/licenses/gpl-license.php                   |
      |                                                                      |
      | Software distributed under the License is distributed on an "AS IS"  |
      | basis, WITHOUT WARRANTY OF ANY KIND, either express or implied. See  |
      | the License for the specific language governing rights and           |
      | limitations under the License.                                       |
      +———————————————————————-+
    */

    header("Content-Type: text/xml");

    define("AMP_CONF", "/etc/amportal.conf");

    $file = file(AMP_CONF);
    if (is_array($file)) {
        foreach ($file as $line) {
            if (preg_match("/^\s*([a-zA-Z0-9_]+)=([a-zA-Z0-9 .&-@=_!<>"\‘]+)\s*$/",$line,$matches)) {
                $amp_conf[ $matches[1] ] = $matches[2];
            }
        }
    }

    require_once(‘
    DB.php‘); //PEAR must be installed
    $db_user = $amp_conf["AMPDBUSER"];
    $db_pass = $amp_conf["AMPDBPASS"];
    $db_host = $amp_conf["AMPDBHOST"];
    $db_name = $amp_conf["AMPDBNAME"];

    $datasource = ‘
    mysql://’.$db_user.’:’.$db_pass.’@’.$db_host.’/’.$db_name;
    $db = DB::connect($datasource); // attempt connection

    $type="getAll";
    $results = $db->$type("SELECT extension,name,voicemail FROM users ORDER BY extension", null);
    foreach($results as $result){
        $extensions[] = array($result[0],$result[1],$result[2]);
    }

    #$extensions = core_users_list();
    echo "<?xml version="1.0" encoding="UTF8"?>\n";
    echo "<AddressBook>\n";
    $index = 0;
    if (isset($extensions)) {
        foreach ($extensions as $key=>$extension) {
            $index= $index + 1;
            echo "\n\n\t<Contact>";
            echo "\n\t\t<LastName>" . $extension[1] . "</LastName>";
            echo "\n\t\t<FirstName></FirstName>";
            echo "\n\t\t<Phone>";
            echo "\n\t\t\t<phonenumber>" . $extension[0] . "</phonenumber>";
            echo "\n\t\t\t<accountindex>" . $index . "</accountindex>";
            echo "\n\t\t</Phone>";
            echo "\n\t</Contact>\n";
        }
    }
    echo "</AddressBook>\n";
    ?>

    Before you can use the new phone book you have to update the phone to make it aware of it. I wrote a script that I talk about in another article for this purpose. If you only need to update one phone, or would rather do it manually the basic steps are outlined below.

    These screens differ with firmware version, but the general concept should remain roughly the same, for example on newer firmware versions for my phone the phone book options are under Phonebook and then Phonebook Management

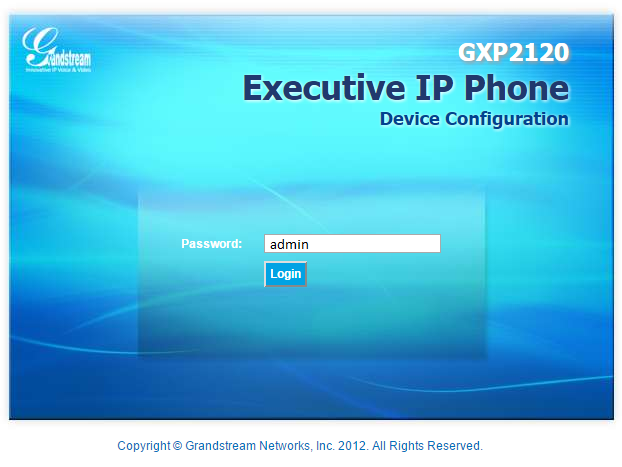
    To make use of the phone book with the phone, navigate to the web interface on the device and login. I’m using a Grandstream GXP2120 phone. The default password is “admin”.
    grandstream_web_login

    After logging in click on the Settings tab and then choose Advanced Settings
    grandstream_web_settings_advanced

    Scroll down to the field Phonebook XML Download My Elastix installation redirects HTTP request to HTTPS. The Grandstream phone doesn’t seem to care if the certificate is backed by a common certificate authority. Most likely you’ll want to select HTTPS as shown. For Server Path leave off the protocol specification of the URL (e.g. http://, https://). Make sure to set a valid Download Interval (something of at least 5 or higher). Optionally chose to remove old entries in the phone book, this might help to avoid confusing stale data.
    grandstream_phonebook_settings

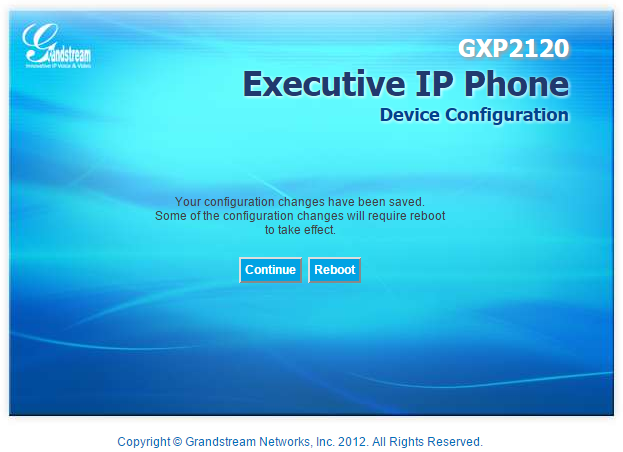
    Once the changes have been made you’ll need to reboot.
    grandstream_reboot

  • Fun with Garmin Forensics

    Fun with Garmin Forensics

    As you’ll recall from my Christmas post the company I work for is replacing their fleet management equipment, and in part that means upgrading some of our older Garmin GPS screens. As a result a steady stream of old equipment has been trickling into my office.

    old_garmins

    Even though these units no longer fit our needs, there is still plenty of life left to them.

    Science!

    Wikipedia states that “forensic science is the scientific method of gathering and examining information about the past“, our methods might not be too scientific, but these devices are chock-full of information about the past.

    In preparation for finding them new homes, I thought it might be wise to see what kind of private data these things have stored. I came across a nice overview presentation on GPS forensics that covers a variety of models and brands. That presentation listed some files of interest:

    Current.gpx
    Archive.gpx
    Position.gpx
    GarminDevice.xml

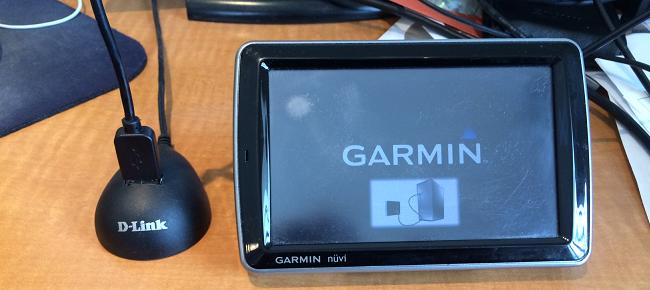
    After connecting the Garmin to a computer and waiting for the Garmin’s operating system to start I was able to see the Garmin as a storage device.

    garmin_usb

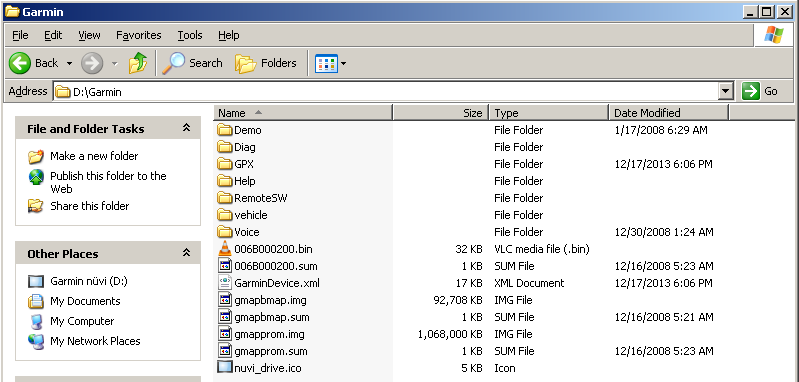
    Navigating to the \Garmin\GPX directory I was able to locate Current.gpx.
    garmin_nuvi_5000_mass_storage

    garmin_nuvi_5000_root_folder

    garmin_nuvi_5000_garmin_folder

    garmin_nuvi_5000_gpx_folder

    GPX Format

    The GPX in the GPX file format stands for GPS eXchange Format. It’s a fairly simple XML format with plenty of human readable items of interest. Here are some (slightly sanitized) snippets from the GPX file I recovered to give you an idea of the format. The file I was working with was devoid of line breaks, but I’ve added some here for clarity.

    After a quick header we get into some more interesting stuff.

    <?xml version="1.0" encoding="UTF-8" standalone="no" ?>
    <gpx xmlns="http://www.topografix.com/GPX/1/1" xmlns:gpxx="http://www.garmin.com/xmlschemas/GpxExtensions/v3" xmlns:gpxtpx="http://www.garmin.com/xmlschemas/TrackPointExtension/v1" creator="nüvi 5000" version="1.1" xmlns:xsi="http://www.w3.org/2001/XMLSchema-instance" xsi:schemaLocation="http://www.topografix.com/GPX/1/1 http://www.topografix.com/GPX/1/1/gpx.xsd http://www.garmin.com/xmlschemas/GpxExtensions/v3 http://www.garmin.com/xmlschemas/GpxExtensionsv3.xsd http://www.garmin.com/xmlschemas/TrackPointExtension/v1 http://www.garmin.com/xmlschemas/TrackPointExtensionv1.xsd">

    The “metadata” section seems pretty boring. I think the time listed here is the last time the unit was used.

    <metadata>
     <link href="http://www.garmin.com">
      <text>Garmin International</text>
      </link>
      <time>2014-01-16T21:44:20Z</time>
    </metadata>

    Now on to some good stuff, Waypoints.

    <wpt lat="23.137160" lon="-81.687469">
      <ele>241.17</ele>
      <name>001</name>
      <sym>Waypoint</sym>
    </wpt>

    Some Waypoint entries contain “extensions”, these might include Address Book entries

    <extensions>
     <gpxx:WaypointExtension>
      <gpxx:Categories>
        <gpxx:Category>Address Book</gpxx:Category>
      </gpxx:Categories>

    Or just addresses

    <extensions>
     <gpxx:WaypointExtension>
      <gpxx:Address>
        <gpxx:StreetAddress>101 W. Flagler St</gpxx:StreetAddress>
        <gpxx:City>Miami</gpxx:City>
        <gpxx:State>FL</gpxx:State>
        <gpxx:Country>USA</gpxx:Country>
        <gpxx:PostalCode>33130</gpxx:PostalCode>
      </gpxx:Address>
     </gpxx:WaypointExtension>
    </extensions>

    Far more interesting than the Waypoints however is the Tracks log. This data is a series of positions at a given time which leaves a trail of breadcrumbs which we can use to reconstruct the journey.

    Here is part of one particular journey

    <trk>
      <name>ACTIVE LOG: 08 JAN 2014 12:06</name>
       <trkseg>

    After the “trkseg” element begins a series of coordinates, elevations, and times follow

    <trkpt lat="23.884920" lon="-81.686757">
      <ele>196.25</ele>
      <time>2014-01-08T17:06:41Z</time>
    </trkpt>
    <trkpt lat="23.884317" lon="-81.686580">
      <ele>196.73</ele>
      <time>2014-01-08T17:06:43Z</time>
    </trkpt>
    <trkpt lat="23.884317" lon="-81.686580">
      <ele>196.73</ele>
      <time>2014-01-08T17:06:44Z</time>
    </trkpt>
    <trkpt lat="23.884317" lon="-81.686580">
      <ele>196.73</ele>
      <time>2014-01-08T17:06:45Z</time>
    </trkpt>

    …And so on

    Google Earth

    As you can see this information is easy to work with to suit your needs. If your needs are just to watch what happened and when, Google Earth is great tool for this. It turns out Google Earth already understands the GPX format, so we don’t need to extract any data manually.

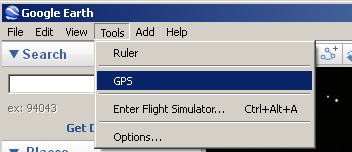
    Just click on Tools then GPS
    google_earth_import_1

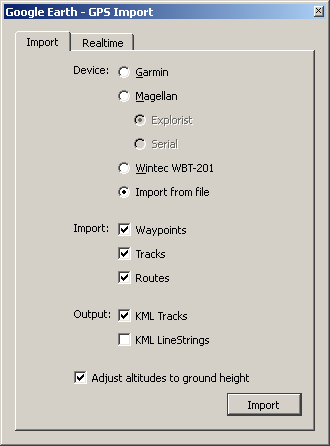
    Select the Import from file option followed by the Import button
    google_earth_import_2

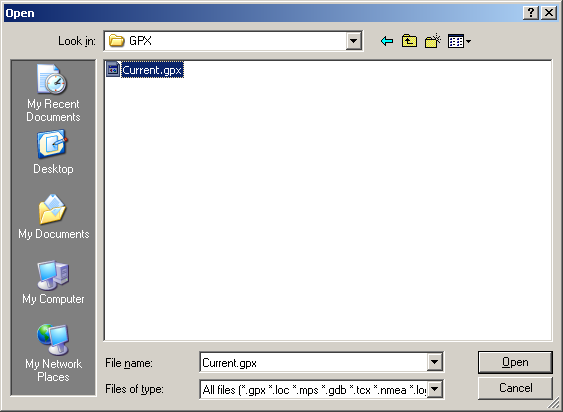
    Navigate to your Current.gpx file (in my case \Garmin\GPX), select it and click Open
    google_earth_import_3

    Google Earth will tell you what data it was able to find. Click OK
    google_earth_import_4

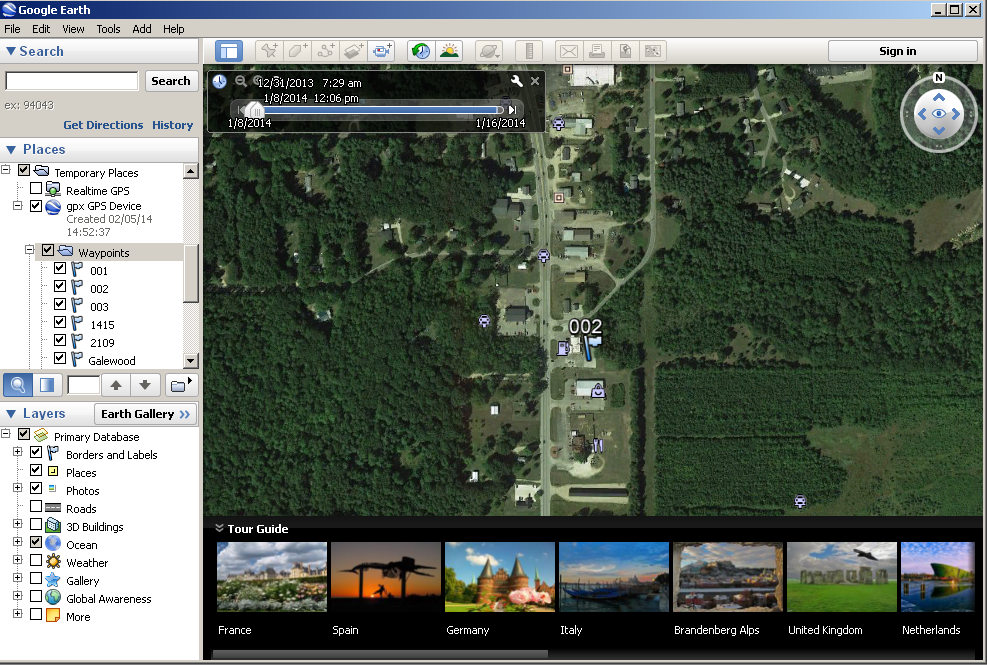
    On the left panel you can move between waypoints to see them on the map.
    google_earth_view_imported_2

    Fun

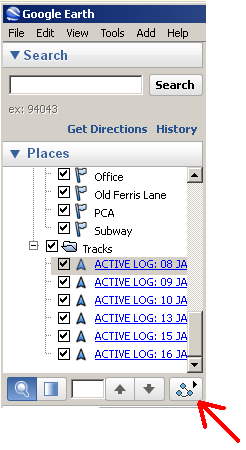
    For even more fun, select one of the “Tracks” logs, and click the play button with breadcrumb icon (I assume that’s what that is anyhow).
    google_earth_view_imported_3

    Here is some sample video I captured from the playback of some track log data. The data isn’t real-time of course (that would be boring), but there is still some relevant timing preserved. Notice how you can even tell which stop lights were red by the time elapsed between movements. Very interesting and potentially revealing stuff.