Author: admin

  • Dell Vostro 1000 Backlight Inverter Replacement

    Dell Vostro 1000 Backlight Inverter Replacement

    An aging Dell Vostro 1000 ended up on my desk the other day. The owner said it had died, when he turned it on some LEDs lit up, but there was no display. It turned out that the backlight which illuminates the LCD panel was not working. This is a common problem with older laptops. A bright flashlight aimed at the screen revealed the ghostly faint image of a Windows desktop struggling to be seen. The backlight is actually an edge light that illuminates a panel behind the LCD screen. On older laptops and LCD monitors this is a compact florescent light (CFL). Many newer displays use LEDs as the light source. A CFL is kind of a miniature version of florescent office light tubes. Just like florescent office lights needs a high voltage ballast to excite the gasses in the tube, a CFL needs an “inverter”. The backlight inverter is by far the more common failure point in an inverter & CFL system. Replacement kits with both the CFL and inverter for most laptops are available on eBay, but I’d recommend just trying the inverter board to start with. The cost is usually less than $5 shipped.

    Since I was stuck repairing this dinosaur, I figured I’d document the process for the benefit of anyone else finding themselves in a similar situation.

    You’ll want to gather some tools, a small Phillips-head screw driver, a small flat-head screw driver or spudger, some double-sided tape and a pry tool.

    Pry tools are nice for opening plastic enclosures of electronics as the soft plastic of the pry tool often gives way before the work material which helps to prevent marring the device. Pry tools can be picked up for cheap on eBay. Guitar picks are also useful for this purpose.

    First, remove the battery from the laptop to prevent accidental powering on the device while working with it.

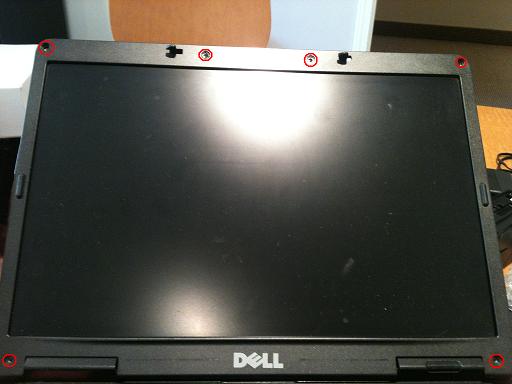
    Carefully pry off the rubber bumpers covering the screws on the LCD bezel. I used a small flat-head screw driver. I attempted to insert the screw driver head under the edge of the rubber bumpers to prevent tearing them. If you’re lucky you’ll take the adhesive material with you. If not you’ll need to replace the adhesive with a small bit of your double-sided tape later. Do not glue these back in place, it will be a mess and whoever opens the screen next will curse your name.

    Locate and remove the rubber bumpers and screws and the indicated locations.

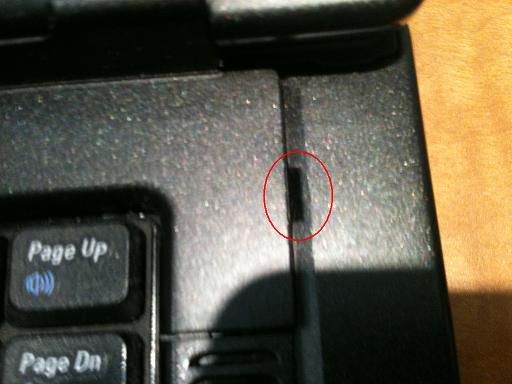
    Locate the gap in the upper right area above the keyboard, this will make a good pry point to begin loosening the bezel with the power button on it.

    Using a firm, but not forceful prying or subtle twisting action of the pry tool, you should feel the bezel loosen as you move along the perimeter. Continue to work around the bezel as shown

    The bezel is now off exposing some screws, however we don’t need to do anything with those screw. This piece was removed to make it easier to access the monitor bezel.

    Work the pry tool into a separation in the LCD bezel. I worked around the frame twisting the pry tool slightly, and the front came off without a problem.

    The LCD bezel should be off now.

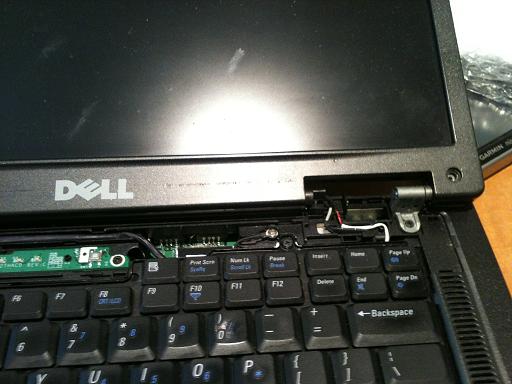
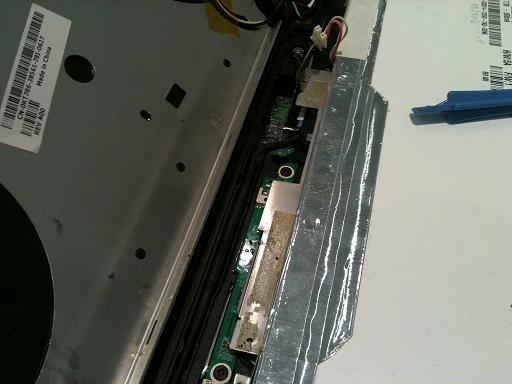
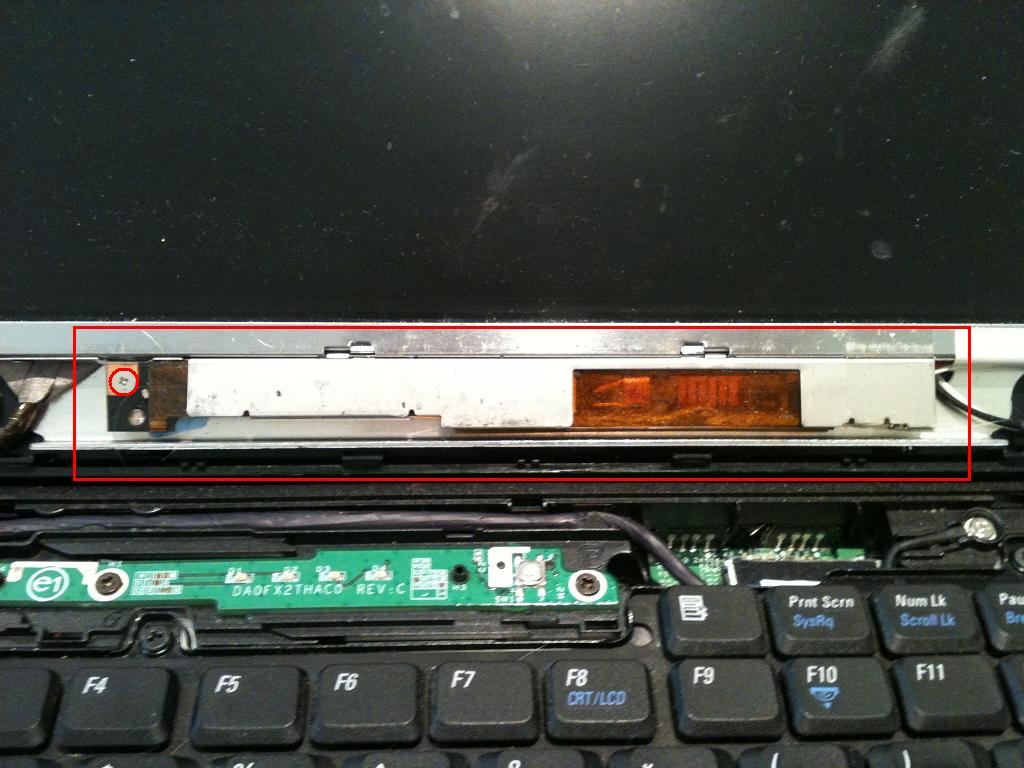
    We can see the back of the inverter (in the red square). Remove the single screw holding the inverter in place (shown in the red circle).

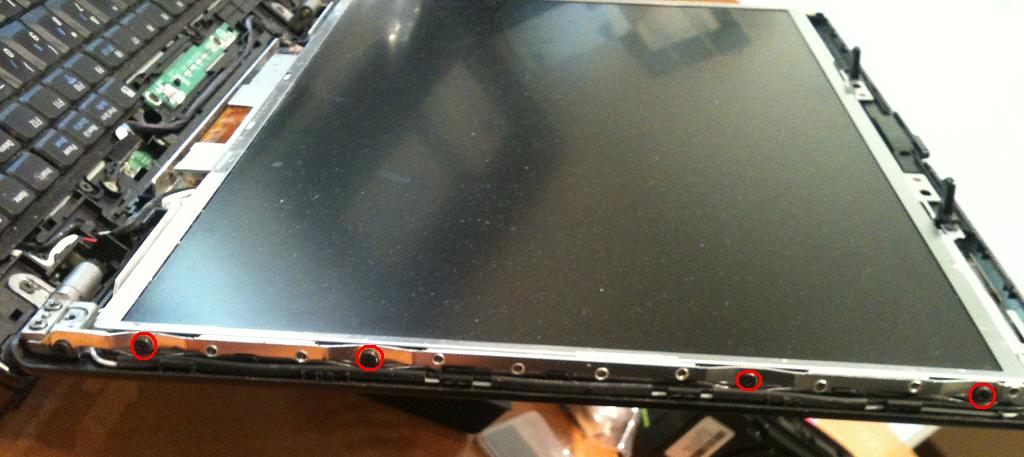
    Look on the left and right edges of the LCD panel. There are screws attaching the panel to the rest of the screen assembly that will need to be removed. The right side is shown with the screws of interest circled in red.

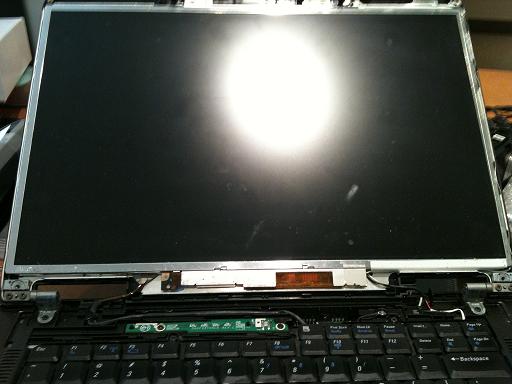
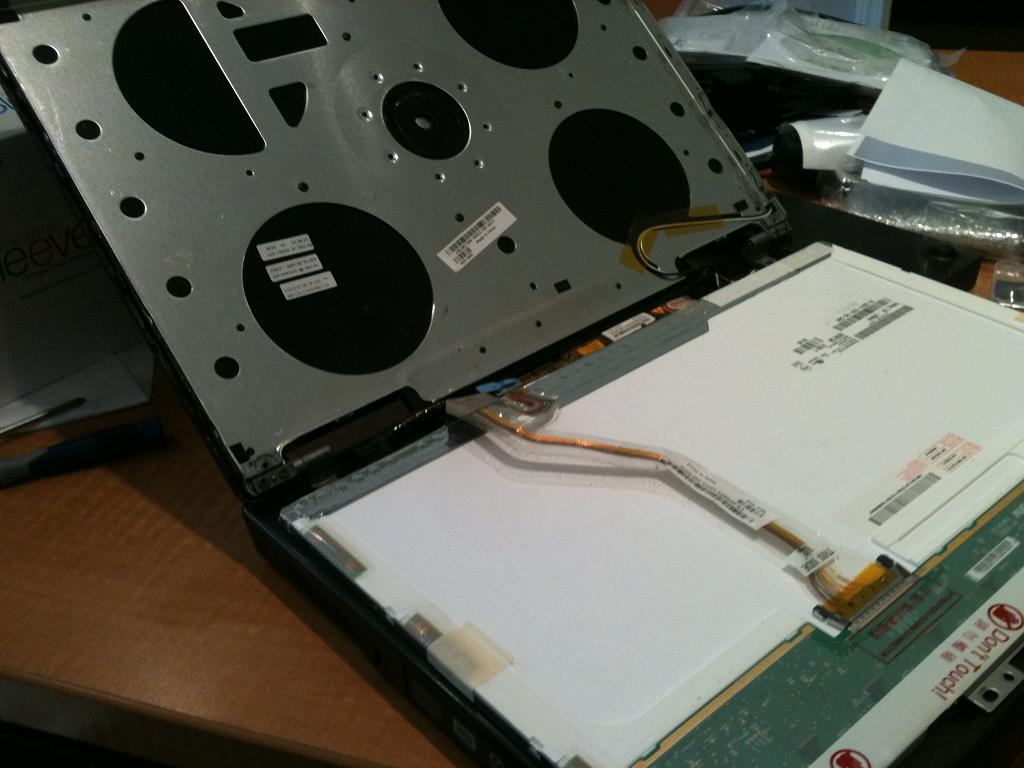
    With the screws removed from each side, find the two metal tabs near the top of the LCD panel. They make a useful point to carefully grip the LCD panel and flip it downward gently onto the keyboard as shown.

    Remove the new inverter from it’s packaging, and verify that the part correctly matches the old inverter.

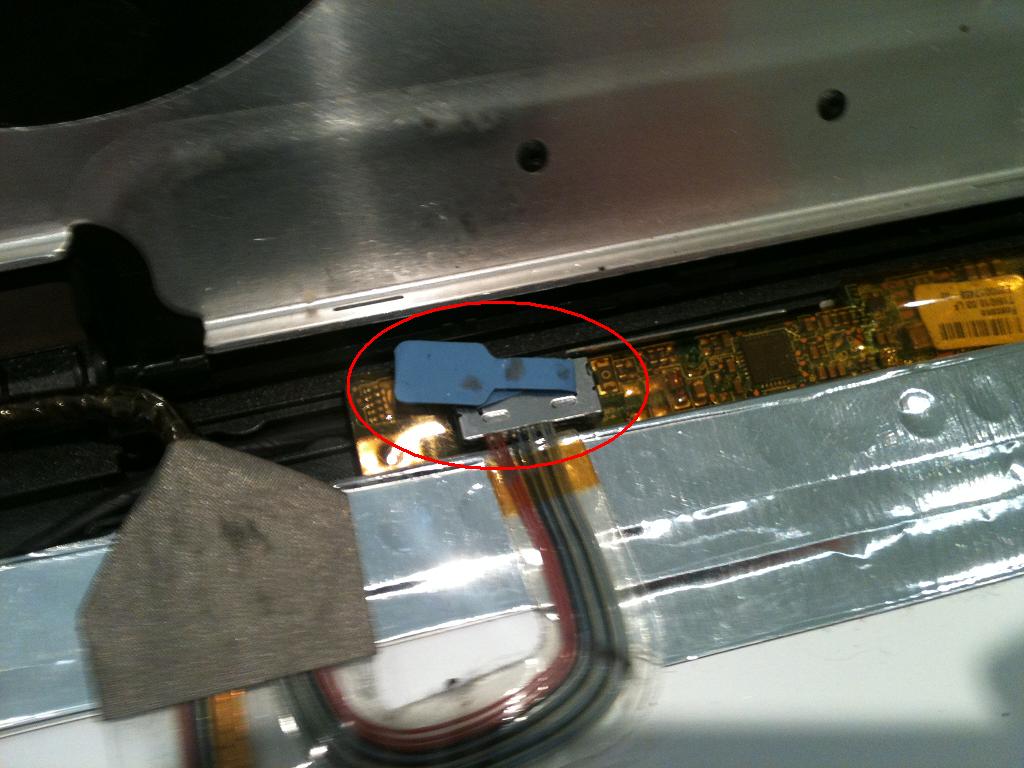
    The control connector for the inverter board is shown below (circled in red). Carefully pull upward on the blue tab to free the connector from the board.

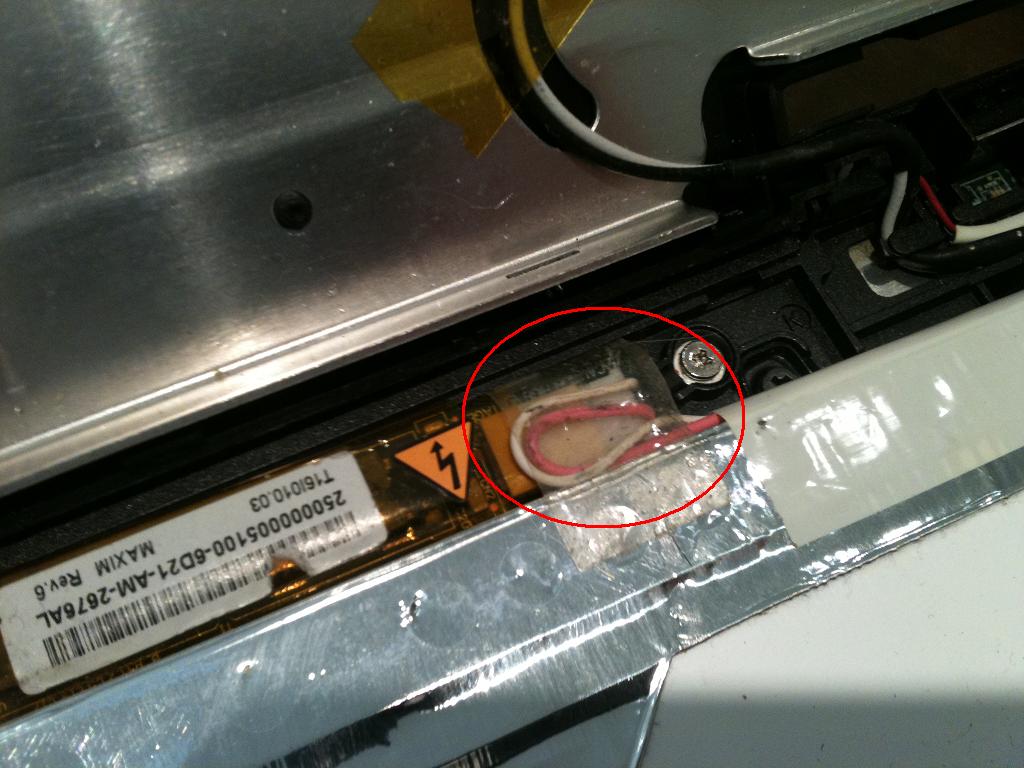
    On the other side of the board, unplug the high voltage power feed.

    The inverter will take some work to free, as there is some strong double-sided tape found underneath.

    Replace the double-sided tape if necessary, then insert the new inverter. Carefully flip the LCD panel back up into position and secure with the screws you removed earlier. Don’t forget to reinsert the small screw that holds the inverter in place. Reattach the LCD bezel, it should snap back together with light pressure.

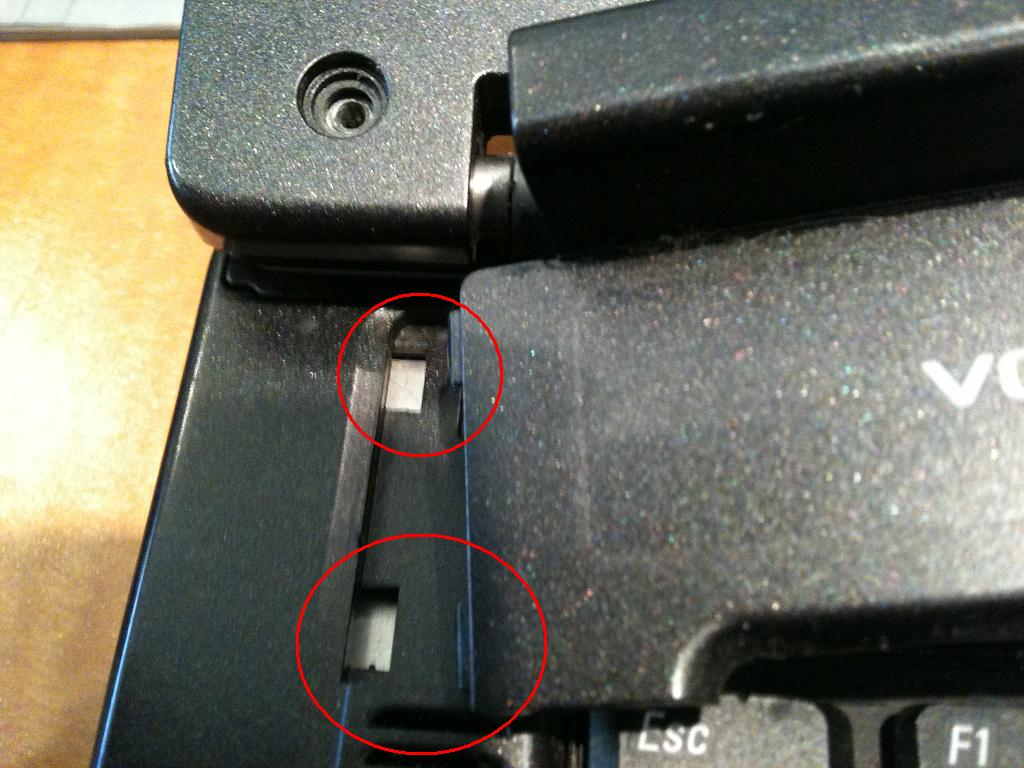
    When reattaching the bezel with the power button, insert the left-hand side first. There are two tabs that must be inserted under the slots (shown circled in red).

    Replace the screws on the LCD bezel front. Add a small amount of double-sided tape if necessary to the rubber bumpers to secure them back in place.

    Reinsert the battery and power on the laptop. If everything worked out, you should have a working backlight again. If the problem persists you may have purchased a bum backlight inverter or the CFL might have actually died, in which case maybe it’s time to break down and buy a CFL & backlight kit. or just get a new laptop.

  • Unattended ACPI Shutdown of Windows VMs

    As part of a backup script I have some VirtualBox machines shutdown gracefully using the VBoxManage command:

    VBoxManage controlvm "$VM_NAME" acpipowerbutton

    This command emulates pressing (not holding) the power button on a modern computer. A compliant operating system should see the event and trigger a shutdown or other response.
    For ACPI shutdown events to work properly with Windows VMs that share resources to remote users, changes must be made to allow shutting down when a user is not logged in locally to the computer. Two methods can be used to enable the feature, both of which are discussed below. You may need to reboot your guest OS after making the changes before they will work.

    Method 1: Group Policy Editor

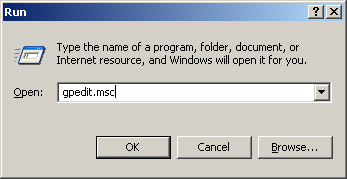
    Open the Run dialog (Windows key + r), type in “gpedit.msc” and click “OK” to open the Group Policy Editor.

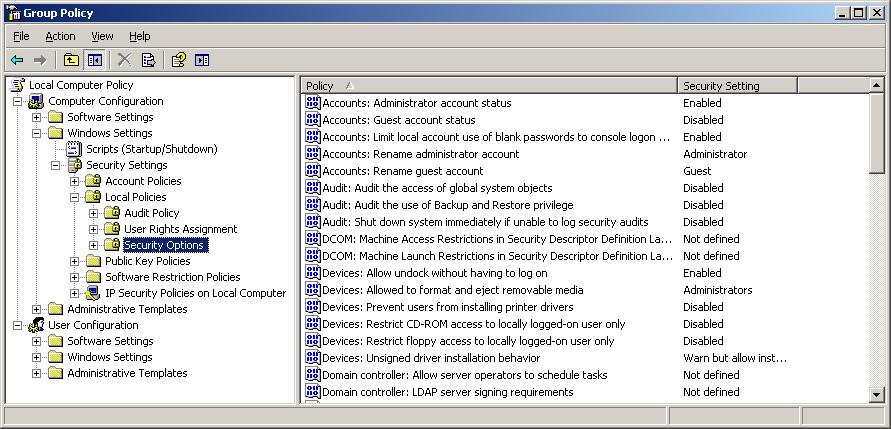
    Once in the Group Policy Editor expand “Computer Configuration“, then “Windows Settings“, then “Security Settings“, then “Local Policies” and click on “Security Options” as shown below

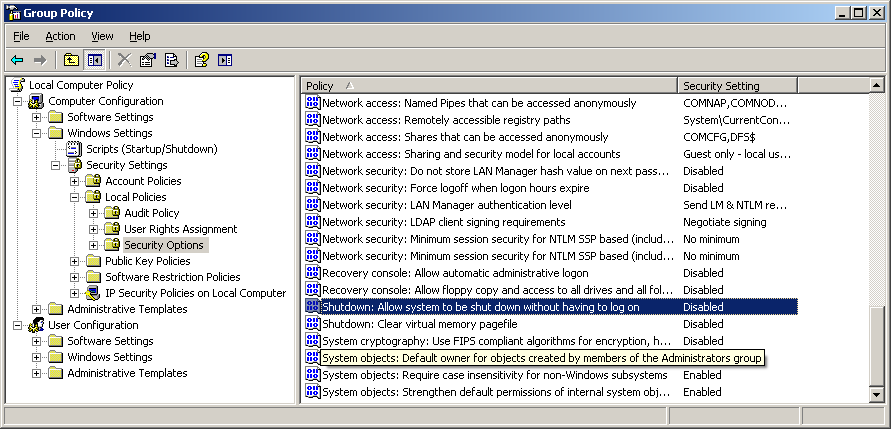
    Scroll down the list in the right pane and find “Shutdown: Allow system to be shut down without having to log on“. In server versions of Windows this option will be “Disabled” by default.

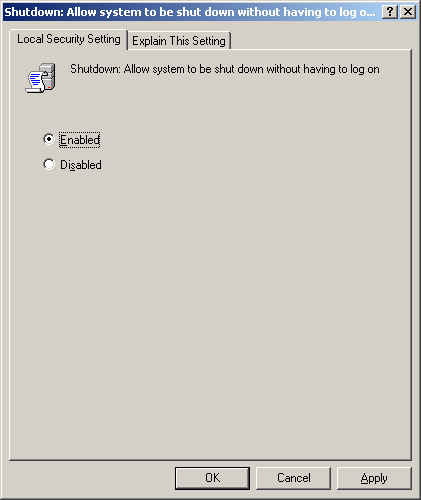
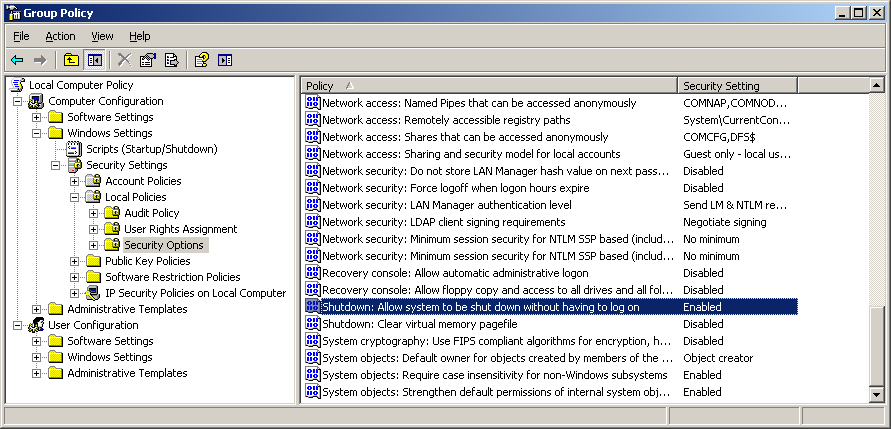
    Double click on “Shutdown: Allow system to be shut down without having to log on” and select “Enabled“. Click Apply and OK to save the changes.

    That’s it, this feature is now enabled.

    Method 2: Registry Editor

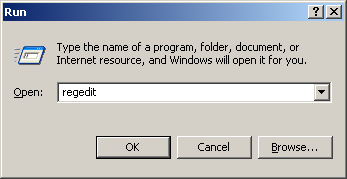
    Open the Run dialog (Windows key + r), type in “regedit” and click “OK” to open the Registry Editor.

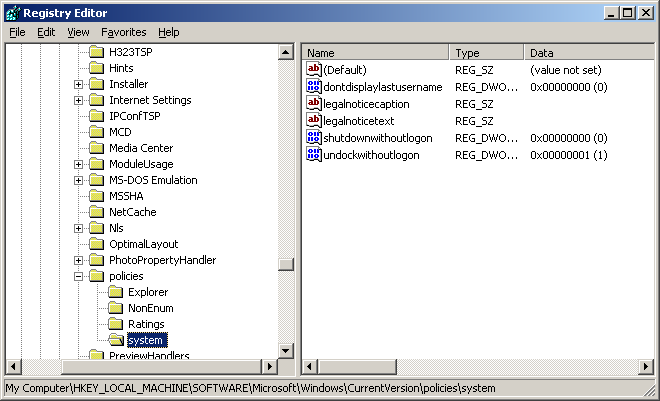
    In the left window pane expand “My Computer” to find “HKEY_LOCAL_MACHINE“, then “SOFTWARE“, then “Microsoft” then “Windows“, then “CurrentVersion“, then “policies“, then “system” as shown below

    HKEY_LOCAL_MACHINE\SOFTWARE\Microsoft\Windows\CurrentVersion\policies\system

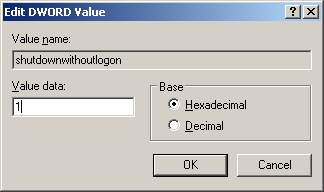
    In the right pane double click on “shutdownwithoutlogon” and change the value to “1“. Since the value is less than 10 is doesn’t matter if Hexadecimal or Decimal is selected. Click “OK” to save.

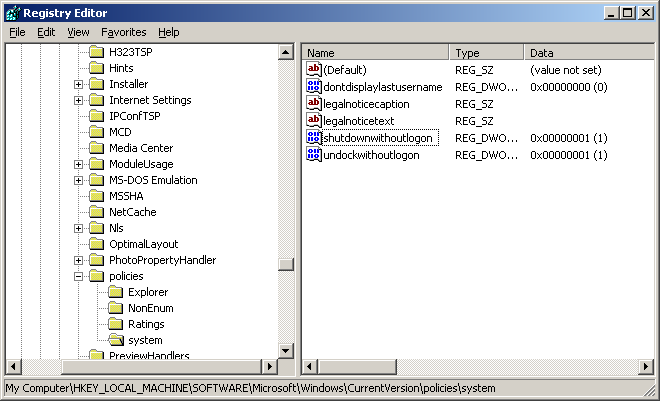
    The value next to “shutdownwithoutlogon” should now show the value of “0x00000001 (1)” as shown below.

    Power button in Power Options

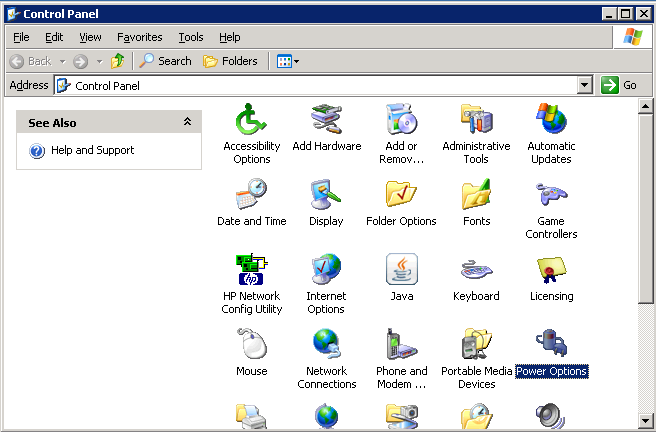
    Make sure that the power button is configured correctly in “Power Options“. Open the Control Panel and double click on the “Power Options” icon.

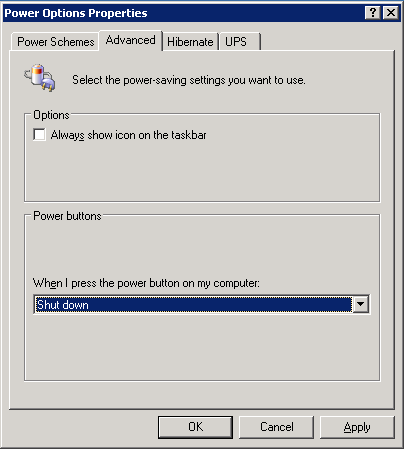
    Click on the “Advanced” tab. In the “Power buttons” section the value under “When I press the power button on my computer:” should be set to “Shut down” as shown below.

    Disable Shutdown Warning

    Windows warns you when you are about to shutdown and take away resources from that appear to be in use. On a server there is a pretty good chance that resources will be in use when it comes time to shutdown. The confirmation dialog box is not conducive to scripting because manual intervention is required.

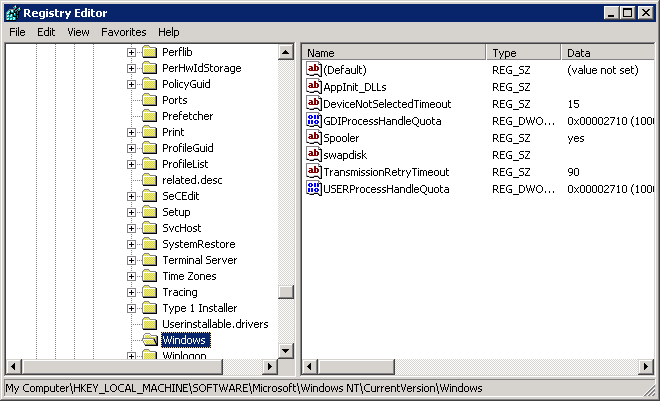
    Although this warning message can’t be removed completely it can be configured to wait only momentarily before automatically selecting the affirmative option and proceeding with the shutdown. To set a timeout, open the Registry Editor (as described earlier) and navigate to

    HKEY_LOCAL_MACHINE\SOFTWARE\Microsoft\Windows NT\CurrentVersion\Windows

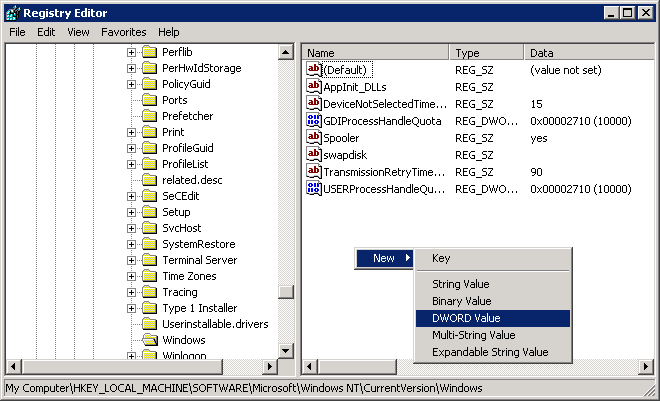
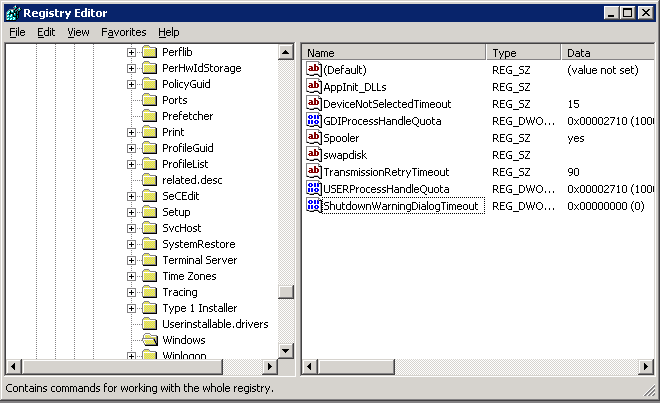
    Right click in the free space in the right-hand window pane and choose “New” then choose “DWORD Value

    Replace “New Value #1” with ShutdownWarningDialogTimeout. It should look like below if you’ve done it correctly.

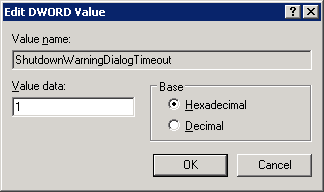
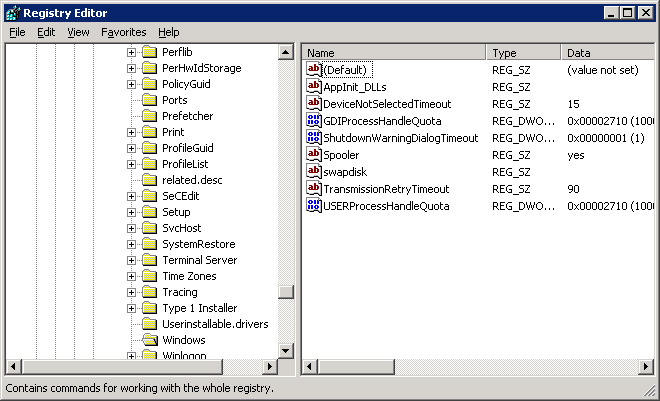
    Now double click on “ShutdownWarningDialogTimeout” to change it’s value. This value is the amount of time to display the warning message before continuing with the shutdown. I’ve set the value to “1“, but it might be wise to set it high enough so that if an actual person was orchestrating the shutdown the notice could serve it’s purpose and alert the operator that they might want to re-think their plan.

    If everything worked it should look similar to the image below

    For your convenience

    Although these steps are pretty quick to implement, they can be annoying to implement on each of your virtualized servers. For your convenience I’ve included a a registry file which can be merged into your existing hive to implement the settings to allow both shutdown while logged off and automatic dismissal of the shutdown warning notice of connected users.

    ACPI_Friendly_Shutdown.reg

    To add the settings to the registry double click the registry file. Windows will prompt you to confirm you wish to merge the changes.

    If everything imported OK, Windows will let you know

    If that doesn’t work…

    There may be cases where the above changes are not enough. It is possible to configure Windows to select the default answer from a MessageBox dialog without displaying it. You should use this option as a last result as it may will have unintended consiquences. For more information see the Microsoft article at:
    http://msdn.microsoft.com/en-us/library/ms940850%28v=winembedded.5%29.aspx

    To enable this feature, open the registry editor (as described previously) and navigate to:

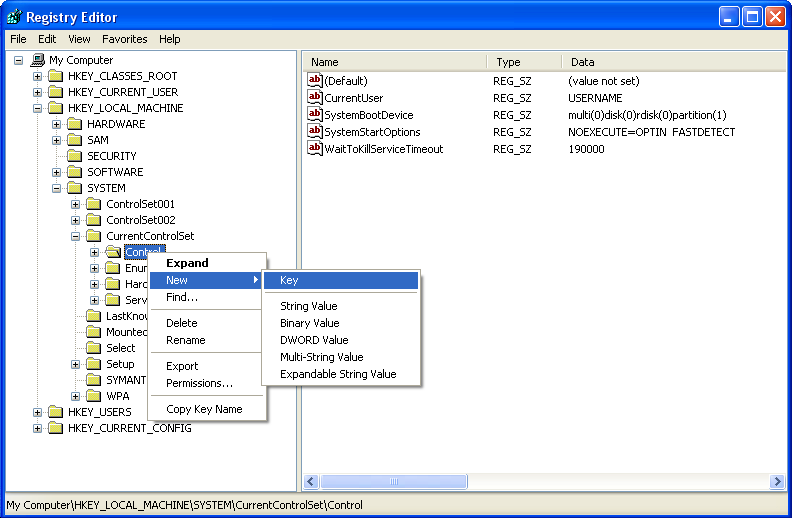
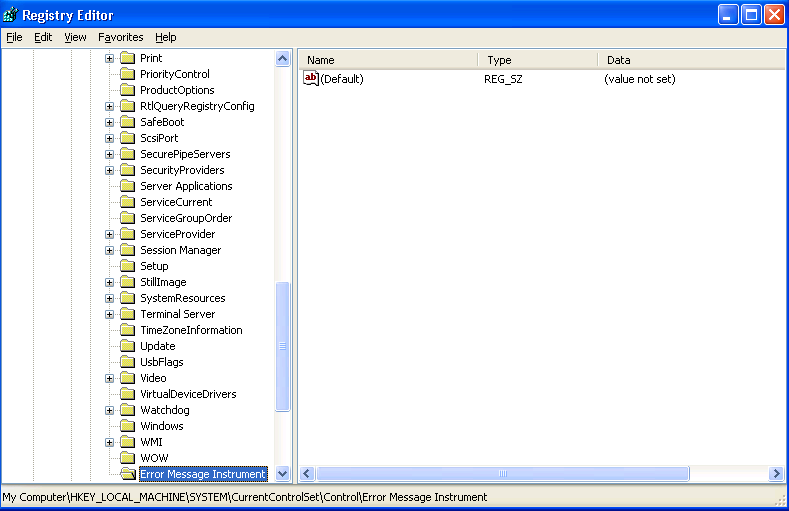
    HKEY_LOCAL_MACHINE\SYSTEM\CurrenctControlSet\Control

    Right-click on “Control” and choose “New” followed by “Key

    The words “New Key #1” will be highlighted, begin typing to overwrite the default value with “Error Message Instrument

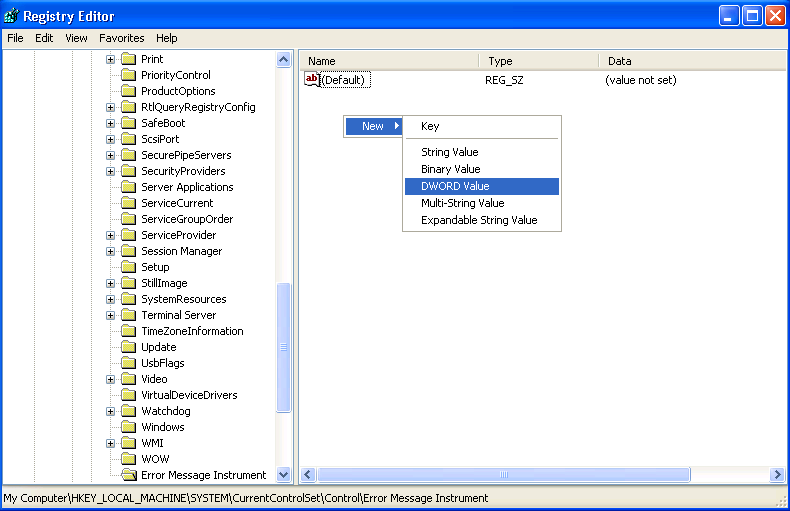
    In the empty space on the right-side pane, right-click and choose “New“, followed by “DWORD Value

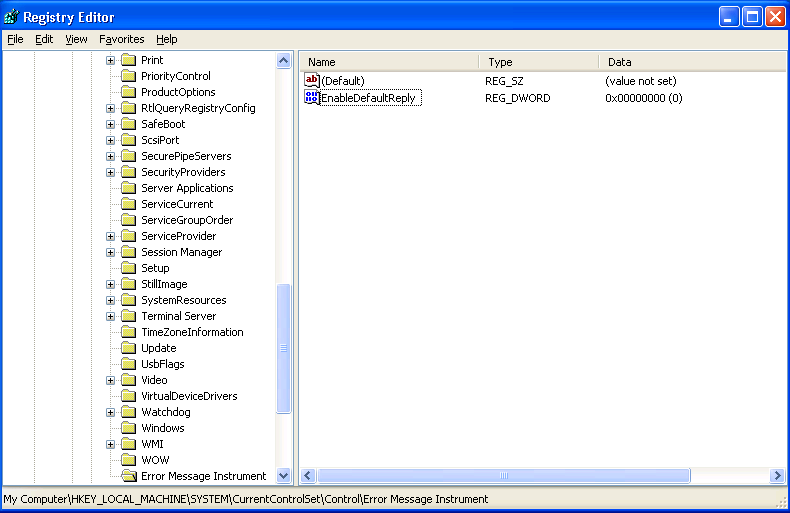
    Set the name to “EnableDefaultReply”

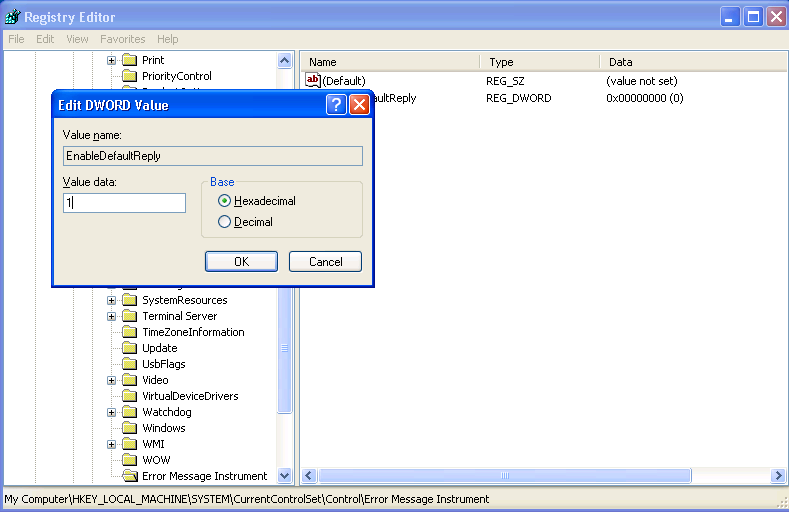
    Double-click on “EnableDefaultReply” to set the value. Type the value “1” into the “Value data” field and click “OK

  • Bash Snippet: Trim Function

    Bash Snippet: Trim Function

    Occasionally I find myself wanting to removing leading and/or trailing occurrences of a character or string from a larger string in bash. A couple common uses are removing quotes, or stripping an unknown number of spaces leading into the data of interest. This can be done pretty easily with other methods such as awk or sed, but with the disadvantage of requiring external commands. This a pure bash implementation using only shell built-ins. It might be better to rewrite this with $BASH_REMATCH, but this is what I currently have.


    #!/bin/bash

    trim () {
        str="$1"
        match="$2"
        # trim spaces by default
        if [ -z "$match" ]; then
            match=" "
        fi
        # trim leading
        while [ "${str:0:${#match}}" == "$match" ];
        do
            str="${str:${#match}:${#str}}"
        done
        # trim tailing
        while [ "${str:$((${#str}-${#match}))}" == "$match" ];
        do
            str="${str:0:$((${#str} - ${#match}))}"
        done
        echo "$str"
    }

    #Remove leading and trailing spaces
    example="    Hello     "
    echo "`trim  "$example" " "`"

    #The second parameter is optional when removing spaces
    example="    Hello     "
    echo "`trim  "$example"`"


    #Remove leading and trailing occurences of "word"
    example="wordHelloword"
    echo "`trim  "$example" "word"`"
  • Zombie Process: Killing the Undead

    Is your Ubuntu MOTD warning you of a zombie process?

    Welcome to Ubuntu 11.10 (GNU/Linux 3.0.0-20-server x86_64)

    * Documentation: https://help.ubuntu.com/11.10/serverguide/C

    System information as of Thu Jun 28 18:36:57 EDT 2012

    System load: 0.0 Processes: 94
    Usage of /: 68.2% of 1.79TB Users logged in: 1
    Memory usage: 29% IP address for eth0: 10.0.0.10
    Swap usage: 8%

    => There is 1 zombie process.

    What’s the scoop with that last line “There is 1 zombie process“, is my operating system getting caught up in this current climate of zombie infatuation? Well no, sadly it’s more boring than that. A zombie process occurs when a child process ends, but the parent doesn’t “reap” it. For a much better run down on what a zombie process is check out the Wikipedia article: Zombie process.

    Here is a quick run down on some terminology. A process is just a fancy name for a running instance of a program. A child process (or just “child”) is a process started by another process. A process that starts another process is the “parent process” of the process it starts.

    The ‘ps’ command shows processes we are running.

    user@host:~$ ps
    PID TTY TIME CMD
    5828 pts/4 00:00:00 bash
    6122 pts/4 00:00:00 ps

    The ‘pstree’ command can show a family tree (of sorts) for processes, parents, their children, the children of their children, etc. Our shell is bash, and as we can see in the output from ‘ps’ above, the process ID number (pid) of our bash prompt is 5828.

    user@host:~$ pstree -Gpl 5828
    bash(5828)───pstree(6123)

    Here we can see that bash is the parent process of the pstree command itself when we run it from the bash prompt. The pstree command exits shortly after it displays this information, and bash will go back to being childless. If we run another instance of bash from inside of the current bash prompt, the new bash instance will be a child of the first.

    user@host:~$ bash
    user@host:~$ pstree -Gpl 5828
    bash(5828)───bash(6124)───pstree(6389)

    So you can see our original bash process with the pid number 5828 has begotten our new child bash process of 6124. The new bash process is where we are running the ‘pstree’ command from, so pstree is a child of 6124.

    For an interesting look at your systems family tree, try running ‘pstree -Gpl 1‘.

    Hopefully you have a good handle on the whole parent/child thing. Now we’ll go zombie hunting. The system has told us that there is a zombie, but we know nothing about it. The ps command has options that will print the status of a process in a column of its output.

    root@host:~# ps aux |grep Z
    USER       PID %CPU %MEM    VSZ   RSS TTY      STAT START   TIME COMMAND
    root      2925  0.0  0.0   9256   880 pts/2    S+   18:40   0:00 grep Z
    root     28766  0.0  0.0      0     0     ?    Z    Jun06   0:00 [apt] <defunct

    Here we’ve used the ‘grep’ command to search for a pattern “Z”. Because there is a “Z” in the “VSZ” column header we can also see the ‘ps’ header we were talking about. Over in the “STAT” column we can see that something called “[apt]” has the mark of the zombie (Z).

    At this point you might be thinking about using the ‘kill’ command to kill this zombie dead. The problem with killing a zombie is that by definition they are already dead. Unlike motion pictures, the way to kill a Linux zombie isn’t by shooting it in its head, but by killing its parent (maybe we should call them vampires instead?).

    Kill and kill -9 are futile at killing zombies.

    root@host:~# kill 28766
    root@host:~# ps aux |grep Z
    USER       PID %CPU %MEM    VSZ   RSS TTY      STAT START   TIME COMMAND
    root      2925  0.0  0.0   9256   880 pts/2    S+   18:40   0:00 grep Z
    root     28766  0.0  0.0      0     0     ?    Z    Jun06   0:00 [apt] <defunct
    root@host:~# kill -9 28766
    root@host:~# ps aux |grep Z
    USER       PID %CPU %MEM    VSZ   RSS TTY      STAT START   TIME COMMAND
    root      2925  0.0  0.0   9256   880 pts/2    S+   18:40   0:00 grep Z
    root     28766  0.0  0.0      0     0     ?    Z    Jun06   0:00 [apt] <defunct

    So what gives? The ‘kill’ command is for killing processes, so what good is it if we can’t kill these processes? Zombie processes have ended, they are no more. Ghosts might be a more fitting term, traces of them exist in the system, but they are no longer functioning, they are waiting to gasp their last breath of exit code to their parent and have their memory wiped from the face of the system. The problem is the parent isn’t cooperating. It’s conceivable that this ignorance of its child’s death is intentional, but it is rare for a zombie condition to persists by design. If you see a zombie process and it doesn’t clear itself up in a moment, there is a good chance you’ll need to take matters into your own hands.. or you know, just ignore it.

    Using pstree we can find child pids if we know the parent, but how can we find the parent pid number from a child pid?

    Finding your own parent PID is easy in bash, it’s stored in the PPID variable.

    user@host:~$ echo $PPID
    5828

    What about finding the parent of an arbitrary process ID? If you have the proc file system (you probably do), you can see lots of information about a given process including the parent pid by looking at the ‘stat’ file for that pid.

    root@host:~# cat /proc/6124/stat
    6124 (bash) S 5828 6124 5828 34820 6398 4202496 1166 3867 0 0 4 0 0 1 20 0 1 0 7883109 25640960 617 18446744073709551615 4194304 5111244 140736553088608 140736553087152 140358224629054 0 65536 3686404 1266761467 18446744071579277349 0 0 17 0 0 0 0 0 0

    The 4th value in the ‘stat’ file is ppid, or the “parent pid” of the process.

    The ‘stat’ file for any pid in a procfs enabled system can be found in /proc/[pid]/stat, where [pid] is replaced with the pid number you are interested in. For a description of the ‘stat’ file format search for ‘/proc/[pid]/stat’ at the URL below:
    http://www.kernel.org/doc/man-pages/online/pages/man5/proc.5.html

    To see just the pid number and ignore the other information we’re not currently interested in we can use the ‘awk’ command to select only the 4th field.

    root@host:~# awk ‘{print $4}’ /proc/6124/stat
    5828

    Armed with the information above, I’ve created a quick little zombie hunting script for use in the cron scheduler, or command line. The script first tries to alert the parent process to reap its child using the SIGCHLD signal. When SIGCHLD fails SIGKILL is used next.

    Zombie Hunter

    #!/bin/bash
    zombies=(`ps ax |awk ‘{print $3" "$1}’ |grep -e ^‘Z ‘ |sed ‘s/Z //1’`)
    for zombie in ${zombies[@]}
    do
        echo "Found a zombie process "`awk ‘{print $2}’ /proc/$zombie/stat`" [pid:$zombie]"
        parent="`awk ‘{print $4}’ /proc/$zombie/stat`"
        echo "Asking parent process "`awk ‘{print $2}’ /proc/$parent/stat`" [pid:$parent] to come quietly…"
        kill -SIGCHLD $parent
        sleep 10 # This seems awfully patient
        if [ -f /proc/$parent/stat ]; then
            echo "Asking not so nicely"
            kill -9 $parent
        fi
        sleep 1
        if ! [ -f /proc/$zombie/stat ]; then
            echo "Zombie vanquished"
        fi
    done
    root@host:~# ./zombie-hunter
    Found a zombie process (apt) [pid:28766]
    Asking parent process (run-parts) [pid:28763] to come quietly…
    Asking not so nicely
    Zombie vanquished