Author: admin

  • Install Asterisk 1.8 from source on Ubuntu 11.10

    Install Asterisk 1.8 from source on Ubuntu 11.10

    After a fresh install of Ubuntu 11.10 I needed to install asterisk again, so I figured I’d make some notes for the next time I have to do it.

    I’m using Asterisk 1.8 rather than the latest bleeding edge because 1.8 has long term support until 2015-10-21 where as the 10.x branch is end of life 2013-10-12. I have too many other things to do these days than reconfigure asterisk, figure out which of my third party add-ons work, etc every time there is an update.

    Since this is a new install, I’m updating the package list and all my files that might be out of date

    apt-get update
    apt-get upgrade

    Make sure kernel headers are installed

    apt-get install linux-headers-`uname -r`

    Grab a bunch of packages for building asterisk, dependencies, compilers, etc

    apt-get install build-essential # Compiler
    apt-get install libxml2-dev # Required
    apt-get install libncurses5-dev libreadline-dev libreadline6-dev  # Termcap stuff
    apt-get install libiksemel-dev # For Google Talk support
    apt-get install libvorbis-dev  # For Ogg Vorbis format support
    apt-get install libssl-dev # Needed for SIP
    apt-get install libspeex-dev libspeexdsp-dev  # For speex codec
    apt-get install mpg123 libmpg123-0 sox openssl wget subversion openssh-server # Odds and ends

    Switch into /usr/src directory as a place to build the source from

    cd /usr/src

    Downloaded and untar DAHDI. I don’t have any Digium hardware in this computer, but I wanted the DAHDI pseudo timing source for MeetMe conferences.

    wget http://downloads.asterisk.org/pub/telephony/dahdi-linux/releases/dahdi-linux-2.6.0.tar.gz
    tar -zxvf dahdi-linux-2.6.0.tar.gz

    Move into the build directory, compile and install DAHDI

    cd dahdi-linux-2.6.0/
    make
    make install
    cd ..

    Download and untar Asterisk

    wget http://downloads.asterisk.org/pub/telephony/asterisk/releases/asterisk-1.8.10.1.tar.gz
    tar -zxvf asterisk-1.8.10.1.tar.gz

    Move into the build directory

    cd asterisk-1.8.10.1/

    Add mp3 support

    ./contrib/scripts/get_mp3_source.sh

    Run the configure script

    ./configure

    If everything works out, you should get the ascii art Asterisk logo

                   .$$$$$$$$$$$$$$$=..      
                .$7$7..          .7$$7:.    
              .$$:.                 ,$7.7  
            .$7.     7$$$$           .$$77  
         ..$$.       $$$$$            .$$$7
        ..7$   .?.   $$$$$   .?.       7$$$.
       $.$.   .$$$7. $$$$7 .7$$$.      .$$$.
     .777.   .$$$$$$77$$$77$$$$$7.      $$$,
     $$$~      .7$$$$$$$$$$$$$7.       .$$$.
    .$$7          .7$$$$$$$7:          ?$$$.
    $$$          ?7$$$$$$$$$$I        .$$$7
    $$$       .7$$$$$$$$$$$$$$$$      :$$$.
    $$$       $$$$$$7$$$$$$$$$$$$    .$$$.  
    $$$        $$$   7$$$7  .$$$    .$$$.  
    $$$$             $$$$7         .$$$.    
    7$$$7            7$$$$        7$$$      
     $$$$$                        $$$      
      $$$$7.                       $$  (TM)    
       $$$$$$$.           .7$$$$$$  $$      
         $$$$$$$$$$$$7$$$$$$$$$.$$$$$$      
           $$$$$$$$$$$$$$$$.

    Optionally choose asterisk components to be installed

    make menuconfig

    Build the binaries

    make

    Copy the files to the right places

    make install

    Optionally copy the sample configs into /etc/asterisk

    make samples

    Copy the init startup scripts to make asterisk start on boot

    make config

    And you’re done.

  • Access an APC AP5456 IP Gateway for Analog KVM in Linux

    Access an APC AP5456 IP Gateway for Analog KVM in Linux

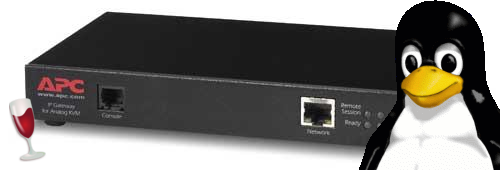
    I recently wrote about running an ActiveX component without Internet Explorer. I used that technique to come up with a shell script front-end for downloading, unpacking and running an executable in Wine for accessing an APC IP KVM (model AP5456). Here is the results of that effort.

    At a minimum the script requires Wine and curl, but to do everything without manually downloading and extracting the cabinet file yourself, you’ll also need cabextract. Some less exotic stuff from coreutils: basename and dirname are needed, but you probably have those already.

    You can download the script here.

    #!/bin/bash

    # A script to access an APC brand model AP5456 IP Gateway for Analog KVM
    # In Linux, using Wine

    USERNAME="apc"
    PASSWORD=""
    KVM_SERVER=""

    VIEWER_PATH=""

    while [ -z "$KVM_SERVER" ]
    do
        echo -n "FQDN of KVM Server (not including https://): "
        read KVM_SERVER
    done

    while [ -z "$USERNAME" ]
    do
            echo -n "Username: "
            read USERNAME
    done

    while [ -z "$PASSWORD" ]
    do
            echo -n "Password: "
            tput invis
            read PASSWORD
            tput sgr0
    done

    get_cab_name () {
        while read line
        do
            if [ "${line/’OBJECT CODEBASE’/}" != "$line" ]; then
                cab_name="${line##*'<OBJECT CODEBASE="’}"
                cab_name="${cab_name%%’"’*}"
                echo "$cab_name"
            fi
        done
    }

    get_cmd_args () {
        while read line
        do
            if [ "${line/PARAM/}" != "$line" ]; then
                ipaddr="${line##*'<PARAM NAME="ipaddr" VALUE="’}"
                ipaddr="${ipaddr%%’"’*}"

                sessionkey="${line##*'<PARAM NAME="sessionkey" VALUE="’}"
                sessionkey="${sessionkey%%’"’*}"

                encryptionkey="${line##*'<PARAM NAME="encryptionkey" VALUE="’}"
                encryptionkey="${encryptionkey%%’"’*}"
            fi
        done
        if [ -n "$sessionkey" ] && [ -n "$encryptionkey" ] && [ -n "$ipaddr" ]; then
            echo "-k $sessionkey -e $encryptionkey $ipaddr"
        fi

    }

    wine="`which wine`"
    if [ -z "$wine" ]; then
        echo "Wine was not found, but is required.  Can not continue without it." >&2
        exit 1
    fi

    cd "`dirname $0`"
    #If a path to vpclient.exe wasn’t specified, and we can’t find it, use /tmp
    #as a place to download it to
    if [ -z "$VIEWER_PATH" ] && ! [ -f "vpclient.exe" ]; then
        mkdir -p "/tmp/vpclient"
        VIEWER_PATH="/tmp/vpclient"
    fi

    #If a full path wasn’t specified, prepend current working directory
    if [ "${VIEWER_PATH:0:1}" != "/" ]; then
        VIEWER_PATH="`pwd`/$VIEWER_PATH"
    fi

    if ! [ -f "$VIEWER_PATH/vpclient.exe" ]; then

        cab_url="`curl -s –insecure –user "$USERNAME:$PASSWORD" "https://$KVM_SERVER/launch.asp" |get_cab_name`"
        cab_url="https://$KVM_SERVER/$cab_url"

        cabextract="`which cabextract`"
        if [ -z "$cabextract" ]; then
            echo "vpclient.exe was not found in $VIEWER_PATH" >&2
            echo "cabextract was not found either, so we can’t download">&2
            echo -e "and extract vpclient.exe from it’s CAB archive.\n" >&2
            echo "Error: user intervention required." >&2
            echo "———————————-" >&2
            echo "Download $cab_url" >&2
            echo "Unpack `basename $cab_url` into $VIEWER_PATH" >&2
            echo " — OR — " >&2
            echo "Install cabextract" >&2
            exit 1
        fi

        if ! [ -d "$VIEWER_PATH" ]; then
            echo "WARNING: Viewer Path specified is not valid." >&2
            echo "Path: $VIEWER_PATH" >&2
            echo -e "——————————————-\n" >&2
            echo -n "Would you like me to create it? (y/N)?" >&2
            read answer
            shopt -s nocasematch
            if [ "$answer" = "y" ]; then
                mkdir -p "$VIEWER_PATH"
                if ! [ -d "$VIEWER_PATH" ]; then
                    echo "Couldn’t create: $VIEWER_PATH" >&2
                    exit 1
                fi
            else
                exit
            fi
            shopt -u nocasematch
           
        fi

        cd "$VIEWER_PATH"
            curl -s –insecure –user "$USERNAME:$PASSWORD" "$cab_url" >"`basename $cab_url`"
            $cabextract -q "`basename $cab_url`" 2>/dev/null
    fi


    cmd_args="`curl -s –insecure –user "$USERNAME:$PASSWORD" "https://$KVM_SERVER/launch.asp" |get_cmd_args`"

    cd "$VIEWER_PATH"

    #Sanity check
    if [ -f "./vpclient.exe" ]; then
        $wine "./vpclient.exe" $cmd_args
    else
        echo "Failed, do it yourself: $wine vpclient.exe $cmd_args"
    fi
  • De-ActiveX-ifying an ActiveX Component

    Some ActiveX components add “enhancement” to the browser by dropping in custom controls for forms or other fanciness. Those types of components require the browser, because they augment the user’s experience within the browser. Other ActiveX components are little more than a standalone executable that can get it’s command line arguments from the web page that serves it. This article is about my experience separating out such an executable from it’s ActiveX constructs and using it without Internet Explorer.

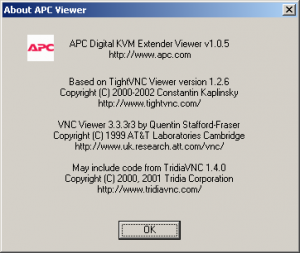
    I have an old APC AP5456 IP Gateway for Analog KVM, it’s a neat little device other than it’s insistence that I use Internet Explorer. It uses an ActiveX component to view the remote consoles. It’s based on VNC, and has some encryption of the RFB data added in. The device listens on port 80 (http) and 5900 (VNC). If I had any doubt after seeing the port number, it was cleared up in the “About…” dialog.

    Unfortunately, I couldn’t just use a regular VNC client to connect. The authentication process has been removed from the VNC-side of things and moved to the web page. When you authenticate to the web page of the IP KVM, it gives the ActiveX component an authentication token which is used to view the console of the computer it’s connected to.

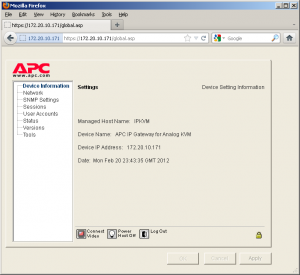
    When you first login using a web browser you’re shown several options. The one we’re interested in is “Connect Video”

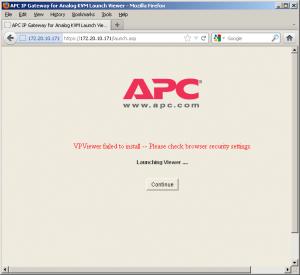
    After clicking “Connect Video” we’re taken to another screen where the ActiveX component should normally be launched. I’m using Firefox in this screenshot so it fails. Most browsers other than Internet Explorer have no idea what to do with ActiveX (and rightfully so).

    This page will meta refresh back to the previous page, so quickly select the option to view the source (Control+u in Firefox).

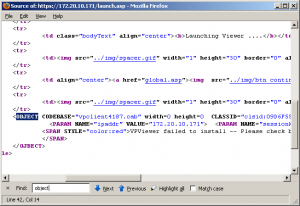
    I searched the page for the <OBJECT> tag that normally holds the ActiveX details. Here is the relevant portion.

    <OBJECT CODEBASE="vpclient4187.cab" width=0 height=0  CLASSID="clsid:09D6F55E-F235-4187-9C60-1D09CFD9FAFF">
      <PARAM NAME="ipaddr" VALUE="172.20.10.171">
      <PARAM NAME="sessionkey" VALUE="0688565E0688565EFA72032A87995D28" >
      <PARAM NAME="encryptionkey" VALUE="68F0585E68F0585E6BBA4AE3E6EF95FA">
    </OJBECT>

    The first thing to notice is the vpclient4187.cab cabinet file. Unpacking the cab file gives us AvocentHTTP.dll, vpfilexfer.dll, launchEXE.dll, vpclient.inf, vpclient.exe, and vpclient.dll. Awesome! It’s probably just that vpclient.exe I need to run right?

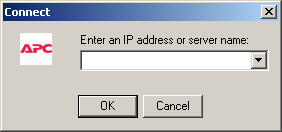
    Well, no, unfortunately typing in the IP address of our IP KVM appliance into the dialog doesn’t result in a connection. We need that authentication token and encryption key to be included in the picture. It still seems very likely that vpclient.exe is what we want, but there’s more configuration that it clearly needs. Since there are no other settings in the dialog of vpclient.exe to adjust, we’ll optimistic assume those missing requirements are passed to it by the command line. The information could be passed to it by Windows messages, after all it’s not the first thing that gets called from the web browser. Looking at the contents of the INF file shows that launchEXE.dll matches the CLASSID of our object codebase. That dll probably gets all the details and hands it off to vpclient.exe. Before we freak out, lets try to keep it simple.

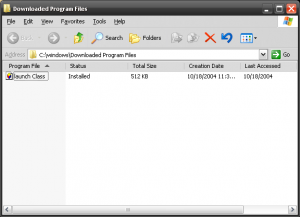
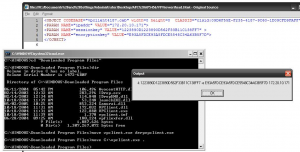
    I wrote a little program to display a message box with the contents of any command line arguments it receives. From a Windows XP computer with Internet Explorer I connect to the IP KVM as normal, and then close the KVM application and Internet Explorer. This causes the ActiveX object to get downloaded and cached. Cached in %WINDIR%\Downloaded Program Files to be specific. I replaced the vpclient.exe with my own application (keeping the name the same). You will need to do this from the command line however, as Windows treats the %WINDIR%\Downloaded Program Files directory in a special way, which blocks you from seeing the actual files contained in it.

    When I reopen Internet Explorer and attempt to connect with the IP KVM again, I see that my speculation was correct.

    The Session Key and the Encryption Key change frequently, and require the vpclient.exe connection to come from the same IP address that authenticated to the web browser, but if we act quickly we can start a session using the information available in view source as command line arguments to vpclient.exe.

    C:\Documents and Settings\Administrator\Desktop>vpclient.exe -k [Session Key] -e [Encryption Key]  [IP Address]

    Of course the reasonable thing to do at this point is to make a front-end client to connect to the IP KVM web page, parse out the required content, and launch vpclient.exe with our argument. I’ll leave that up to you, but if you’re interested in doing it under Linux I’ve got you covered.

  • Make a Program Run as a Windows Service on Boot

    Components that run automatically with Windows on boot up often establish themselves as a system service. Other options are to add programs into the registry in places like HKCU\Software\Microsoft\Windows\CurrentVersion\Run and HKLM\Software\Microsoft\Windows\CurrentVersion\Run, or into the “All Users” Startup group folder (C:\Documents and Settings\All Users\Start Menu\Programs\Startup, C:\Users\All Users\Start Menu\Programs\Startup). There are pros and cons to each method, for example Startup group items will not begin until a user has logged on to the system.

    To register a program as a service you can use the SC.EXE command which should be part of your Windows operating system.

    Microsoft Windows XP [Version 5.1.2600]
    (C) Copyright 1985-2001 Microsoft Corp.

    C:\user>sc create MyProgramName binpath= "C:\MyFolder\MyProgram.exe" type= own start= auto DisplayName= "My Sample Program"
    [SC] CreateService SUCCESS

    Sometimes programs require running interactively with the Desktop, you can modify your service in the Services control panel applet, (or with SC) to reflect that. To specify via SC that a program should run interactively add “type= interact” in the arguments (note, you can more than one “type=” statements at a time).

    The problem we quickly run into is that MyProgram.exe is not aware of how to behave like a service, so the Service Control Manager (SCM) will shut it down shortly after it starts. We can get around this by making a different program call MyProgram.exe in the binpath configuration.

    C:\user>sc config MyProgramName binpath= "cmd.exe /c C:\MyFolder\MyProgram.exe" type= own start= auto DisplayName= "My Sample Program"
    [SC] ChangeServiceConfig SUCCESS

    Notice two things here, first instead of saying “sc create” I said “sc config“, that is because we already had a service named “MyProgramName” from our previous attempt. The “config” argument edits an existing service, where as the “create” argument makes a new service from scratch. You can also delete an existing service with “sc delete” followed by the service name (i.e. MyProgramName). The second thing you should notice is that I’ve added “cmd.exe /c” to the binpath config.

    CMD.EXE is also not service-aware and so SCM will stop it shortly after it begins, however SCM will not kill the child program (MyProgram.exe), only it’s parent (cmd.exe). The problem with this approach is that SCM will still report the service as failing to start, and will reflect that status in the Services applet as well.

    The work around is to use SRVANY.EXE that comes with the Windows Resource Kit, it is a service-aware application that will play nice with SCM, and will start up our program in the process.

    You can download the Windows Resource Kit from:
    http://www.microsoft.com/download/en/details.aspx?displaylang=en&id=17657

    Once downloaded and ran, the Windows Resource Kit installs to
    Installs to:

    "%PROGRAMFILES%\Windows Resource Kits\Tools"

    Copy SRVANY.EXE to a different location. In the example above, the MyProgram.exe application was in the C:\MyFolder directory, you could copy SRVANY.EXE to that location as well.

    Delete any previous attempts at creating a service you might have made jumping ahead and not reading all of this article before starting

    C:\user>sc delete MyProgramName
    [SC] DeleteService SUCCESS

    Now recreate the service, by use SRVANY.EXE in the BinPath statement.

    C:\user>sc create MyProgramName binpath= "C:\MyFolder\SRVANY.EXE" type= own start= auto DisplayName= "My Sample Program"
    [SC] CreateService SUCCESS

    This will give us a service called “MyProgramName“, the name that displays in the Services control panel application will be “My Sample Program“, but the name we’d use with “net start” or “net stop” is MyProgramName. The problem is that
    this doesn’t have anything to do with MyProgram.exe, no where is MyProgram.exe actually being started.

    SRVANY.EXE looks at the name of the service it’s being ran as. In this way you can have multiple services configured to run SRVANY.EXE, and depending on the name of the service starting SRVANY, it will figure out what to do next. SRVANY gets its instructions by looking at the Windows registry. When you create a new service a registry key is made at HKLM\System\CurrentControlSet\Services with the name of your newly created service.

    So for this example the service named MyProgramName now has this registry entry:

    HKEY_LOCAL_MACHINE\SYSTEM\CurrentControlSet\Services\MyProgramName

    Open up regedit.exe, and go to HKEY_LOCAL_MACHINE\SYSTEM\CurrentControlSet\Services\MyProgramName
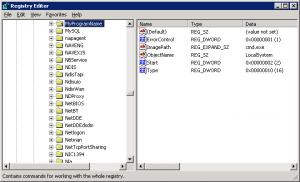
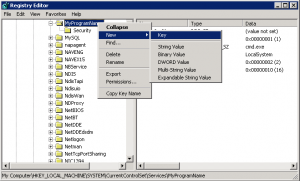
    Make a new registry key called “Parameters” by right-clicking on the MyProgramName key and choosing “New” -> “Key

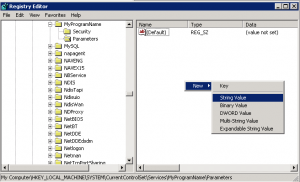
    Click on the newly created “Parameters” key
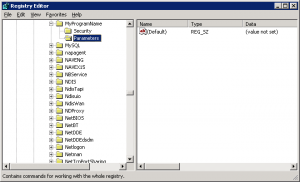
    In the empty space at the right, right-click and choose “New” -> “String Value

    Name the new string value “Application” and set the value to the program and command line arguments to run.
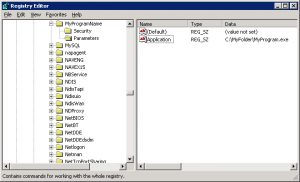
    SRVANY will look for the “Application” key and run it when SCM tells it to start up.

    If you are designing an application to run as a Windows service it needs to be service-aware in that it must speak and honor constructs of the Service Control Manager. The SCM is in charge of telling a service to start or stop, as well as determining if the service has started in a timely fashion or has crashed unexpectedly (and what to do in such a case). Unfortunately you may be using a third-party application as a service, or perhaps you’re just trying to be lazy, in which case I hope the above information has helped you out.