Category: System Administration

Keeping the machine moving

  • Access an APC AP5456 IP Gateway for Analog KVM in Linux

    Access an APC AP5456 IP Gateway for Analog KVM in Linux

    I recently wrote about running an ActiveX component without Internet Explorer. I used that technique to come up with a shell script front-end for downloading, unpacking and running an executable in Wine for accessing an APC IP KVM (model AP5456). Here is the results of that effort.

    At a minimum the script requires Wine and curl, but to do everything without manually downloading and extracting the cabinet file yourself, you’ll also need cabextract. Some less exotic stuff from coreutils: basename and dirname are needed, but you probably have those already.

    You can download the script here.

    #!/bin/bash

    # A script to access an APC brand model AP5456 IP Gateway for Analog KVM
    # In Linux, using Wine

    USERNAME="apc"
    PASSWORD=""
    KVM_SERVER=""

    VIEWER_PATH=""

    while [ -z "$KVM_SERVER" ]
    do
        echo -n "FQDN of KVM Server (not including https://): "
        read KVM_SERVER
    done

    while [ -z "$USERNAME" ]
    do
            echo -n "Username: "
            read USERNAME
    done

    while [ -z "$PASSWORD" ]
    do
            echo -n "Password: "
            tput invis
            read PASSWORD
            tput sgr0
    done

    get_cab_name () {
        while read line
        do
            if [ "${line/’OBJECT CODEBASE’/}" != "$line" ]; then
                cab_name="${line##*'<OBJECT CODEBASE="’}"
                cab_name="${cab_name%%’"’*}"
                echo "$cab_name"
            fi
        done
    }

    get_cmd_args () {
        while read line
        do
            if [ "${line/PARAM/}" != "$line" ]; then
                ipaddr="${line##*'<PARAM NAME="ipaddr" VALUE="’}"
                ipaddr="${ipaddr%%’"’*}"

                sessionkey="${line##*'<PARAM NAME="sessionkey" VALUE="’}"
                sessionkey="${sessionkey%%’"’*}"

                encryptionkey="${line##*'<PARAM NAME="encryptionkey" VALUE="’}"
                encryptionkey="${encryptionkey%%’"’*}"
            fi
        done
        if [ -n "$sessionkey" ] && [ -n "$encryptionkey" ] && [ -n "$ipaddr" ]; then
            echo "-k $sessionkey -e $encryptionkey $ipaddr"
        fi

    }

    wine="`which wine`"
    if [ -z "$wine" ]; then
        echo "Wine was not found, but is required.  Can not continue without it." >&2
        exit 1
    fi

    cd "`dirname $0`"
    #If a path to vpclient.exe wasn’t specified, and we can’t find it, use /tmp
    #as a place to download it to
    if [ -z "$VIEWER_PATH" ] && ! [ -f "vpclient.exe" ]; then
        mkdir -p "/tmp/vpclient"
        VIEWER_PATH="/tmp/vpclient"
    fi

    #If a full path wasn’t specified, prepend current working directory
    if [ "${VIEWER_PATH:0:1}" != "/" ]; then
        VIEWER_PATH="`pwd`/$VIEWER_PATH"
    fi

    if ! [ -f "$VIEWER_PATH/vpclient.exe" ]; then

        cab_url="`curl -s –insecure –user "$USERNAME:$PASSWORD" "https://$KVM_SERVER/launch.asp" |get_cab_name`"
        cab_url="https://$KVM_SERVER/$cab_url"

        cabextract="`which cabextract`"
        if [ -z "$cabextract" ]; then
            echo "vpclient.exe was not found in $VIEWER_PATH" >&2
            echo "cabextract was not found either, so we can’t download">&2
            echo -e "and extract vpclient.exe from it’s CAB archive.\n" >&2
            echo "Error: user intervention required." >&2
            echo "———————————-" >&2
            echo "Download $cab_url" >&2
            echo "Unpack `basename $cab_url` into $VIEWER_PATH" >&2
            echo " — OR — " >&2
            echo "Install cabextract" >&2
            exit 1
        fi

        if ! [ -d "$VIEWER_PATH" ]; then
            echo "WARNING: Viewer Path specified is not valid." >&2
            echo "Path: $VIEWER_PATH" >&2
            echo -e "——————————————-\n" >&2
            echo -n "Would you like me to create it? (y/N)?" >&2
            read answer
            shopt -s nocasematch
            if [ "$answer" = "y" ]; then
                mkdir -p "$VIEWER_PATH"
                if ! [ -d "$VIEWER_PATH" ]; then
                    echo "Couldn’t create: $VIEWER_PATH" >&2
                    exit 1
                fi
            else
                exit
            fi
            shopt -u nocasematch
           
        fi

        cd "$VIEWER_PATH"
            curl -s –insecure –user "$USERNAME:$PASSWORD" "$cab_url" >"`basename $cab_url`"
            $cabextract -q "`basename $cab_url`" 2>/dev/null
    fi


    cmd_args="`curl -s –insecure –user "$USERNAME:$PASSWORD" "https://$KVM_SERVER/launch.asp" |get_cmd_args`"

    cd "$VIEWER_PATH"

    #Sanity check
    if [ -f "./vpclient.exe" ]; then
        $wine "./vpclient.exe" $cmd_args
    else
        echo "Failed, do it yourself: $wine vpclient.exe $cmd_args"
    fi
  • Make a Program Run as a Windows Service on Boot

    Components that run automatically with Windows on boot up often establish themselves as a system service. Other options are to add programs into the registry in places like HKCU\Software\Microsoft\Windows\CurrentVersion\Run and HKLM\Software\Microsoft\Windows\CurrentVersion\Run, or into the “All Users” Startup group folder (C:\Documents and Settings\All Users\Start Menu\Programs\Startup, C:\Users\All Users\Start Menu\Programs\Startup). There are pros and cons to each method, for example Startup group items will not begin until a user has logged on to the system.

    To register a program as a service you can use the SC.EXE command which should be part of your Windows operating system.

    Microsoft Windows XP [Version 5.1.2600]
    (C) Copyright 1985-2001 Microsoft Corp.

    C:\user>sc create MyProgramName binpath= "C:\MyFolder\MyProgram.exe" type= own start= auto DisplayName= "My Sample Program"
    [SC] CreateService SUCCESS

    Sometimes programs require running interactively with the Desktop, you can modify your service in the Services control panel applet, (or with SC) to reflect that. To specify via SC that a program should run interactively add “type= interact” in the arguments (note, you can more than one “type=” statements at a time).

    The problem we quickly run into is that MyProgram.exe is not aware of how to behave like a service, so the Service Control Manager (SCM) will shut it down shortly after it starts. We can get around this by making a different program call MyProgram.exe in the binpath configuration.

    C:\user>sc config MyProgramName binpath= "cmd.exe /c C:\MyFolder\MyProgram.exe" type= own start= auto DisplayName= "My Sample Program"
    [SC] ChangeServiceConfig SUCCESS

    Notice two things here, first instead of saying “sc create” I said “sc config“, that is because we already had a service named “MyProgramName” from our previous attempt. The “config” argument edits an existing service, where as the “create” argument makes a new service from scratch. You can also delete an existing service with “sc delete” followed by the service name (i.e. MyProgramName). The second thing you should notice is that I’ve added “cmd.exe /c” to the binpath config.

    CMD.EXE is also not service-aware and so SCM will stop it shortly after it begins, however SCM will not kill the child program (MyProgram.exe), only it’s parent (cmd.exe). The problem with this approach is that SCM will still report the service as failing to start, and will reflect that status in the Services applet as well.

    The work around is to use SRVANY.EXE that comes with the Windows Resource Kit, it is a service-aware application that will play nice with SCM, and will start up our program in the process.

    You can download the Windows Resource Kit from:
    http://www.microsoft.com/download/en/details.aspx?displaylang=en&id=17657

    Once downloaded and ran, the Windows Resource Kit installs to
    Installs to:

    "%PROGRAMFILES%\Windows Resource Kits\Tools"

    Copy SRVANY.EXE to a different location. In the example above, the MyProgram.exe application was in the C:\MyFolder directory, you could copy SRVANY.EXE to that location as well.

    Delete any previous attempts at creating a service you might have made jumping ahead and not reading all of this article before starting

    C:\user>sc delete MyProgramName
    [SC] DeleteService SUCCESS

    Now recreate the service, by use SRVANY.EXE in the BinPath statement.

    C:\user>sc create MyProgramName binpath= "C:\MyFolder\SRVANY.EXE" type= own start= auto DisplayName= "My Sample Program"
    [SC] CreateService SUCCESS

    This will give us a service called “MyProgramName“, the name that displays in the Services control panel application will be “My Sample Program“, but the name we’d use with “net start” or “net stop” is MyProgramName. The problem is that
    this doesn’t have anything to do with MyProgram.exe, no where is MyProgram.exe actually being started.

    SRVANY.EXE looks at the name of the service it’s being ran as. In this way you can have multiple services configured to run SRVANY.EXE, and depending on the name of the service starting SRVANY, it will figure out what to do next. SRVANY gets its instructions by looking at the Windows registry. When you create a new service a registry key is made at HKLM\System\CurrentControlSet\Services with the name of your newly created service.

    So for this example the service named MyProgramName now has this registry entry:

    HKEY_LOCAL_MACHINE\SYSTEM\CurrentControlSet\Services\MyProgramName

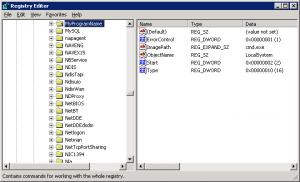
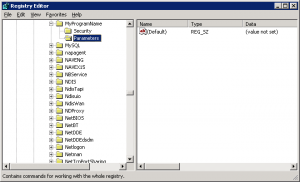
    Open up regedit.exe, and go to HKEY_LOCAL_MACHINE\SYSTEM\CurrentControlSet\Services\MyProgramName

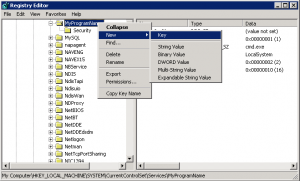
    Make a new registry key called “Parameters” by right-clicking on the MyProgramName key and choosing “New” -> “Key

    Click on the newly created “Parameters” key

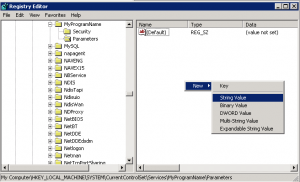
    In the empty space at the right, right-click and choose “New” -> “String Value

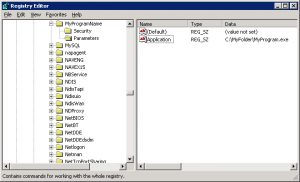
    Name the new string value “Application” and set the value to the program and command line arguments to run.

    SRVANY will look for the “Application” key and run it when SCM tells it to start up.

    If you are designing an application to run as a Windows service it needs to be service-aware in that it must speak and honor constructs of the Service Control Manager. The SCM is in charge of telling a service to start or stop, as well as determining if the service has started in a timely fashion or has crashed unexpectedly (and what to do in such a case). Unfortunately you may be using a third-party application as a service, or perhaps you’re just trying to be lazy, in which case I hope the above information has helped you out.

  • TLER and MD Arrays

    TLER is the Western Digital “feature” for making a hard drive give up trying to read/write before it normally would. This can be useful in a RAID environment in that a RAID controller is able to recover from a read/write error faster than an individual disk would since the RAID controller can consult the redundant data stored on the other (healthy) disks of the RAID array. Other manufactures have similar features, ERC in Seagate-speak, and CCTL on Samsung and Hitachi drives. For a more in-depth look check out the Wikipedia page for Time-Limited Error Recovery.

    If a drive in a RAID array sits too long trying to read or write to a faulty area of the hard drive, the RAID controller may decide that life’s too short to wait for this obviously failing disk, and it will resolve this conflict by dropping the disk out of the array. Failing disks out of an array of course, is not a welcome behavior if that drive is not truly garbage, as additional drive failures could result in a complete loss of data. Unfortunately many things can trigger a hard disk drive to error and cause a delay returning information to the RAID controller. Drives that would be considered “good”, by most any other measure may be discarded and forced to be rebuilt into the array (assuming someone manually intervenes to accomplish this before the degraded RAID dies completely).

    There is some debate, and a good deal of unhelpful information regarding how the GNU md (mdadm) RAID benefits or detriments from TLER. Here is an example of what I mean:
    http://kerneltrap.org/mailarchive/linux-raid/2009/9/8/6389653. My take on it is that enabling TLER, although not required, may make the system move along smoother/quicker in the event of an error, and probably not cause me much worry in terms of data corruption.

    Western Digital used to make available a tool named WDTLER.EXE that would allow you to enable and tweak this feature on your drives. They have since pulled the file from their website, but as with most things on the Internet, it’s still out there some where. A quick Google search for “WDTLER.ZIP” turns up promising results. Like many low level firmware utilities for hard disks or BIOS flashing, we’ll need to run WDTLER.EXE from a DOS boot disk. I don’t have a floppy drive, and even if I did, I’m really not sure where to find a floppy disk (last time I tried was amusing, then very annoying, and then slightly amusing again when I finally found a dusty box in a drug store).

    Here are some instructions that I hope will be handy for people seeking a bootable DOS CD-ROM with WDTLER.EXE utilities.
    Things you’ll need:

  • Vmware Server or Workstation (or VirtualBox, etc provided you know how to use it applicably)
  • A copy of WDTLER.ZIP (Try Google)
  • The file fdbasews.iso from http://www.freedos.org/freedos/files/
  • 7-Zip from http://www.7-zip.org/ (or something else that can extract files from an ISO image
  • The version of the executables in WDTLER.ZIP that I’m working with can be identified with the following hashes.

    WDTLER.EXE
    MD5 : f74947e95d4d416b15eb8c9ed4210477
    SHA1 : e56b42244da70e1df03860b3505bac667f122ad6
    SHA256: 9401d94fc514aa8128bbba743f92e28eeb84a7365c71e91a091d02c2b46b6bce

    HDACCESS.EXE
    MD5 : 2ced2d76106d3d52b3885a0f1d9225bf
    SHA1 : 8fdfc31707d6f3b391cf498a7de494424866529a
    SHA256: b6eb1edb56c9c481335ff4a7e0f9f0009c1ad3a7fb6e6593071cd5488e01ca52

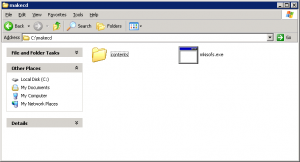
    Make a temporary directory to work in. I’m using C:\makecd in the examples below.

    Create a CD-ROM containing the WDTLER utilities:

  • Make the directory C:\makecd
  • With 7-zip extract the file \isolinux\buildcd\mkisofs.exe from the FreeDos ISO (fdbasews.iso) and place it in C:\makecd
  • Make a sub-directory called contents in C:\makecd\contents
  • Extract the contents of WDTLER.ZIP into C:\makecd\contents
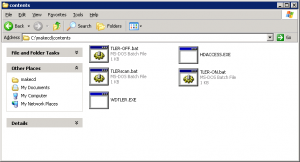
  • You should now have something like this:

    Open a command prompt, and change into the C:\makecd directory, then run mkisofs as show below.

    C:\>cd\makecd
    C:\makecd>mkisofs -o freedostler.iso -l ./contents/*
    Total translation table size: 0
    Total rockridge attributes bytes: 0
    Total directory bytes: 0
    Path table size(bytes): 10
    Max brk space used df30
    272 extents written () MB)

    If you like, open the newly created freedostler.iso file in 7-Zip to make sure everything looks ok.

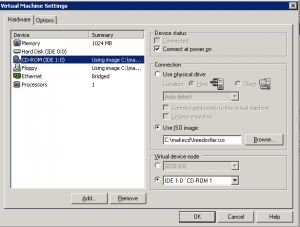
    Now open VMWare and create a new Virtual machine (the type shouldn’t really matter). Adjust the virtual machine settings to use an ISO image in the virtual CD-ROM drive. Use the fdbasews.iso we downloaded from FreeDOS (and not the ISO file we just created).
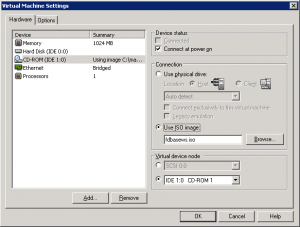
    Next add a virtual Floppy drive. When prompted choose “Create a blank floppy image”.
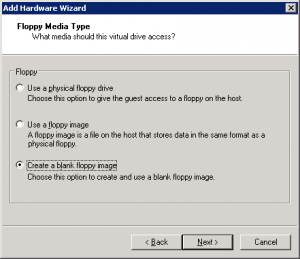
    Save the blank floppy image as “freedos_tler.img” in the C:\makecd directory.
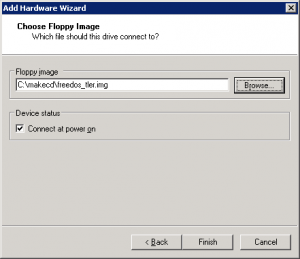
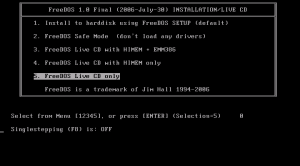
    Boot the new Virtual Machine. You should end up at the FreeDOS boot screen. Hit enter (or 1, followed by enter), to continue.
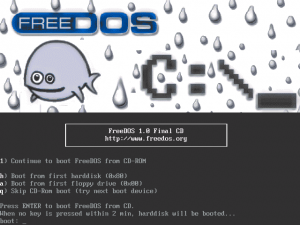
    At the next FreeDOS boot menu choose option 5 “FreeDOS Live CD only”.
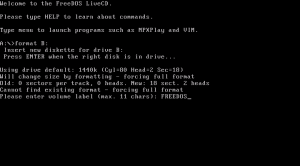
    At the FreeDOS DOS prompt type format B: and hit enter. The A: drive is actually the El ToritoCD-ROM boot image pretending to be a floppy drive, B: should be our virtual VMWare floppy drive. You will get prompted for a volume label, I went with “FREEDOS”, although you could just hit enter.
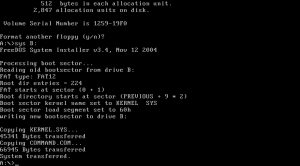
    Next type sys B: and hit enter. The “sys” command creates a boot record on the target drive and copies COMMAND.COM to the root directory (Ah!, old DOS knowledge earning it’s space in my brain).
    OK, leave the FreeDOS virtual machine running, but go back to the VMWare settings, and change the CD-ROM ISO image to C:\makecd\freedostler.iso (the ISO file we created earlier).
    At the FreeDOS command prompt type copy X:\*.* B: and hit enter.
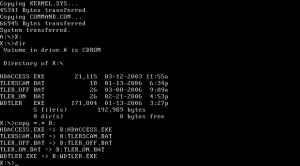
    Now reboot the Virtual Machine, since freedostler.iso isn’t yet a bootable image, we should boot off the newly created floppy disk image. On systems without an AUTOEXEC.BAT file, you’ll get this annoying prompt for date and time on each boot. You can fix that by creating an empty AUTOEXEC.BAT file. I show off my arcane DOS knowledge below to accomplish this.
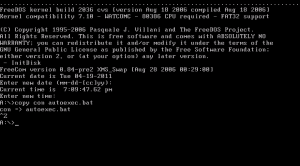
    AUTOEXEC.BAT or no AUTOEXEC.BAT, the important thing is we tested that we have a bootable floppy disk image. Here’s the big idea at this point. we just created a bootable floppy disk image that contains the WDTLER utilities. We first created the non-bootable CD-ROM ISO with the WDTLER utilities so that we’d have an easy way of copying them to a floppy image in VMWare without having to mess with networking drivers and software. With the WDTLER files copied to the bootable floppy disk we no longer need the non-bootable freedostler.iso, so go ahead and erase it.

    We’re now going to re-create freedostler.iso using our “freedos_tler.img” disk image as our bootable Torito image.

    C:\makecd>mkisofs -r -b freedos_tler.img -o freedostler.iso -l *
    Size of boot image is 2880 sectors -> Emulating a 1440 kB floppy
    Total translation table size: 2048
    Total rockridge attributes bytes: 341
    Total directory bytes: 0
    Path table size(bytes): 10
    Max brk space used e980
    897 extents written (1 MB)

    This copies a backup of our work to the the CD-ROM ISO as well. Since we’re going to waste a whole CD writing data that could easily fit on a floppy, we might as well make something slightly more useful. You should now have a bootable freedostler.iso file. Test it in VMWare to make sure everything is working. The WDTLER utility files should show up in the A:\ directory.

    Here’s a much more convenient approach using Ultimate Boot CD that leaves me wondering why I bother blogging anything at all: http://shifteightgeneration.com/content/wdtler-fix-tler-setting-wd-desktop-hard-drives, nice job Steve.