Category: Telephony

  • GXP2020EXT Provision & Template

    GXP2020EXT Provision & Template

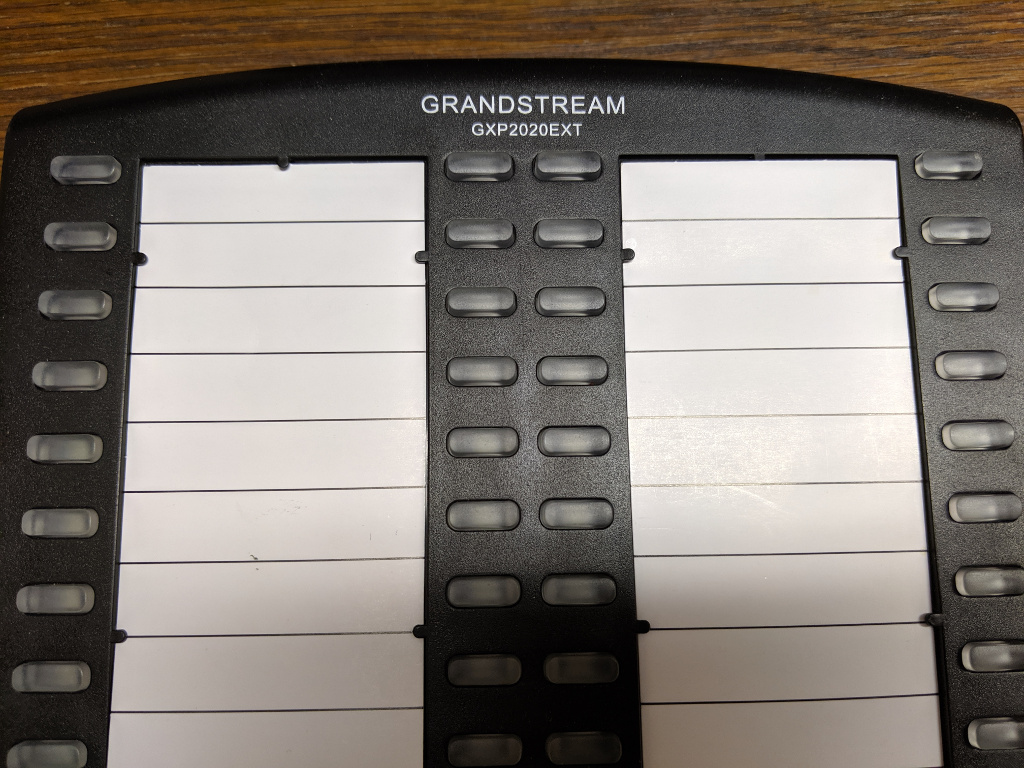
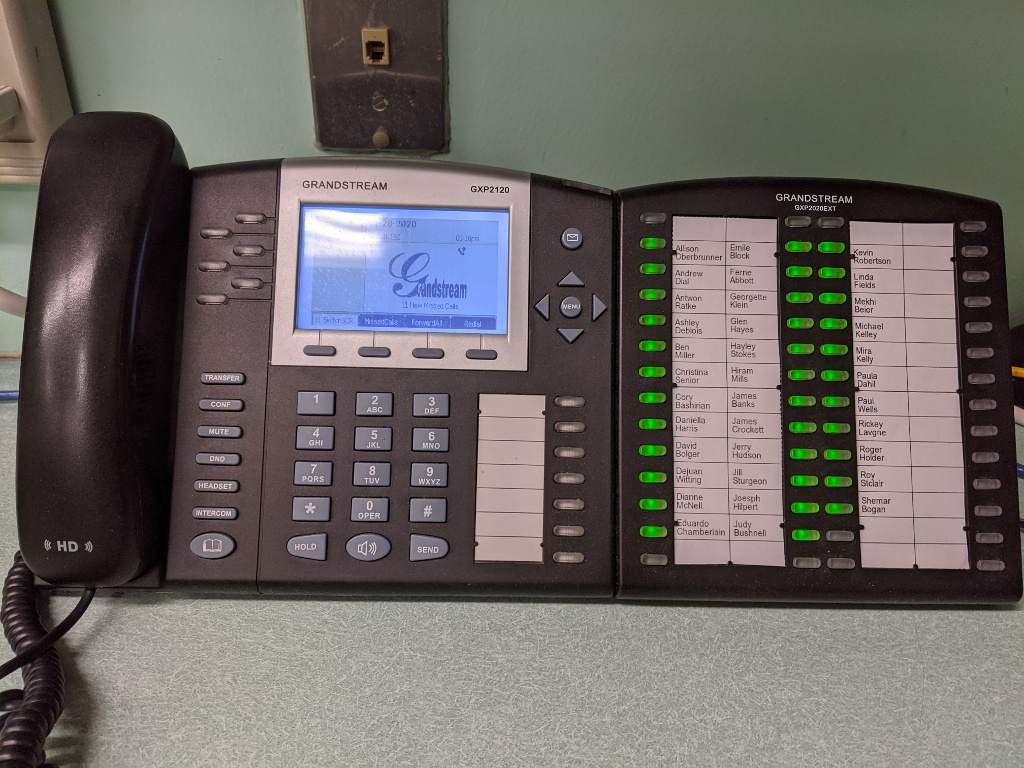
    The Grandstream GXP2020EXT is an accessory “sidecar” (or in Grandstream-speak “Expansion Module”) that adds 56 speed dials with BLF to Grandstream model GXP20xx VoIP telephones.

    In the article below I’ve provided two scripts to help GXP2020EXT users keep their units programed with fresh directory information and matching card inserts.

    The Problem

    As the phone system administrator at work, one of the more annoying duties I have is updating the labels on telephone sidecars. You see these on receptionist phones, switchboard operator phones, lobby phones, etc. Grandstream’s GXP2020EXT is a 56 button panel with an indicator light to see if the line is busy (Busy Lamp Field, or BLF). You can actually connect two GXP2020EXT units together to support 112 lines.

    In addition to programming the GXP2020EXT to make it aware of which line is which, there are also some supplied card inserts for writing down names associated with each line.

    I wanted an easy way to not only program the GXP2020EXT, but also create a printable card insert.

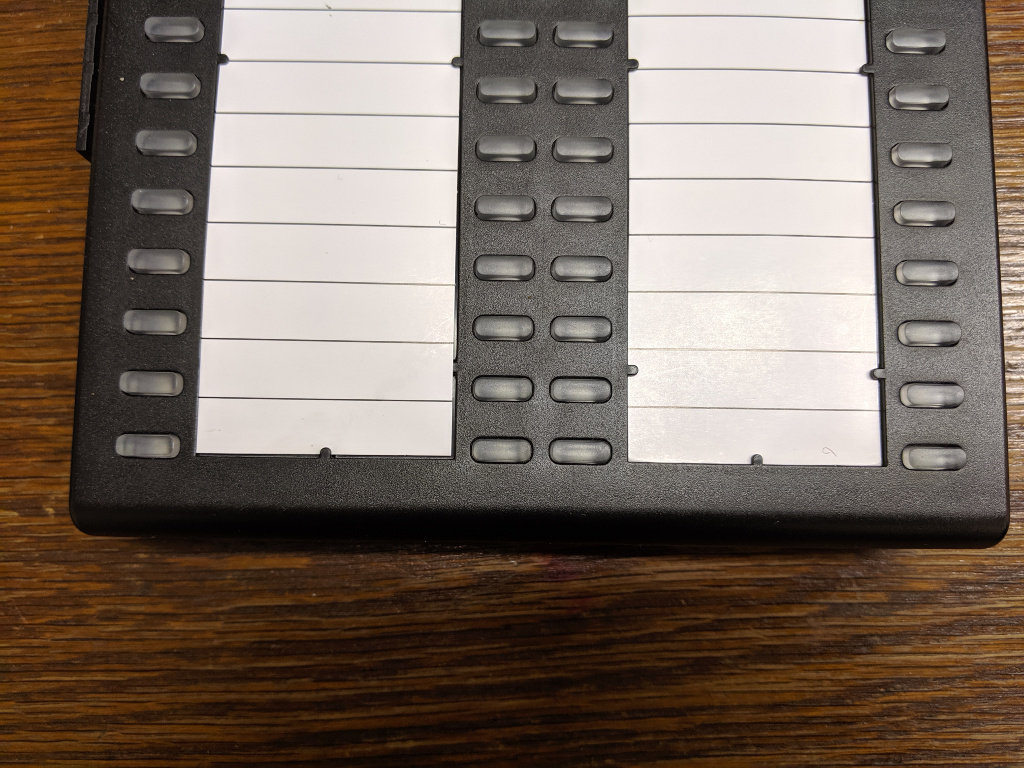
    The layout of the GXP2020EXT buttons and card insert leave something to be desired in my opinion. The bottom row of buttons lines up pretty well with the bottom line of the card insert, but as you work your way up from the bottom toward the top, the buttons start ending up more or less in the middle of the space for the name entry on the card. By the time you get all the way to the top the button is at the very top of the name position.

    The Solution

    I created two scripts to help me turn a list of names and extensions into a printable card insert and fully provisoned GXP2020EXT.

    I spent a lot of time trying different spacings with the card insert to see if I could work out lines that were less confusing to my users, but ultimately I just opted to skip the first and last rows, and this seems to have cleared up the user confusion I was getting occasional reports about.

    Feeding data to two scripts seemed not only easier, but less likely to introduce error (displaying one name, but programming for a different line, etc).

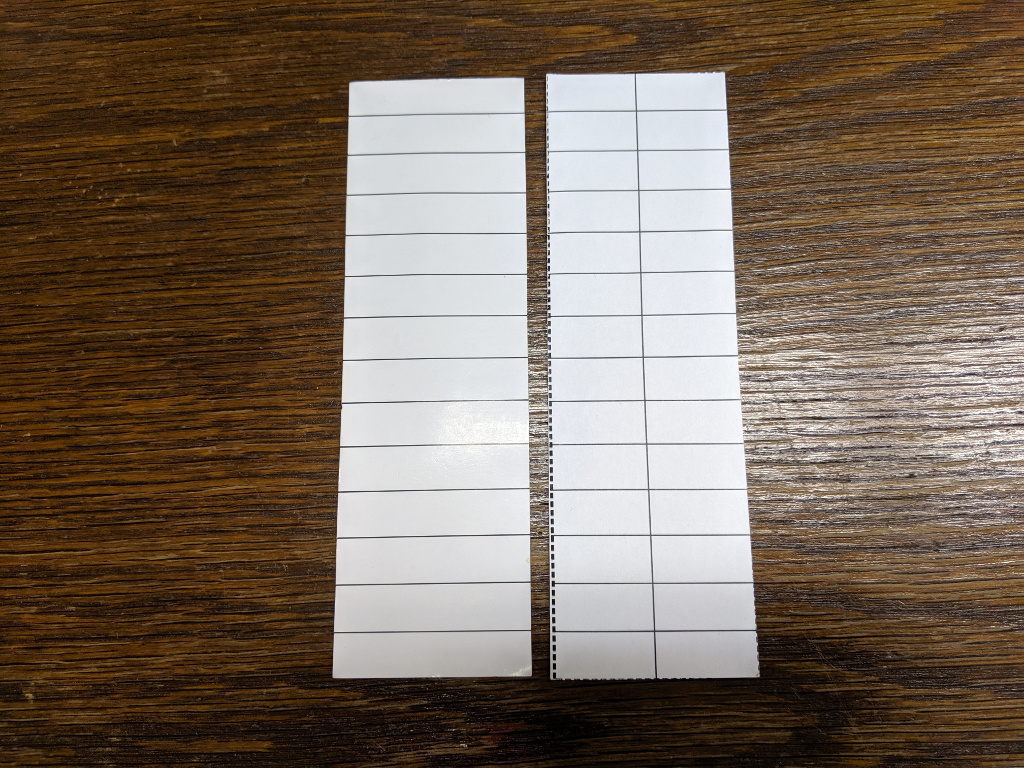
    I also added a vertical line down the center of the card as a demarcation between the sides. The GXP2020EXT is pretty flexible, and can be programmed in different ways. Each line on the card could have two buttons for example, one that shows the user’s status (busy etc) and another one that calls the user, maybe one that transfers, or even one that just taps into the line to let a call center supervisor listen in, all depending on how you go about programming it and your phone system capabilities. I just use the BLF feature, pressing the corresponding button calls the user, so the vertical separator made sense to me. This way I’ll put two names on each line of the card (one party on the left, and one on the right).

    Below is my printed card (right) shown next to a Grandstream supplied card (left). If all you want is a blank card like this you can just download a PDF of it here: gxp202ext_blank.pdf

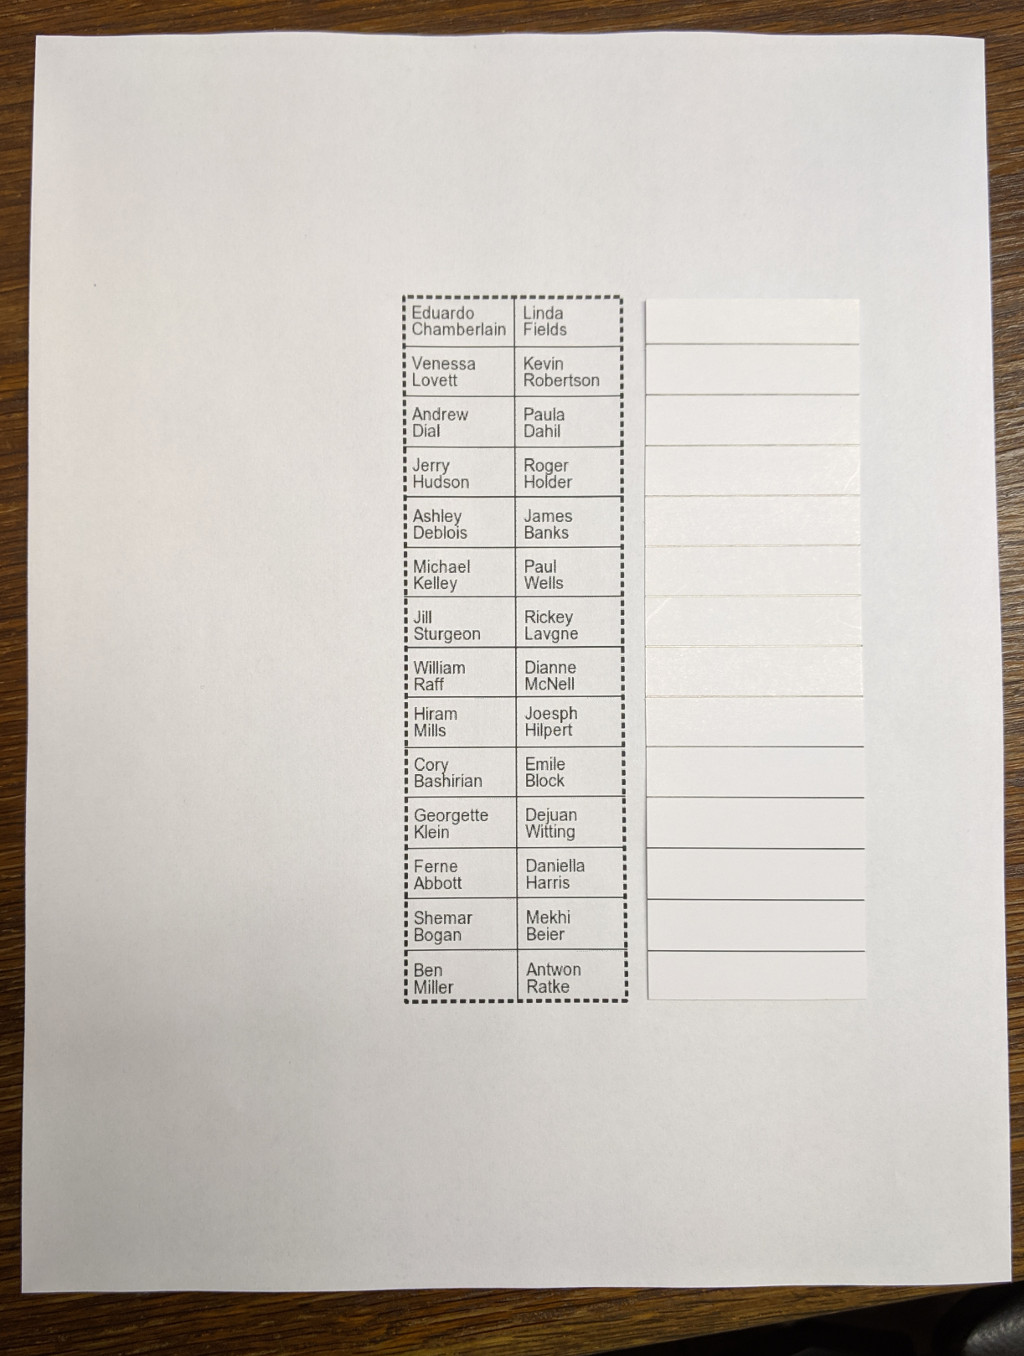
    Here is what it looks like with some names filled in

    Template Script

    The script I wrote to create these template files requires ImageMagick (with Ghostscript support). I’m using Ubuntu in this example. To install ImageMagick (if it isn’t already), just run:

    $ sudo apt install imagemagick

    Choose (y)es to accept the recommended packages and perform the install.

    In order to create a PDF with ImageMagick on Ubuntu you’ll probably also want to modify /etc/ImageMagick-6/policy.xml, otherwise you might see an error message like:

    convert-im6.q16: attempt to perform an operation not allowed by the security policy `PDF’ @ error/constitute.c/IsCoderAuthorized/408.

    Edit /etc/ImageMagick-6/policy.xml and in the <policymap> section, find the “ghostscript” comment area

    <!– disable ghostscript format types –>
      <policy domain="coder" rights="none" pattern="PS" />
      <policy domain="coder" rights="none" pattern="EPS" />
      <policy domain="coder" rights="none" pattern="PDF" />
      <policy domain="coder" rights="none" pattern="XPS" />

    Change the pattern=PDF line to read

      <policy domain="coder" rights="read|write" pattern="PDF" />

    Keep in mind there are security implications to doing this, which is why the rights weren’t set in the first place. I’m running this script on my desktop, and I don’t have any processes likely to be a vector to throw malicious or untrustworthy data at ImageMagick, so I feel OK changing this on my system, but your situation may be different. Strictly speaking the step of turning the PNGs into PDF isn’t required, it’s just helpful to get them to print at the right size. Alternatively if you import the PNGs into LibreOffice and print from there you’ll probably be fine too.

    If you want to run this on the same system as an ancient CentOS 5.5 Elastix server you’ll want to temporarily move your yum repos, create a new one to the CentOS vault, install ImageMagick, and then move your broken old yum repos back in to place.

    $ sudo su –
    $ cd /etc/yum.repos.d/
    $ mkdir /root/backup
    $ mv * !$
    $ cat <<EOF >vault.repo
    [vault]
    name=CentOS Vault
    baseurl=http://vault.centos.org/5.5/os/i386/
    enable=1
    EOF
    $ yum check-update
    $ yum install ImageMagick
    # optionally get some extra fonts
    $ yum install liberation-font
    $ mv /root/backup .
    $ rm vault.repo

    This is all you need, but ImageMagick might still try to use the Microsoft Arial font. You can get the redistributable MS Core Fonts and use cabextract to dump them into /usr/share/fonts/default/TrueType/ or you could specify an alternative font in make_template.sh, or you could just upload a bunch of TTF fonts into /usr/share/fonts/default/TrueType/ from another system.

    Once the ImageMagick requirements are met, the next thing you’ll need is your list of names. You’ll also want a list of extension numbers too, this will be handy when we move on to provisioning the GXP2020EXT. You can use the same list for both tasks. I’d suggest making a list in the following format:

    Eduardo Chamberlain <1122>
    Linda Fields <1104>
    Venessa Lovett <1115>
    Kevin Robertson <1172>
    Andrew Dial <1108>
    Paula Dahil <1165>
    Jerry Hudson <1112>
    Roger Holder <1126>
    Ashley Deblois <1116>

    My office runs Elastix/FreePBX/Asterisk. The format above is the same as you might expect to see in the extensions list of the Elastix web interface (PBX -> PBX Configuration -> Extensions). You can just copy those and paste them into a new file. If you’re using a different system or a newer version of Elastix you could just make the list by hand in a pinch. I’m going to save the list to a file named names.txt for the purpose of example and documentation below.

    Due to the limited space, we probably don’t want to include the extension number in the printed card (only the name). However we do want to have those extensions in the file for later use by the provisioning script.

    An easy solution is to use awk to output only the name portion (the words before the ‘<‘ character appears) on each line of our file

    $ awk ‘BEGIN { FS = "<" }; {print $1}’ names.txt
    Eduardo Chamberlain
    Linda Fields
    Venessa Lovett
    Kevin Robertson
    Andrew Dial
    Paula Dahil
    Jerry Hudson
    Roger Holder
    Ashley Deblois

    You probably also want to be sure to alphabetically sort your list so that it’s easier to find a particular name on the display card. You can use the sort command to accomplish this. Pipe the output of sort into awk.

    $ sort names.txt |awk ‘BEGIN { FS = "<" }; {print $1}’
    Andrew Dial
    Ashley Deblois
    Eduardo Chamberlain
    Jerry Hudson
    Kevin Robertson
    Linda Fields
    Paula Dahil
    Roger Holder
    Venessa Lovett

    OK, so put it all together and pipe it into the make_template.sh script (supplied below)

    $ sort names.txt |awk ‘BEGIN { FS = "<" }; {print $1}’ |./make_template.sh

    You should now have a file named template.pdf that you can print out. Cut along the dashed lines with a pair of scissors and if everything worked out right the two sheets of paper you have left should fit in the card slots of the GXP2020EXT sidecar.

    If like me you’d prefer to keep the top and bottom row of each card blank, then you’ll want to manually edit your names.txt file. Perform a sort ahead of time on the file, you won’t want to sort it in a pipeline as the order of the items in the file will need to be preserved to accomplish this task. Edit the file and insert a blank/empty line on each line-n where n % 14 = 1 or 0, or more verbosely, add a blank line to lines number 1, 14, 15, 28, 29, 42, 43, and 56.

    download make_template.sh

    #!/bin/bash

    i=0
    while read -t1 line
    do
        name_part1[$i]="${line%’ ‘*}"
        name_part2[$i]="${line##*’ ‘}"
        ((++i))
    done
    unset i

    if [ -z "${name_part1[0]}" ] && [ "${#name_part1[@]}" == "1" ]; then
        echo -e "\nUsage: [ pipe | ] $0 [ < stdin ]"
        echo -e "\nExamples:"
        echo -e "\t$0 < names.txt"
        echo -e "\t\t – or -"
        echo -e "\tcat names.txt | $0"
        echo -e "\nScript requires an input stream!\n"
        exit 1
    fi
       

    get_names() {
        echo "-fill black -pointsize 14"
        i=0

        # Two maintain alphabetical order vertically rather
        # than horizontal + vertically we put the draw
        # statements into two different loops to process
        # all of one side of the card first

        # Left side of card
        while [ "$i" -lt "14" ]
        do
            # adjust placement for bottom half
            if [ "$i" -lt "8" ]; then
                y1=20
                y2=34
            else
                y1=16
                y2=30
            fi
            echo -e "-draw "text 8,$(($y1 + 43 * $i))  ‘${name_part1[$i]}’""
            echo -e "-draw "text 8,$(($y2 + 43 * $i))  ‘${name_part2[$i]}’""
            ((i++))

        done
        # Right side of card
        while [ "$i" -lt "28" ]
        do
            # adjust placement for bottom half
            if [ "$i" -lt "15" ]; then
                y1=20
                y2=34
            else
                y1=16
                y2=30
            fi
            echo -e "-draw "text 103,$(($y1 + 43 * $((i – 14)))) ‘${name_part1[$i]}’""
            echo -e "-draw "text 103,$(($y2 + 43 * $((i – 14)))) ‘${name_part2[$i]}’""
            ((i++))

        done
    }

    offset() {
        skew="$1"
        ((skew–))
        skew="$((skew * 10))"
        skew="$((skew * 5 / 10))"

        if [ "${skew: -1:1}" == "5" ]; then
            skew="$((skew+ 10))"
        fi

        skew="${skew:0:1}"

        echo "$skew"
    }

    draw_box() {
        echo "-fill none -strokewidth 2 -stroke black "
        echo "-draw ‘stroke-dasharray 5 3  rectangle 1,1,187,595’ "
        echo "-fill none -strokewidth 1 -stroke black "
        echo "-draw ‘line 95,0 95,609’ "
        row=1
        while [ "$row" -le "13" ];
        do
            echo "-draw ‘line 0,$((43 * $row – $(offset $row) )) 190,$((43 * $row – $(offset $row) ))’ "
            ((++row))
        done
    }


    # Generate left template
    bash -c "$(echo convert -size 189×597 xc:white $(get_names) $(draw_box) template1.png)"

    # shift remaining names down the array
    if [ "${#name_part1[@]}" -gt "27" ]; then
        i=0
        while [ "$i" -le "27" ]
        do
            name_part1[$i]="${name_part1[$((i + 28))]}"
            name_part2[$i]="${name_part2[$((i + 28))]}"
            ((i++))
        done
    fi

    # Generate right template
    bash -c "$(echo convert -size 189×597 xc:white $(get_names) $(draw_box) template2.png)"


    # side by side on one peice of paper
    #montage -units PixelsPerInch -density 96 template?.png -mode concatenate -tile 2x template.pdf

    # Or one per page
    convert -units PixelsPerInch -density 96 template?.png template.pdf

    if [ -f "template.pdf" ]; then
        rm template1.png template2.png
    fi

    Provisioning Script

    Some of this script is repurposed from my earlier gspush.sh script which can be used to program other features beyond the GXP2020EXT. (If you work a lot with older Grandstream phones you might be interested in that article as well).

    This script is meant to be used with the GXP2020EXT connected to a Grandstream GXP21xx phone. If you somehow have it hooked up to something else you may need to adjust the values in the script first.

    The provisioning script is easy to use. Feed it the list of names and specify the IP address of the phone with the GXP2020EXT connected to it. If you are using a password other than the default specify it after the IP address. If you forget how to run the command just run it without input for a reminder:

    $ ./provision_gxp2020ext.sh
    Usage: stdout |./provision_gxp2020ext.sh <IP Address of Grandstream GXP2020EXT device> [password]
        Supply a list of names and extensions (one per line) via stdio in the format:
        Name <Extension>

    Output looks something like this, but will vary depending on the firmware of the GXP21xx phone

    $ cat names.txt |./provision_gxp2020ext.sh 10.0.0.152 secret
    Sid: 8beeff00d42
    Status:
    Status: 1
    Done.

    download provision_gxp2020ext.sh

    #!/bin/bash

    GXP_PHONE_IP="$1"

    if [ -n "$2" ]; then
        GXP_PASSWD="$2"
    else
        GXP_PASSWD="admin" # default
    fi

    get_sid() {
            while read -r || [[ -n "$REPLY" ]]
            do
                    if [ -n "$sid" ]; then
                            break
                    fi
                    if [ "${REPLY:0:23}" == "Set-Cookie: session_id="  ]; then
                            sid="${REPLY:23}"
                sid="${sid//;}"
                    fi
                    if [ "${REPLY//’"sid"’}" != "$REPLY" ]; then
                            sid="${REPLY#*’"sid"’}"
                sid="${sid#*’"’}"
                            sid="${sid%%’"’*}"
                    fi
            done
            echo "$sid"
    }

    post_status() {
            # Older firmware says need to reboot, newer firmware says success
            while read -r || [[ -n "$REPLY" ]]
            do
                    if [ "${REPLY//eboot}" != "$REPLY" ]; then
                            echo "1"
                            break
                    fi
                    if [ "${REPLY//success}" != "$REPLY" ]; then
                            echo "1"
                            break
                    fi
            done
    }

    urlencode () {
            tab="`echo -en "\x9"`"
            i="$@"
            i=${i//%/%25}  ; i=${i//’ ‘/%20} ; i=${i//$tab/%09}
            i=${i//!/%21}  ; i=${i//’"’/%22}  ; i=${i//#/%23}
            i=${i//\$/%24} ; i=${i//\&/%26}  ; i=${i//\’/%27}
            i=${i//(/%28}  ; i=${i//)/%29}   ; i=${i//\*/%2a}
            i=${i//+/%2b}  ; i=${i//,/%2c}   ; i=${i//-/%2d}
            i=${i//\./%2e} ; i=${i//\//%2f}  ; i=${i//:/%3a}
            i=${i//;/%3b}  ; i=${i//</%3c}   ; i=${i//=/%3d}
            i=${i//>/%3e}  ; i=${i//\?/%3f}  ; i=${i//@/%40}
            i=${i//\[/%5b} ; i=${i//\\/%5c}  ; i=${i//\]/%5d}
            i=${i//\^/%5e} ; i=${i//_/%5f}   ; i=${i//\`/%60}
            i=${i//\{/%7b} ; i=${i//|/%7c}   ; i=${i//\}/%7d}
            i=${i//\~/%7e}
            echo "$i"
            i=""
    }


    # Read stdin and create the string of Grandstream config values


    # Valid Key mode values:
    # 0 = Speed Dial, 1 = BLF, 2 = Presence Watcher, 3 = eventlist BLF,
    # 4 = Speed Dial via active account, 5 = DialDTMF, 6 = Voicemail,
    # 7 = CallReturn, 8 = Transfer, 9 = CallPark, 10 = Intercom,
    # 11 = LDAP Search

    Pvalues=""
    i=0
    while read -t1 line
    do
        name="${line%%'<‘*}"
        extension="${line##*'<‘}"
        extension="${extension%%’>’*}"
        if [ -z "$name" ]; then # Turn off any unused/old BLF
            Pvalues+="P$((6001 + i))=0&" # Key mode, speed dial
        else
            Pvalues+="P$((6001 + i))=1&" # Key mode, BLF
        fi
        Pvalues+="P$((6201 + i))=0&" # Account
        Pvalues+="P$((6401 + i))=$(urlencode "$name")&" # Name
        Pvalues+="P$((6601 + i))=$(urlencode "$extension")&" # UserID
        ((i++))
    done

    if [ -z "$Pvalues" ] || [ -z "$GXP_PHONE_IP" ]; then
        echo "Usage: stdout |$0 <IP Address of Grandstream GXP2020EXT device> [password]" >&2
        echo -e "\tSupply a list of names and extensions (one per line) via stdio in the format:" >&2
        echo -e "\tName <Extension>" >&2
        exit 1
    fi

    # Provision the GXP2020EXT

    # Older firmware passed password as "P2", newer firmware passes as "password"
    # <form> action is the same
    sid="$(curl -s -i -d "P2=$GXP_PASSWD&password=$GXP_PASSWD" "http://${GXP_PHONE_IP}/cgi-bin/dologin" |get_sid)"
    echo "Sid: $sid"

    # <form> action for config update is different across firmware versions
    # Try old firmware style first
    status="$(curl -s -i -b "session_id=$sid" -d "${Pvalues}update=Update" "http://${GXP_PHONE_IP}/cgi-bin/update" |post_status)"
    echo "Status: $status"

    # Try new firmware way if the last attempt failed
    if [ -z "$status" ]; then
    #   # Try new firmware config update action
        status="$(curl -s -i -b "session_id=$sid" -d "$Pvalues&sid=$sid" "http://${GXP_PHONE_IP}/cgi-bin/api.values.post" |post_status)"
        echo "Status: $status"
    fi
    if [ -z "$status" ]; then
        # Couldn’t update speed dial on phone
        echo "Could not update speed dial correctly"
        exit 1
    else
        echo "Done."
    fi

    That’s all there is to do now when we have a change of staff. Actually, at our company I took this one step further, by using my Grandstream / Elastix Phonebook Provisioning URL in a cron task to periodically export the names and look for changes between polling intervals. When changes are detected, the GXP2020EXT is automatically re-provisoned to reflect them, and an updated template is emailed to IT staff to print, cut, and replace. I’m now free to ignore this task completely.

  • Phone Phreak Silver Box

    Phone Phreak Silver Box

    How many Touch-Tone digits does your landline have? 12 ? …That’s so pedestrian.

    If you’re a phone geek you might know about the old military AUTOVON phone system.

    These phones added 4 additional digits, that could be used to indicate the urgency of the call.
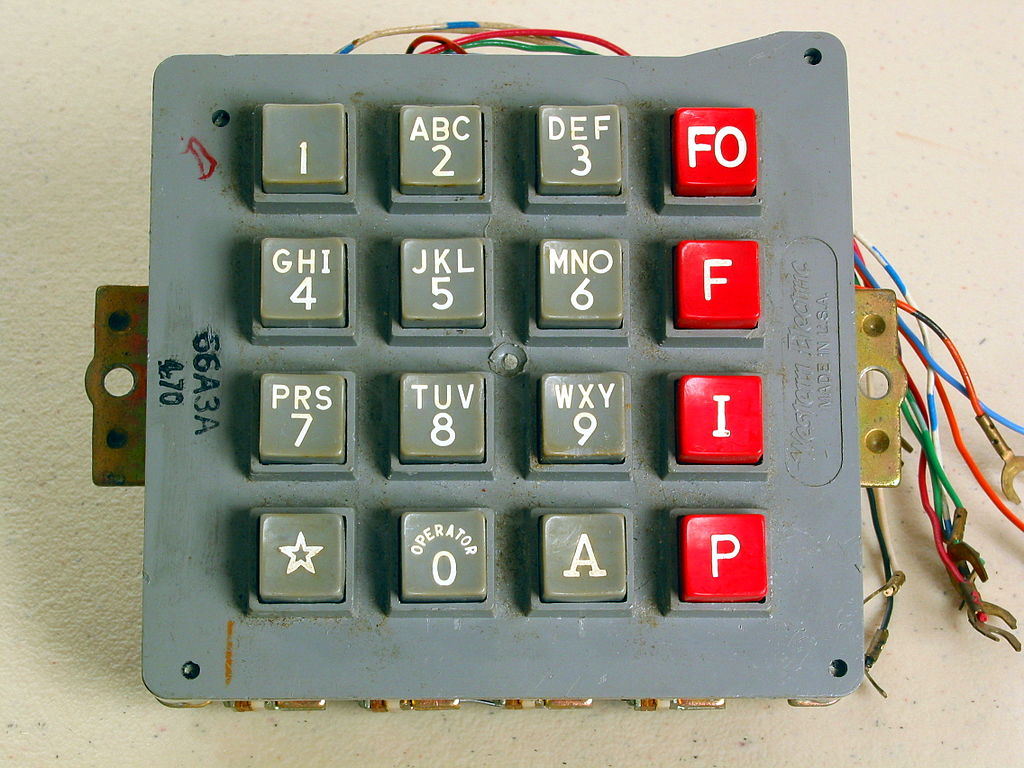
    P for priority, I for immediate, and F for flash

    If all the lines were tied up, and you were an important enough person with an important enough call, there was also FO, Flash Override. Ooh, that sounds cool, other calls be damned, we need to tell SAC to recall those bombers STAT!

    Each button on a Touch-Tone dial produces a different tone. Technically each button produces not one, but two different tones

    Touch-Tone dialing is part of something we call DTMF, dual tone multi-frequency signaling

    This makes it easier for equipment to detect key presses. Background noise, or even the sound of someone’s voice might trick a tone detector into thinking it has one of the tones, but it’s far less common to falsely detect the presence of both tones at the same time.

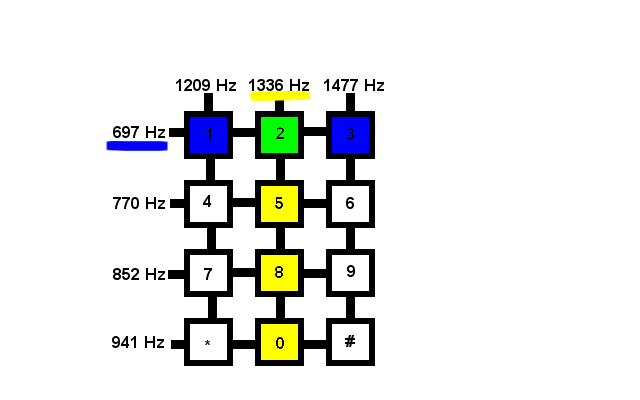
    The dual tones of DTMF come from the combination of a row tone and a column tone. Each column produced one of the two tones, and each row produced the other

    For example, the numbers 1, 2, and 3 all share the frequency 697 Hz in common and the numbers 2, 5, 8, 0 all share 1,336 Hz in common but only the number 2 is made up of both 697 Hz and 1,336 Hz

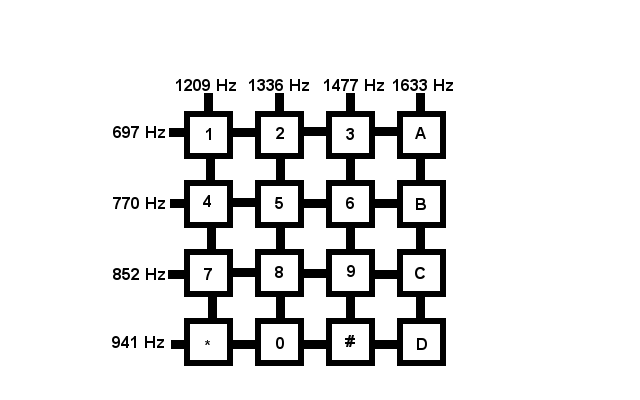
    AUTOVON used an extra column of 1,633 Hz to add the additional four buttons.

    This 4th column isn’t exclusive to AUTOVON. It may not be common, but it can be found in use in various telecommunications applications. For instance AMIS, the Audio Messaging Interchange Specification (which is used to transmit voicemail messages between different systems) uses these additional 4th column tones.

    When these fourth column buttons are used outside of AUTVON we usually refer to them as, A, B, C, and D (rather than FO, F, I, and P respectively)

    Imagine what you could do with an extra set of digits. Maybe add an extra layer of obscurity to your voicemail password, no more 1234 for me, but maybe 123ABC ? Add secret debug menus to your interactive voice response menus and Asterisk Gateway Interface scripts. Unlock an extra octave in your DTMF song performances. Exciting stuff.. surely.

    You can sometimes find old AUTOVON phones on eBay, but they generally go for more money than I’d consider spending.

    Are you sensing a project? You’re right!

    Phone phreaks have used various gizmos over the years to produce tones and explore or just rip-off phone networks.

    Possibly in tribute to Steve Wozniak‘s little blue box that allowed him to explore the in-band signalling of the long distance trunk lines of yesteryear, these devices were commonly called boxes, and the purpose of the device was identified by a color.

    There’s a whole rainbow of colored boxes out there, for example If you were tricking a payphone into thinking you just deposited a quarter you were red boxing.

    One of these so-called boxes was the Silver Box, a device to generate these 4th column tones.

    One of the simplest versions of the silver box involved modifying an existing phone by adding a toggle switch to switch the last column 3, 6, 9, # from 1,477 Hz to 1,633 Hz. If you were lucky enough your phone might even have a local oscillator generating the 1,633 Hz tone (if not, you’d need to create a circuit to generate it).

    To make my silver box I’m going to combine the best parts of to two different phones

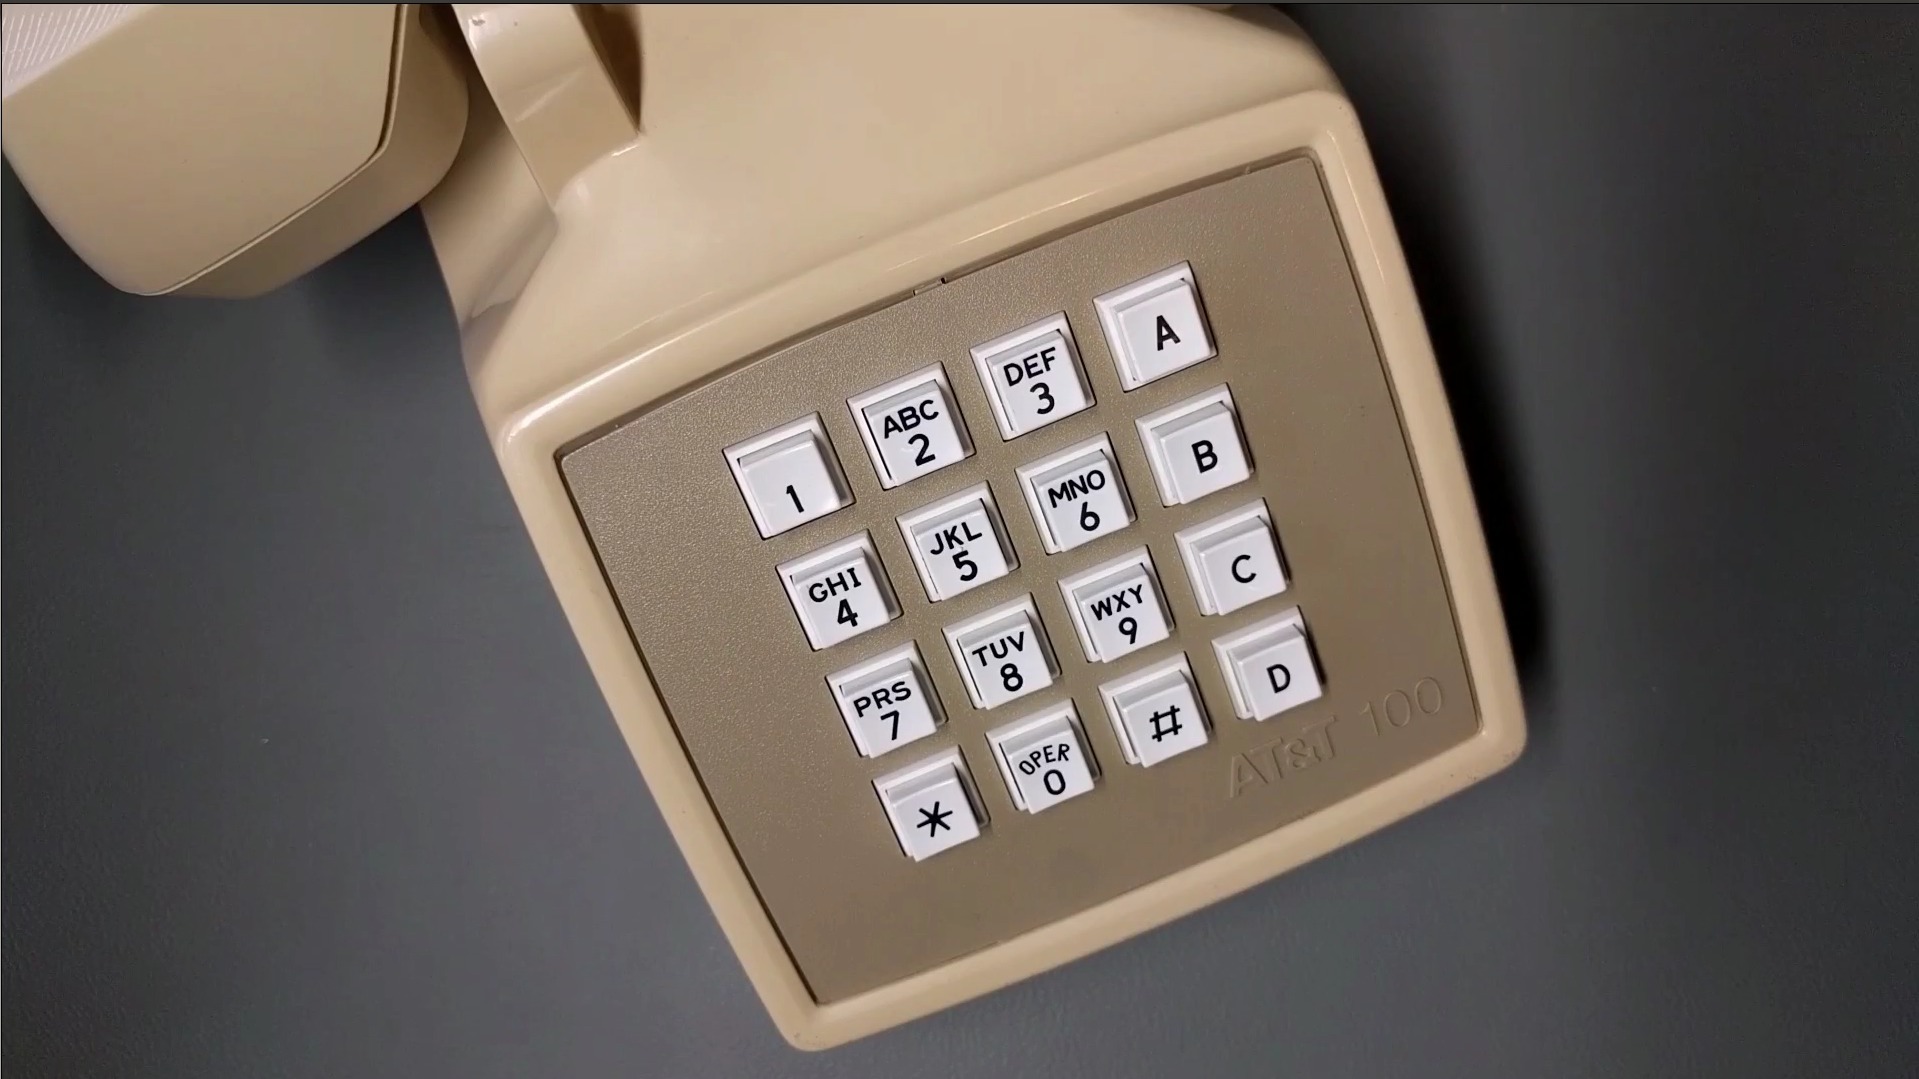
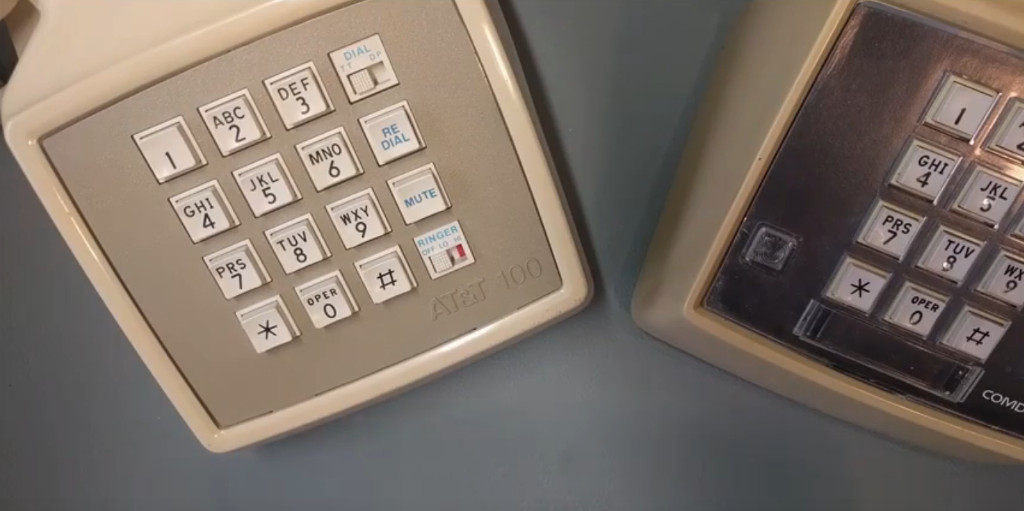
    On the left is an AT&T Traditional 100, it’s going to be the body of my phone, and I’ll be using most of its original electronics. The idea for this project came while I was looking at a picture of this phone. I thought, “huh, this extra column of buttons and switches over on the right looks evenly spaced and sized with the other buttons. I wonder if I could replace the keypad without having to modify the the phone.

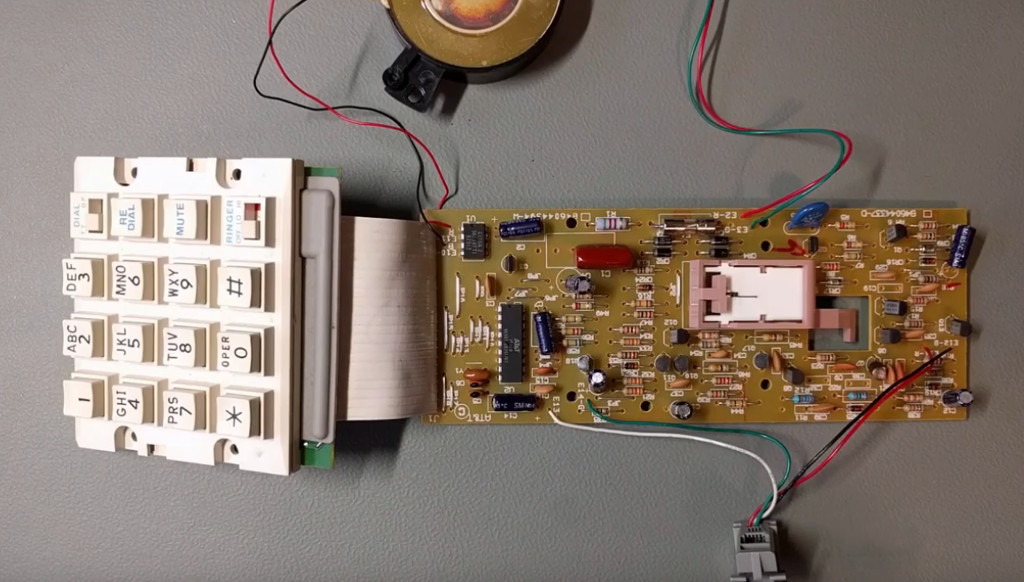
    On the right, is a COMDIAL 2579 (or at least I think that’s the model number). I’m going to be using some of its dialing guts for the project, to see why, lets take a closer look.

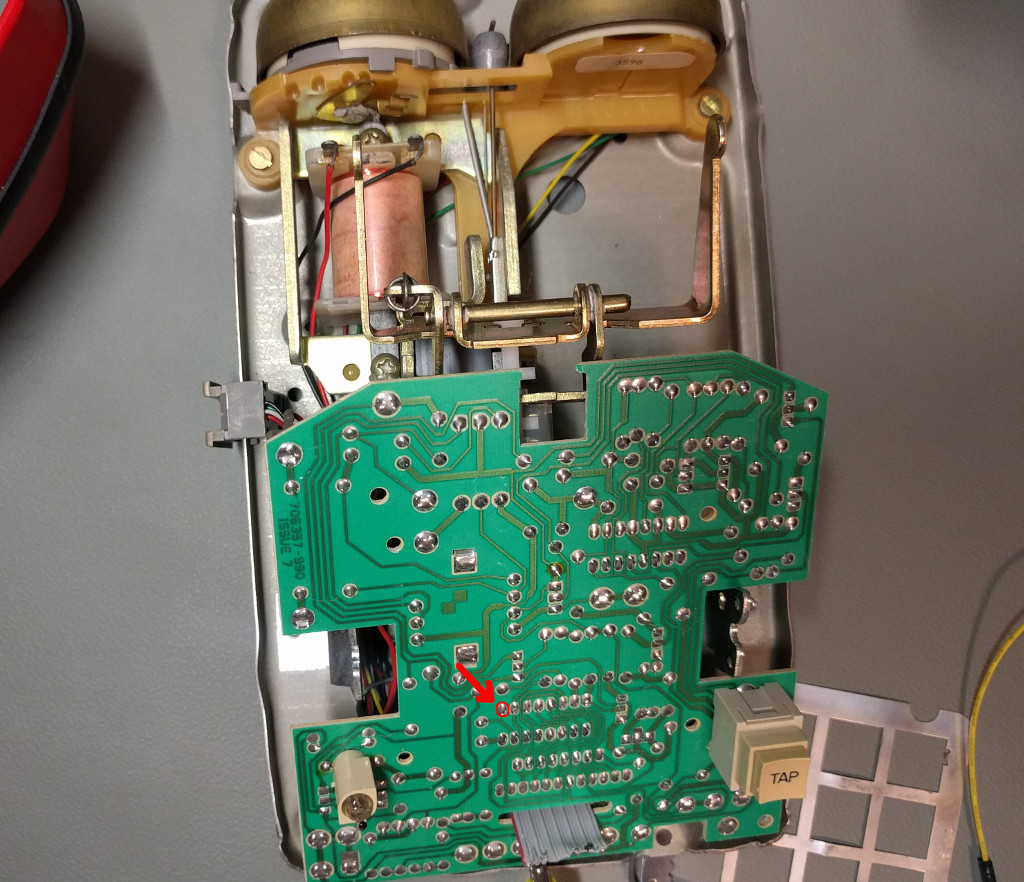
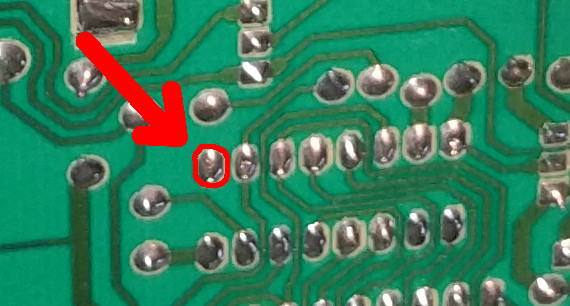
    Popping the top off the phone we can see a 16-pin DIP IC soldered to the PCB. One of the pins doesn’t appear to have any traces drawn to it.

    Here is a closer look at that DIP layout

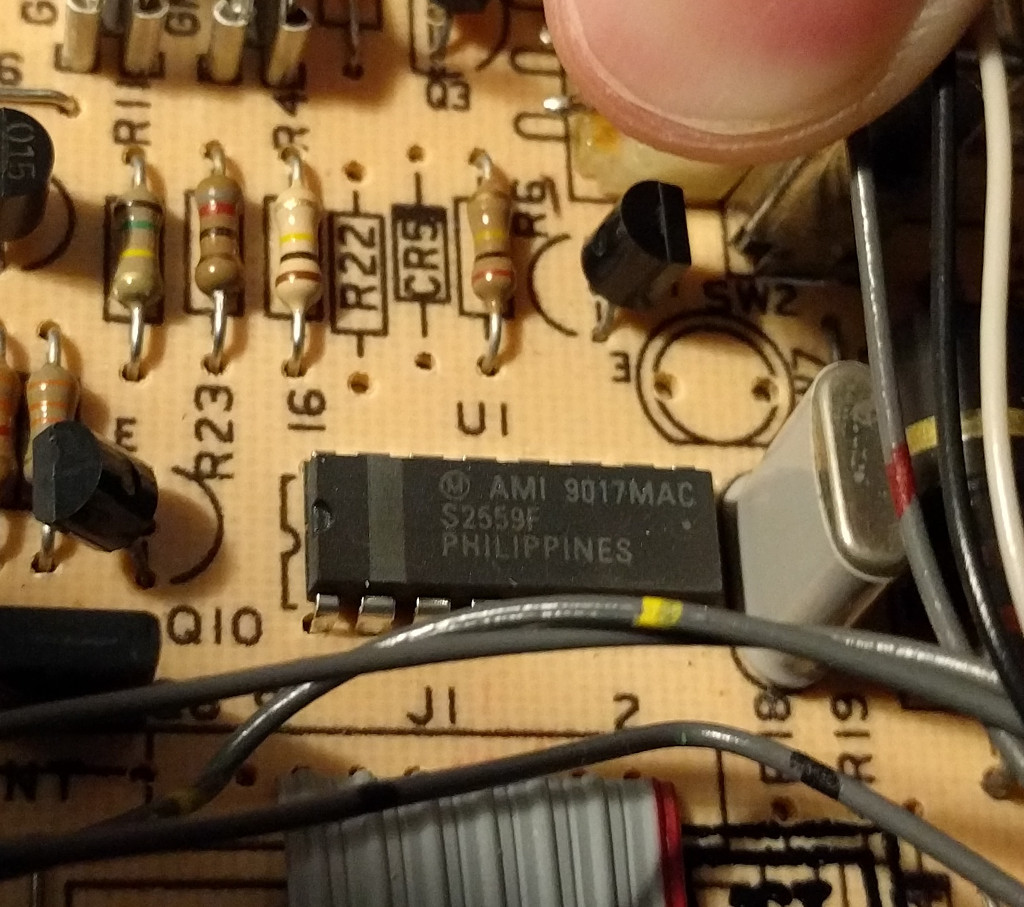
    Removing the PCB and flipping it over we can get a closer look at that IC.

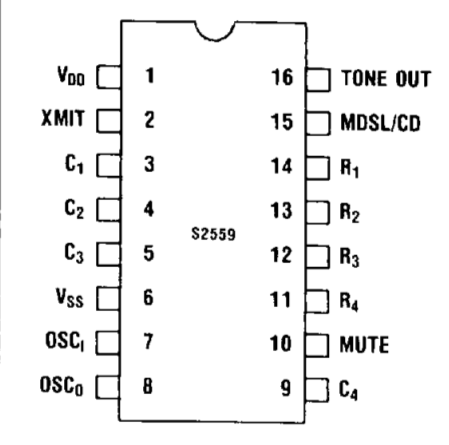
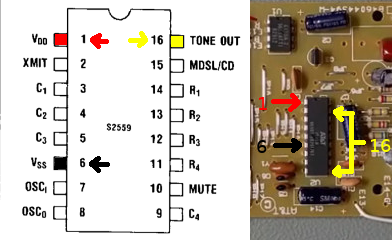
    It’s labeled AMI S2559F (American Microsystems Incorporated). Searching for the product datasheet online gives us the pin-out. We can see that pin 9 that wasn’t connected to any traces on the PCB corresponds to C4 (column 4).

    I removed this chip and the required (common 3.58 MHz TV crystal) oscillator (connected to pins 7 & 8) from the COMDIAL PCB and transplanted them onto a piece of perfboard.

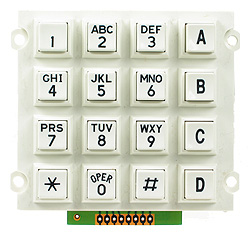
    There are a lot of 4×4 keypads out there, but the one I bought came from Futurlec. I like this one because it looks like it belongs on a phone (it has the traditional letters above the numbers, and OPER above the 0 key). I wired it up to the pins of the S2559F using AMI’s datasheet.

    I used a multimeter set in continuity testing mode to identify how to wire up my keypad.
    Pin 1 of the keypad corresponded to the 2nd row (4, 5, 6, B). Pin 2 to row 3 (7, 8, 9, C), Pin 3 to column 1 (1, 4, 7, *), Pin 4 to row 4 (*, 0, #, D). Pin 5 to column 2 (2, 5, 7, 9, 0). Pin 6 to column 3 (3, 6, 9, #). Pin 7 to column 4 (A, B, C, D). Pin 8 to row 1 (1, 2, 3, A).

    _______
    1|2|3|A| Pin 8
    4|5|6|B| Pin 1
    7|8|9|C| Pin 2
    *|0|#|D| Pin 4
    ——-
    3 5 6 7 <-Pins

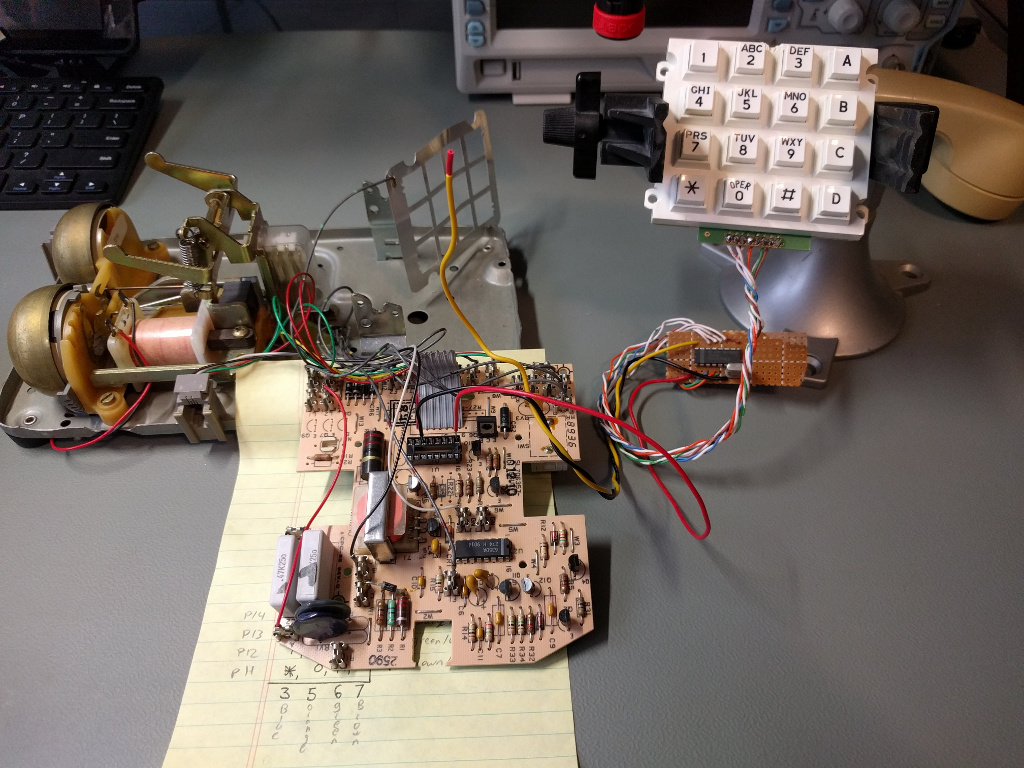
    After successfully testing the circuit connected to the COMDIAL PCB I began working on integrating the perfboard and keypad into the body of AT&T Traditional 100.

    I removed the AT&T Traditional 100 PCB from its housing and removed the 18-pin IC to begin work on guessing the pin-outs. Unfortunately this IC is pretty uncommon, and I wasn’t able to find a datasheet to help me along.

    On pin 1 (VDD) of the AT&T 18 pin IC I found sufficient voltage for the S2559F. According to the datasheet, to operate (generate a tone) the S2559F needs around 2.5 VDC, but can work with as much as 10 VDC. Pin 6 (VSS) seemed to be a good ground. To get a tone to play I needed to bridge pins 10 & 17 (TONE OUT) and inject the tone-out pin of the S2559F to that connection.

    Here is an illustration of how I hooked it up

    This all seemed to work pretty well, and I’m happy with the results even if I don’t really have that much use for the phone itself. I suppose if you are going to keep a landline around the house, might as well keep an interesting one.

    I suppose it might not be totally correct to call this a landline. I have it connected to an analog telephone adapter for VoIP (that I own). You probably don’t want to go about connecting hacked up telephony equipment to lines that aren’t your own. In some jurisdictions this might even be illegal (oh, that sounds like a disclaimer! old school. Nice).

    Have Phun!

  • Elastix *69 (Call Trace) Fix

    Elastix *69 (Call Trace) Fix

    We’re running an older installation of Elastix at my office, version 2.0.0 (release 58) on top of freePBX version 2.7.0 (release 10). The call trace feature was bothering me. This feature is mapped to the *69 feature code as is common with many LECs in North America. In the default implementation you hear an announcement about the number of the last incoming call, and can then optionally press the “1” key to call the party back. I was frequently annoyed with having to wait for the IVR attendant to finish announcing the number of my last incoming call, I couldn’t interrupt the announcement without waiting for her to finish. Seemed pretty clear that I needed to replace Playback() with Background() some place.

    Here is a video showing the original behavior, and the modified behavior.

    Inside of /etc/asterisk/extensions_additional.conf is a context for [app-calltrace-perform]. Originally I made the correction in there, completely ignoring the header comment that read “Do NOT edit this file as it is auto-generated by FreePBX”. This worked, for a little bit, until changes were made and applied in the Elastix web interface, and then as promised the config was overwritten by a new auto-generated configuration.

    It appears the correct place to add this is in /etc/asterisk/extensions_override_freepbx.conf

    I appended the following lines to the end of extensions_override_freepbx.conf to accomplish the desired change.

    [app-calltrace-perform]
    include => app-calltrace-perform-custom
    exten => s,1,Answer
    exten => s,n,Wait(1)
    exten => s,n,Macro(user-callerid,)
    exten => s,n,Set(lastcaller=${DB(CALLTRACE/${AMPUSER})})
    exten => s,n,GotoIf($[ $[ "${lastcaller}" = "" ] | $[ "${lastcaller}" = "unknown" ] ]?noinfo)
    exten => s,n,Background(info-about-last-call&telephone-number)
    exten => s,n,SayDigits(${lastcaller})
    exten => s,n,Set(TIMEOUT(digit)=3)
    exten => s,n,Set(TIMEOUT(response)=7)
    exten => s,n,Background(to-call-this-number&press-1)
    exten => s,n,Goto(fin)
    exten => s,n(noinfo),Playback(from-unknown-caller)
    exten => s,n,Macro(hangupcall,)
    exten => s,n(fin),Noop(Waiting for input)
    exten => s,n,WaitExten(60,)
    exten => s,n,Playback(sorry-youre-having-problems&goodbye)
    exten => 1,1,Goto(from-internal,${lastcaller},1)
    exten => i,1,Playback(vm-goodbye)
    exten => i,n,Macro(hangupcall,)
    exten => t,1,Playback(vm-goodbye)
    exten => t,n,Macro(hangupcall,)
    ; end of [app-calltrace-perform]

    When done, save the file and reload the dialplan

    asterisk -rx "dialplan reload"

    This all comes from Elastix (well technically FreePBX I think) other than the replacement of Playback() with Background() during the playback of info-about-last-call.gsm. Of course I also had to move Set(lastcaller..) and stuff above Background() since we can now jump straight to exten => 1,1 without having those variables set.

    I’m not sure if this has changed in later versions of Elastix 2.x. I have to assume this annoys other people as well, but maybe it’s just me. If you have anything to add let me know in the comments.

    Thanks

  • Install Certified Asterisk 13 from source on Ubuntu 14.04 LTS

    Install Certified Asterisk 13 from source on Ubuntu 14.04 LTS

    Need an Asterisk setup? Why not combine the long term support of an Ubuntu LTS release with the long term support of a Certified Asterisk release?

    Certified Asterisk releases are supported for around 4 years, and Ubuntu LTS for around 5 years, helping ensure you don’t need to mess around with major reconfiguration again for some time.

    We’ll be working with Certified Asterisk 13 and Ubuntu 14.04. Certified Asterisk 13 has an end-of-life date (EOL) of October 24, 2019, and Ubuntu 14.04 has an EOL of April 2019.

    A list of Asterisk versions and their end of life dates can be found here:
    https://wiki.asterisk.org/wiki/display/AST/Asterisk+Versions

    Prerequisites

    Let’s start by making sure we are up to date

    apt-get update && apt-get -y upgrade

    Make sure kernel headers are installed

    apt-get -y install linux-headers-$(uname -r)

    Grab a sensible build environment along with subversion and git which we will use later to retrieve additional source code

    apt-get -y install build-essential subversion git

    For many people, the next two sections will be optional, you can probably skip down to the “Asterisk” section below.

    DAHDI

    On the system I’m working with, I have a Digium T1/E1 PRI card, so I’m going to grab the DAHDI modules and tools as well. You may want to install DAHDI regardless of your hardware for the dahdi_dummy timing driver. At one point the Zaptel dummy driver was used for MeetMe conferences when Digium hardware based timing was absent, although I’m not sure if this still remains the case.

    We’ll be building our source under /usr/local/src, so switch in to that directory.

    cd /usr/local/src

    Download and unpack DAHDI

    wget http://downloads.asterisk.org/pub/telephony/dahdi-linux-complete/dahdi-linux-complete-current.tar.gz
    tar zxvf dahdi-linux-complete-current.tar.gz

    Switch in to the newly created source directory, compile, and install DAHDI.

    cd dahdi-linux-complete-2.10.0.1+2.10.0.1/
    make all
    make install
    make config

    If you have DAHDI hardware you should see the type of card in the make config output

     Adding system startup for /etc/init.d/dahdi …
       /etc/rc0.d/K30dahdi -> ../init.d/dahdi
       /etc/rc1.d/K30dahdi -> ../init.d/dahdi
       /etc/rc6.d/K30dahdi -> ../init.d/dahdi
       /etc/rc2.d/S15dahdi -> ../init.d/dahdi
       /etc/rc3.d/S15dahdi -> ../init.d/dahdi
       /etc/rc4.d/S15dahdi -> ../init.d/dahdi
       /etc/rc5.d/S15dahdi -> ../init.d/dahdi
    DAHDI has been configured.

    List of detected DAHDI devices:

    pci:0000:04:02.0     wcte13xp+    d161:800b Wildcard TE132/TE134

    run ‘dahdi_genconf modules’ to load support for only
    the DAHDI hardware installed in this system.  By
    default support for all DAHDI hardware is loaded at
    DAHDI start.

    Switch back to /usr/local/src to continue building other packages

    cd /usr/local/src

    LIBPRI


    As I mentioned above I have a PRI card, so I also will be installing libpri, but you can skip this step if it doesn’t apply to you.

    wget http://downloads.asterisk.org/pub/telephony/libpri/libpri-1.4-current.tar.gz
    tar zxvf libpri-1.4-current.tar.gz
    cd libpri-1.4.15/
    make
    make install
    cd ..

    Asterisk

    OK, finally we can get to building Asterisk. Let’s find the latest certified Asterisk 13 on this page:
    http://www.asterisk.org/downloads/asterisk/all-asterisk-versions

    At the time of writing it looks like that is 13.1-cert1, so that’s what we’ll use in this example (you may need to adjust these instructions accordingly).

    Download the gzip compressed Asterisk tarball.

    cd /usr/local/src
    wget http://downloads.asterisk.org/pub/telephony/certified-asterisk/certified-asterisk-13.1-current.tar.gz

    Decompress and unpack the file

    tar zxvf certified-asterisk-13.1-current.tar.gz

    Switch in to the newly created source directory

    cd certified-asterisk-13.1-cert1/

    Add mp3 support

    ./contrib/scripts/get_mp3_source.sh

    Fetch all the prerequisites available in the package repository

     ./contrib/scripts/install_prereq install

    I ran into a problem on one computer where the install_prereq script Aborted with a message about conflicts. It looks like aptitude returned “:i386” prefixed on some of the output while searching for installed packages. When then data was later fed in to apt-get it failed.. so I modified it with:
    aptitude -F ‘%c %p’ search ^build-essential$ ^libz-dev$ |awk ‘/^p/{print $2}’ |sed ‘s/:i386//g’

    On line 74 changed:

    | awk ‘/^p/{print $2}’

    to

    | awk ‘/^p/{print $2}’ |sed ‘s/:i386//g’

    I think the script also looks for pjproject-devel, and I wonder if that should be libpjproject-dev instead.

    If you get conflicts and the script aborts, or if you prefer not installing everything but the kitchen sink you could manually grab the essentials:

    apt-get install build-essential # Compiler
    apt-get install libxml2-dev # Required
    apt-get install libncurses5-dev libreadline-dev libreadline6-dev  # Termcap stuff
    apt-get install libiksemel-dev # For Google Talk support
    apt-get install libvorbis-dev  # For Ogg Vorbis format support
    apt-get install libssl-dev # Needed for SIP
    apt-get install libspeex-dev libspeexdsp-dev  # For speex codec
    apt-get install mpg123 libmpg123-0 sox openssl wget subversion openssh-server # Odds and ends

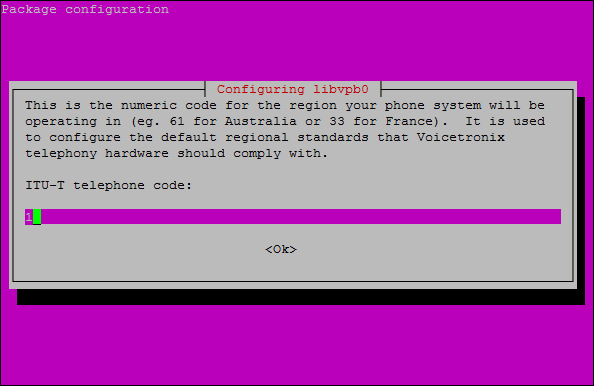
    If libvpb0 gets installed you may be prompted to type in your country calling code

    asterisk13_libvpb0

    After installation completes you should see a message indicating success.

    #############################################
    ## install completed successfully
    #############################################

    There may be additional source code to grab that wasn’t retrieved from the Ubuntu repository. This will potentially install Network Broadcast Sound, libresample, jansson, libsrtp, and pjproject

    ./contrib/scripts/install_prereq install-unpackaged

    Now that the prerequisites should be well covered, let’s configure Asterisk.
    Run the configure script

    ./configure

    If everything works out, you should get the ASCII art Asterisk logo

                   .$$$$$$$$$$$$$$$=..
                .$7$7..          .7$$7:.
              .$$:.                 ,$7.7
            .$7.     7$$$$           .$$77
         ..$$.       $$$$$            .$$$7
        ..7$   .?.   $$$$$   .?.       7$$$.
       $.$.   .$$$7. $$$$7 .7$$$.      .$$$.
     .777.   .$$$$$$77$$$77$$$$$7.      $$$,
     $$$~      .7$$$$$$$$$$$$$7.       .$$$.
    .$$7          .7$$$$$$$7:          ?$$$.
    $$$          ?7$$$$$$$$$$I        .$$$7
    $$$       .7$$$$$$$$$$$$$$$$      :$$$.
    $$$       $$$$$$7$$$$$$$$$$$$    .$$$.
    $$$        $$$   7$$$7  .$$$    .$$$.
    $$$$             $$$$7         .$$$.
    7$$$7            7$$$$        7$$$
     $$$$$                        $$$
      $$$$7.                       $$  (TM)
       $$$$$$$.           .7$$$$$$  $$
         $$$$$$$$$$$$7$$$$$$$$$.$$$$$$
           $$$$$$$$$$$$$$$$.

    Ensure the the modules you want are enabled.

    make menuconfig

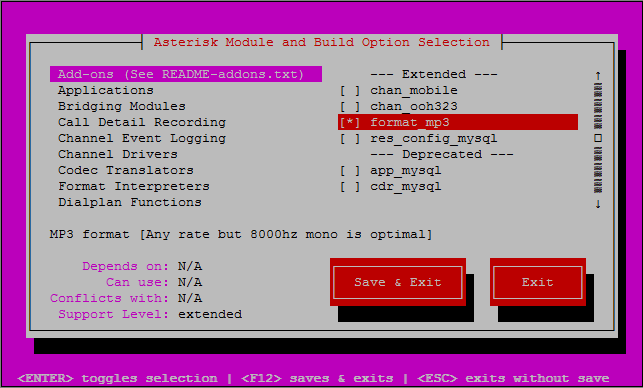
    You might want to see if there are any neat things you want. format_mp3 for example, or EXTRA-SOUNDS-EN-GSM might be desirable.

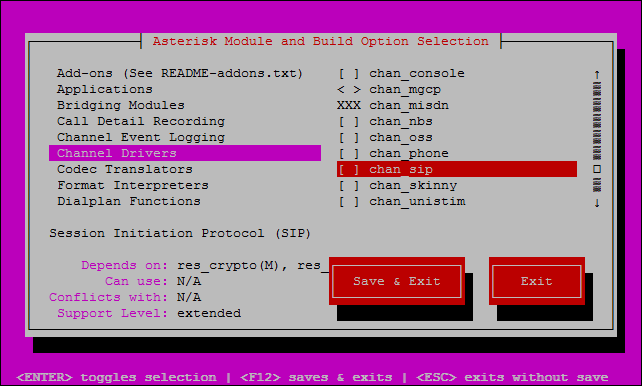
    Channel Drivers -> chan_sip
    Add-ons -> format_mp3
    Extra Sounds Packages -> EXTRA-SOUNDS-EN-GSM

    asterisk13_makemenuconfig

    N.B.
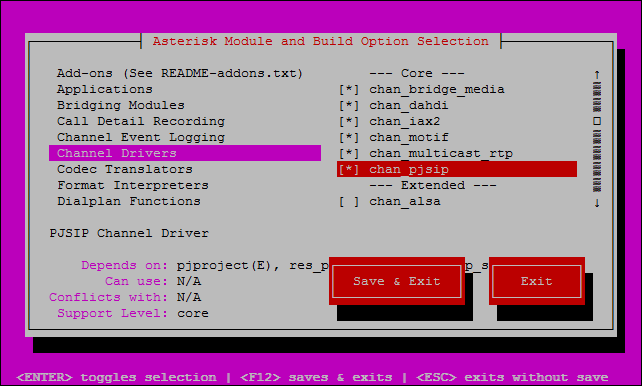
    Recently the Asterisk project started using PJSIP as a replacement for the older chan_sip. If you want or need the classic Asterisk SIP module you’ll have to manually select it.

    To use the deprecated chan_sip, unselect the the PJSIP channel driver.

    asterisk13_chan_pjsip_default

    Next, select the chan_sip driver.
    asterisk13_chan_sip

    When you are done making any changes “Save & Exit” out of menuconfig.

    Now it is time to build Asterisk

    make

    You should get a message that the build completed successfully.

     +——— Asterisk Build Complete ———+
     + Asterisk has successfully been built, and +
     + can be installed by running:              +
     +                                           +
     +                make install               +
     +——————————————-+

    So let’s copy the newly built files into the right places on the system

    make install

    If everything went to plan, you should see a message that the install completed successfully.

     +—- Asterisk Installation Complete ——-+
     +                                           +
     +    YOU MUST READ THE SECURITY DOCUMENT    +
     +                                           +
     + Asterisk has successfully been installed. +
     + If you would like to install the sample   +
     + configuration files (overwriting any      +
     + existing config files), run:              +
     +                                           +
     +                make samples               +
     +                                           +
     +—————–  or ———————+
     +                                           +
     + You can go ahead and install the asterisk +
     + program documentation now or later run:   +
     +                                           +
     +               make progdocs               +
     +                                           +
     + **Note** This requires that you have      +
     + doxygen installed on your local system    +
     +——————————————-+

    Copy the init startup scripts to make asterisk start on boot

    make config
     Adding system startup for /etc/init.d/asterisk …
       /etc/rc0.d/K91asterisk -> ../init.d/asterisk
       /etc/rc1.d/K91asterisk -> ../init.d/asterisk
       /etc/rc6.d/K91asterisk -> ../init.d/asterisk
       /etc/rc2.d/S50asterisk -> ../init.d/asterisk
       /etc/rc3.d/S50asterisk -> ../init.d/asterisk
       /etc/rc4.d/S50asterisk -> ../init.d/asterisk
       /etc/rc5.d/S50asterisk -> ../init.d/asterisk

    And you’re done.