
Need an Asterisk setup? Why not combine the long term support of an Ubuntu LTS release with the long term support of a Certified Asterisk release?
Certified Asterisk releases are supported for around 4 years, and Ubuntu LTS for around 5 years, helping ensure you don’t need to mess around with major reconfiguration again for some time.
We’ll be working with Certified Asterisk 13 and Ubuntu 14.04. Certified Asterisk 13 has an end-of-life date (EOL) of October 24, 2019, and Ubuntu 14.04 has an EOL of April 2019.
A list of Asterisk versions and their end of life dates can be found here:
https://wiki.asterisk.org/wiki/display/AST/Asterisk+Versions
Prerequisites
Let’s start by making sure we are up to date
apt-get update && apt-get -y upgradeMake sure kernel headers are installed
apt-get -y install linux-headers-$(uname -r)Grab a sensible build environment along with subversion and git which we will use later to retrieve additional source code
apt-get -y install build-essential subversion gitFor many people, the next two sections will be optional, you can probably skip down to the “Asterisk” section below.
DAHDI
On the system I’m working with, I have a Digium T1/E1 PRI card, so I’m going to grab the DAHDI modules and tools as well. You may want to install DAHDI regardless of your hardware for the dahdi_dummy timing driver. At one point the Zaptel dummy driver was used for MeetMe conferences when Digium hardware based timing was absent, although I’m not sure if this still remains the case.
We’ll be building our source under /usr/local/src, so switch in to that directory.
cd /usr/local/srcDownload and unpack DAHDI
wget http://downloads.asterisk.org/pub/telephony/dahdi-linux-complete/dahdi-linux-complete-current.tar.gz
tar zxvf dahdi-linux-complete-current.tar.gz
Switch in to the newly created source directory, compile, and install DAHDI.
cd dahdi-linux-complete-2.10.0.1+2.10.0.1/
make all
make install
make config
If you have DAHDI hardware you should see the type of card in the make config output
Adding system startup for /etc/init.d/dahdi ...
   /etc/rc0.d/K30dahdi -> ../init.d/dahdi
   /etc/rc1.d/K30dahdi -> ../init.d/dahdi
   /etc/rc6.d/K30dahdi -> ../init.d/dahdi
   /etc/rc2.d/S15dahdi -> ../init.d/dahdi
   /etc/rc3.d/S15dahdi -> ../init.d/dahdi
   /etc/rc4.d/S15dahdi -> ../init.d/dahdi
   /etc/rc5.d/S15dahdi -> ../init.d/dahdi
DAHDI has been configured.

List of detected DAHDI devices:

pci:0000:04:02.0     wcte13xp+    d161:800b Wildcard TE132/TE134

run 'dahdi_genconf modules' to load support for only
the DAHDI hardware installed in this system.  By
default support for all DAHDI hardware is loaded at
DAHDI start.
Switch back to /usr/local/src to continue building other packages
cd /usr/local/srcLIBPRI
As I mentioned above I have a PRI card, so I also will be installing libpri, but you can skip this step if it doesn’t apply to you.
wget http://downloads.asterisk.org/pub/telephony/libpri/libpri-1.4-current.tar.gz
tar zxvf libpri-1.4-current.tar.gz
cd libpri-1.4.15/
make
make install
cd ..
Asterisk
OK, finally we can get to building Asterisk. Let’s find the latest certified Asterisk 13 on this page:
http://www.asterisk.org/downloads/asterisk/all-asterisk-versions
At the time of writing it looks like that is 13.1-cert1, so that’s what we’ll use in this example (you may need to adjust these instructions accordingly).
Download the gzip compressed Asterisk tarball.
cd /usr/local/src
wget http://downloads.asterisk.org/pub/telephony/certified-asterisk/certified-asterisk-13.1-current.tar.gz
Decompress and unpack the file
tar zxvf certified-asterisk-13.1-current.tar.gzSwitch in to the newly created source directory
cd certified-asterisk-13.1-cert1/Add mp3 support
./contrib/scripts/get_mp3_source.shFetch all the prerequisites available in the package repository
./contrib/scripts/install_prereq installI ran into a problem on one computer where the install_prereq script Aborted with a message about conflicts. It looks like aptitude returned “:i386” prefixed on some of the output while searching for installed packages. When then data was later fed in to apt-get it failed.. so I modified it with:
aptitude -F ‘%c %p’ search ^build-essential$ ^libz-dev$ |awk ‘/^p/{print $2}’ |sed ‘s/:i386//g’
On line 74 changed:
| awk '/^p/{print $2}'to
| awk '/^p/{print $2}' |sed 's/:i386//g'I think the script also looks for pjproject-devel, and I wonder if that should be libpjproject-dev instead.
If you get conflicts and the script aborts, or if you prefer not installing everything but the kitchen sink you could manually grab the essentials:
apt-get install build-essential # Compiler
apt-get install libxml2-dev # Required
apt-get install libncurses5-dev libreadline-dev libreadline6-dev # Termcap stuff
apt-get install libiksemel-dev # For Google Talk support
apt-get install libvorbis-dev # For Ogg Vorbis format support
apt-get install libssl-dev # Needed for SIP
apt-get install libspeex-dev libspeexdsp-dev # For speex codec
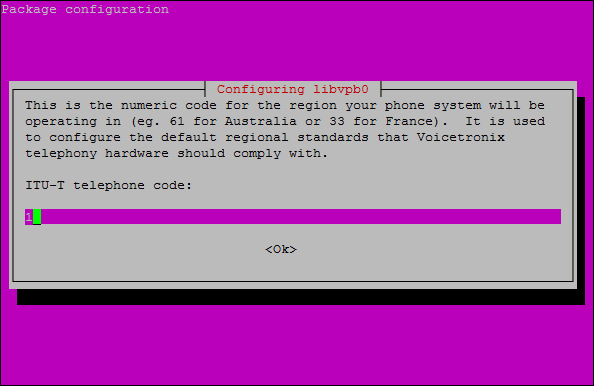
apt-get install mpg123 libmpg123-0 sox openssl wget subversion openssh-server # Odds and endsIf libvpb0 gets installed you may be prompted to type in your country calling code
After installation completes you should see a message indicating success.
#############################################
## install completed successfully
#############################################
There may be additional source code to grab that wasn’t retrieved from the Ubuntu repository. This will potentially install Network Broadcast Sound, libresample, jansson, libsrtp, and pjproject
./contrib/scripts/install_prereq install-unpackagedNow that the prerequisites should be well covered, let’s configure Asterisk.
Run the configure script
./configureIf everything works out, you should get the ASCII art Asterisk logo
.$$$$$$$$$$$$$$$=..
            .$7$7..          .7$$7:.
          .$$:.                 ,$7.7
        .$7.     7$$$$           .$$77
     ..$$.       $$$$$            .$$$7
    ..7$   .?.   $$$$$   .?.       7$$$.
   $.$.   .$$$7. $$$$7 .7$$$.      .$$$.
 .777.   .$$$$$$77$$$77$$$$$7.      $$$,
 $$$~      .7$$$$$$$$$$$$$7.       .$$$.
.$$7          .7$$$$$$$7:          ?$$$.
$$$          ?7$$$$$$$$$$I        .$$$7
$$$       .7$$$$$$$$$$$$$$$$      :$$$.
$$$       $$$$$$7$$$$$$$$$$$$    .$$$.
$$$        $$$   7$$$7  .$$$    .$$$.
$$$$             $$$$7         .$$$.
7$$$7            7$$$$        7$$$
 $$$$$                        $$$
  $$$$7.                       $$  (TM)
   $$$$$$$.           .7$$$$$$  $$
     $$$$$$$$$$$$7$$$$$$$$$.$$$$$$
       $$$$$$$$$$$$$$$$.
Ensure the the modules you want are enabled.
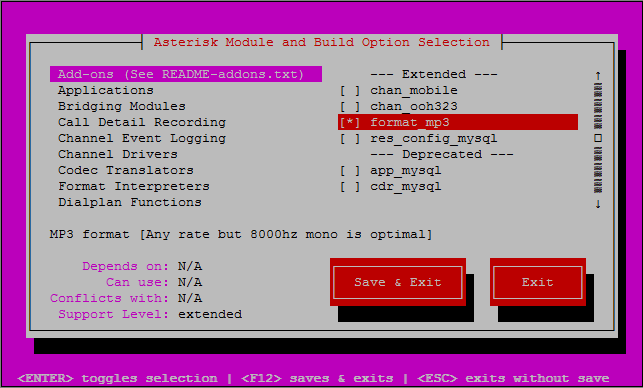
make menuconfigYou might want to see if there are any neat things you want. format_mp3 for example, or EXTRA-SOUNDS-EN-GSM might be desirable.
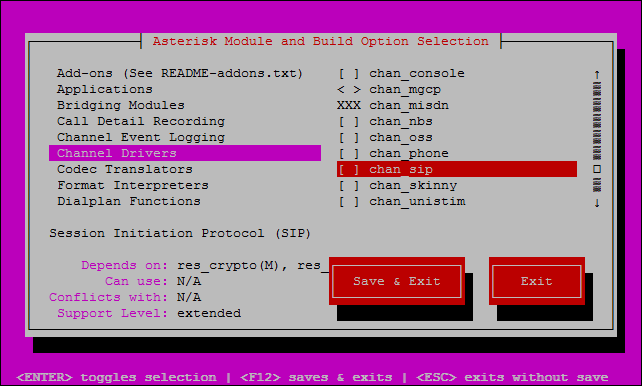
Channel Drivers -> chan_sip
Add-ons -> format_mp3
Extra Sounds Packages -> EXTRA-SOUNDS-EN-GSM
N.B.
Recently the Asterisk project started using PJSIP as a replacement for the older chan_sip. If you want or need the classic Asterisk SIP module you’ll have to manually select it.
To use the deprecated chan_sip, unselect the the PJSIP channel driver.
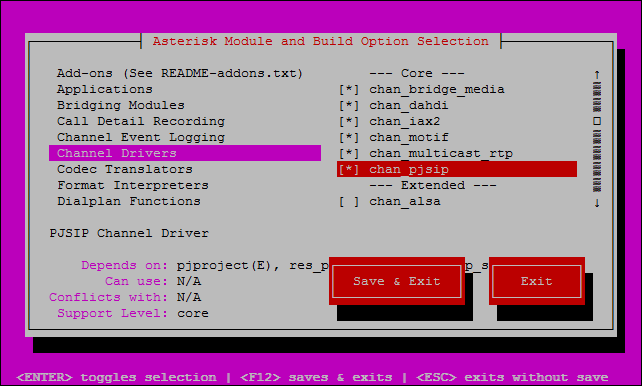
Next, select the chan_sip driver.
When you are done making any changes “Save & Exit” out of menuconfig.
Now it is time to build Asterisk
makeYou should get a message that the build completed successfully.
+--------- Asterisk Build Complete ---------+
 + Asterisk has successfully been built, and +
 + can be installed by running:              +
 +                                           +
 +                make install               +
 +-------------------------------------------+
So let’s copy the newly built files into the right places on the system
make installIf everything went to plan, you should see a message that the install completed successfully.
+---- Asterisk Installation Complete -------+
 +                                           +
 +    YOU MUST READ THE SECURITY DOCUMENT    +
 +                                           +
 + Asterisk has successfully been installed. +
 + If you would like to install the sample   +
 + configuration files (overwriting any      +
 + existing config files), run:              +
 +                                           +
 +                make samples               +
 +                                           +
 +-----------------  or ---------------------+
 +                                           +
 + You can go ahead and install the asterisk +
 + program documentation now or later run:   +
 +                                           +
 +               make progdocs               +
 +                                           +
 + **Note** This requires that you have      +
 + doxygen installed on your local system    +
 +-------------------------------------------+
Copy the init startup scripts to make asterisk start on boot
make configAdding system startup for /etc/init.d/asterisk ...
/etc/rc0.d/K91asterisk -> ../init.d/asterisk
/etc/rc1.d/K91asterisk -> ../init.d/asterisk
/etc/rc6.d/K91asterisk -> ../init.d/asterisk
/etc/rc2.d/S50asterisk -> ../init.d/asterisk
/etc/rc3.d/S50asterisk -> ../init.d/asterisk
/etc/rc4.d/S50asterisk -> ../init.d/asterisk
/etc/rc5.d/S50asterisk -> ../init.d/asteriskAnd you’re done.
Thanks for the article!
PS: Your website is barely readable with this light-grey font on a white background. Especially not in bright environments.