Author: admin

  • Elastix *69 (Call Trace) Fix

    Elastix *69 (Call Trace) Fix

    We’re running an older installation of Elastix at my office, version 2.0.0 (release 58) on top of freePBX version 2.7.0 (release 10). The call trace feature was bothering me. This feature is mapped to the *69 feature code as is common with many LECs in North America. In the default implementation you hear an announcement about the number of the last incoming call, and can then optionally press the “1” key to call the party back. I was frequently annoyed with having to wait for the IVR attendant to finish announcing the number of my last incoming call, I couldn’t interrupt the announcement without waiting for her to finish. Seemed pretty clear that I needed to replace Playback() with Background() some place.

    Here is a video showing the original behavior, and the modified behavior.

    Inside of /etc/asterisk/extensions_additional.conf is a context for [app-calltrace-perform]. Originally I made the correction in there, completely ignoring the header comment that read “Do NOT edit this file as it is auto-generated by FreePBX”. This worked, for a little bit, until changes were made and applied in the Elastix web interface, and then as promised the config was overwritten by a new auto-generated configuration.

    It appears the correct place to add this is in /etc/asterisk/extensions_override_freepbx.conf

    I appended the following lines to the end of extensions_override_freepbx.conf to accomplish the desired change.

    [app-calltrace-perform]
    include => app-calltrace-perform-custom
    exten => s,1,Answer
    exten => s,n,Wait(1)
    exten => s,n,Macro(user-callerid,)
    exten => s,n,Set(lastcaller=${DB(CALLTRACE/${AMPUSER})})
    exten => s,n,GotoIf($[ $[ "${lastcaller}" = "" ] | $[ "${lastcaller}" = "unknown" ] ]?noinfo)
    exten => s,n,Background(info-about-last-call&telephone-number)
    exten => s,n,SayDigits(${lastcaller})
    exten => s,n,Set(TIMEOUT(digit)=3)
    exten => s,n,Set(TIMEOUT(response)=7)
    exten => s,n,Background(to-call-this-number&press-1)
    exten => s,n,Goto(fin)
    exten => s,n(noinfo),Playback(from-unknown-caller)
    exten => s,n,Macro(hangupcall,)
    exten => s,n(fin),Noop(Waiting for input)
    exten => s,n,WaitExten(60,)
    exten => s,n,Playback(sorry-youre-having-problems&goodbye)
    exten => 1,1,Goto(from-internal,${lastcaller},1)
    exten => i,1,Playback(vm-goodbye)
    exten => i,n,Macro(hangupcall,)
    exten => t,1,Playback(vm-goodbye)
    exten => t,n,Macro(hangupcall,)
    ; end of [app-calltrace-perform]

    When done, save the file and reload the dialplan

    asterisk -rx "dialplan reload"

    This all comes from Elastix (well technically FreePBX I think) other than the replacement of Playback() with Background() during the playback of info-about-last-call.gsm. Of course I also had to move Set(lastcaller..) and stuff above Background() since we can now jump straight to exten => 1,1 without having those variables set.

    I’m not sure if this has changed in later versions of Elastix 2.x. I have to assume this annoys other people as well, but maybe it’s just me. If you have anything to add let me know in the comments.

    Thanks

  • Install Certified Asterisk 13 from source on Ubuntu 14.04 LTS

    Install Certified Asterisk 13 from source on Ubuntu 14.04 LTS

    Need an Asterisk setup? Why not combine the long term support of an Ubuntu LTS release with the long term support of a Certified Asterisk release?

    Certified Asterisk releases are supported for around 4 years, and Ubuntu LTS for around 5 years, helping ensure you don’t need to mess around with major reconfiguration again for some time.

    We’ll be working with Certified Asterisk 13 and Ubuntu 14.04. Certified Asterisk 13 has an end-of-life date (EOL) of October 24, 2019, and Ubuntu 14.04 has an EOL of April 2019.

    A list of Asterisk versions and their end of life dates can be found here:
    https://wiki.asterisk.org/wiki/display/AST/Asterisk+Versions

    Prerequisites

    Let’s start by making sure we are up to date

    apt-get update && apt-get -y upgrade

    Make sure kernel headers are installed

    apt-get -y install linux-headers-$(uname -r)

    Grab a sensible build environment along with subversion and git which we will use later to retrieve additional source code

    apt-get -y install build-essential subversion git

    For many people, the next two sections will be optional, you can probably skip down to the “Asterisk” section below.

    DAHDI

    On the system I’m working with, I have a Digium T1/E1 PRI card, so I’m going to grab the DAHDI modules and tools as well. You may want to install DAHDI regardless of your hardware for the dahdi_dummy timing driver. At one point the Zaptel dummy driver was used for MeetMe conferences when Digium hardware based timing was absent, although I’m not sure if this still remains the case.

    We’ll be building our source under /usr/local/src, so switch in to that directory.

    cd /usr/local/src

    Download and unpack DAHDI

    wget http://downloads.asterisk.org/pub/telephony/dahdi-linux-complete/dahdi-linux-complete-current.tar.gz
    tar zxvf dahdi-linux-complete-current.tar.gz

    Switch in to the newly created source directory, compile, and install DAHDI.

    cd dahdi-linux-complete-2.10.0.1+2.10.0.1/
    make all
    make install
    make config

    If you have DAHDI hardware you should see the type of card in the make config output

     Adding system startup for /etc/init.d/dahdi …
       /etc/rc0.d/K30dahdi -> ../init.d/dahdi
       /etc/rc1.d/K30dahdi -> ../init.d/dahdi
       /etc/rc6.d/K30dahdi -> ../init.d/dahdi
       /etc/rc2.d/S15dahdi -> ../init.d/dahdi
       /etc/rc3.d/S15dahdi -> ../init.d/dahdi
       /etc/rc4.d/S15dahdi -> ../init.d/dahdi
       /etc/rc5.d/S15dahdi -> ../init.d/dahdi
    DAHDI has been configured.

    List of detected DAHDI devices:

    pci:0000:04:02.0     wcte13xp+    d161:800b Wildcard TE132/TE134

    run ‘dahdi_genconf modules’ to load support for only
    the DAHDI hardware installed in this system.  By
    default support for all DAHDI hardware is loaded at
    DAHDI start.

    Switch back to /usr/local/src to continue building other packages

    cd /usr/local/src

    LIBPRI


    As I mentioned above I have a PRI card, so I also will be installing libpri, but you can skip this step if it doesn’t apply to you.

    wget http://downloads.asterisk.org/pub/telephony/libpri/libpri-1.4-current.tar.gz
    tar zxvf libpri-1.4-current.tar.gz
    cd libpri-1.4.15/
    make
    make install
    cd ..

    Asterisk

    OK, finally we can get to building Asterisk. Let’s find the latest certified Asterisk 13 on this page:
    http://www.asterisk.org/downloads/asterisk/all-asterisk-versions

    At the time of writing it looks like that is 13.1-cert1, so that’s what we’ll use in this example (you may need to adjust these instructions accordingly).

    Download the gzip compressed Asterisk tarball.

    cd /usr/local/src
    wget http://downloads.asterisk.org/pub/telephony/certified-asterisk/certified-asterisk-13.1-current.tar.gz

    Decompress and unpack the file

    tar zxvf certified-asterisk-13.1-current.tar.gz

    Switch in to the newly created source directory

    cd certified-asterisk-13.1-cert1/

    Add mp3 support

    ./contrib/scripts/get_mp3_source.sh

    Fetch all the prerequisites available in the package repository

     ./contrib/scripts/install_prereq install

    I ran into a problem on one computer where the install_prereq script Aborted with a message about conflicts. It looks like aptitude returned “:i386” prefixed on some of the output while searching for installed packages. When then data was later fed in to apt-get it failed.. so I modified it with:
    aptitude -F ‘%c %p’ search ^build-essential$ ^libz-dev$ |awk ‘/^p/{print $2}’ |sed ‘s/:i386//g’

    On line 74 changed:

    | awk ‘/^p/{print $2}’

    to

    | awk ‘/^p/{print $2}’ |sed ‘s/:i386//g’

    I think the script also looks for pjproject-devel, and I wonder if that should be libpjproject-dev instead.

    If you get conflicts and the script aborts, or if you prefer not installing everything but the kitchen sink you could manually grab the essentials:

    apt-get install build-essential # Compiler
    apt-get install libxml2-dev # Required
    apt-get install libncurses5-dev libreadline-dev libreadline6-dev  # Termcap stuff
    apt-get install libiksemel-dev # For Google Talk support
    apt-get install libvorbis-dev  # For Ogg Vorbis format support
    apt-get install libssl-dev # Needed for SIP
    apt-get install libspeex-dev libspeexdsp-dev  # For speex codec
    apt-get install mpg123 libmpg123-0 sox openssl wget subversion openssh-server # Odds and ends

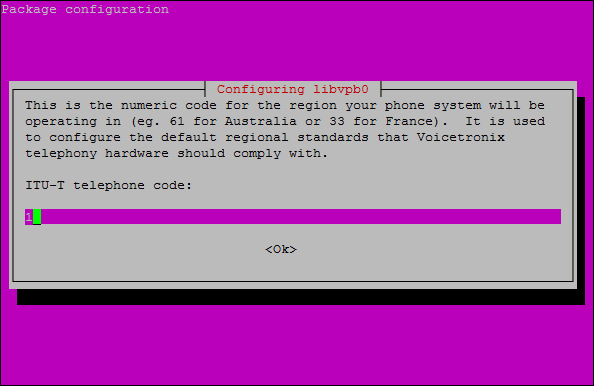
    If libvpb0 gets installed you may be prompted to type in your country calling code
    asterisk13_libvpb0

    After installation completes you should see a message indicating success.

    #############################################
    ## install completed successfully
    #############################################

    There may be additional source code to grab that wasn’t retrieved from the Ubuntu repository. This will potentially install Network Broadcast Sound, libresample, jansson, libsrtp, and pjproject

    ./contrib/scripts/install_prereq install-unpackaged

    Now that the prerequisites should be well covered, let’s configure Asterisk.
    Run the configure script

    ./configure

    If everything works out, you should get the ASCII art Asterisk logo

                   .$$$$$$$$$$$$$$$=..
                .$7$7..          .7$$7:.
              .$$:.                 ,$7.7
            .$7.     7$$$$           .$$77
         ..$$.       $$$$$            .$$$7
        ..7$   .?.   $$$$$   .?.       7$$$.
       $.$.   .$$$7. $$$$7 .7$$$.      .$$$.
     .777.   .$$$$$$77$$$77$$$$$7.      $$$,
     $$$~      .7$$$$$$$$$$$$$7.       .$$$.
    .$$7          .7$$$$$$$7:          ?$$$.
    $$$          ?7$$$$$$$$$$I        .$$$7
    $$$       .7$$$$$$$$$$$$$$$$      :$$$.
    $$$       $$$$$$7$$$$$$$$$$$$    .$$$.
    $$$        $$$   7$$$7  .$$$    .$$$.
    $$$$             $$$$7         .$$$.
    7$$$7            7$$$$        7$$$
     $$$$$                        $$$
      $$$$7.                       $$  (TM)
       $$$$$$$.           .7$$$$$$  $$
         $$$$$$$$$$$$7$$$$$$$$$.$$$$$$
           $$$$$$$$$$$$$$$$.

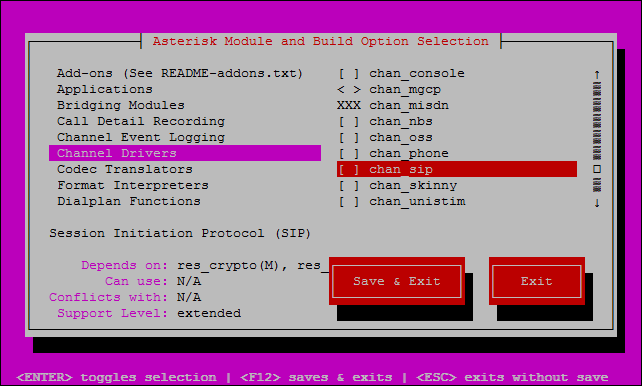
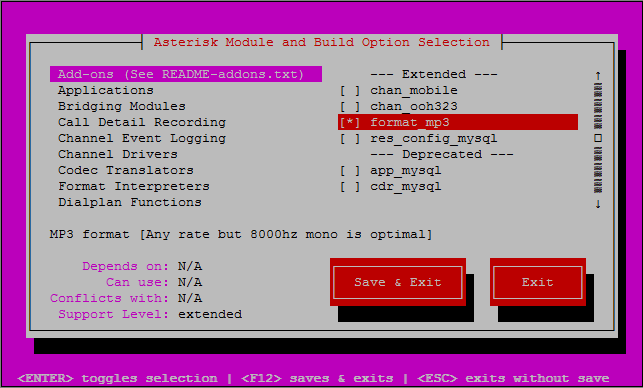
    Ensure the the modules you want are enabled.

    make menuconfig

    You might want to see if there are any neat things you want. format_mp3 for example, or EXTRA-SOUNDS-EN-GSM might be desirable.

    Channel Drivers -> chan_sip
    Add-ons -> format_mp3
    Extra Sounds Packages -> EXTRA-SOUNDS-EN-GSM
    asterisk13_makemenuconfig

    N.B.
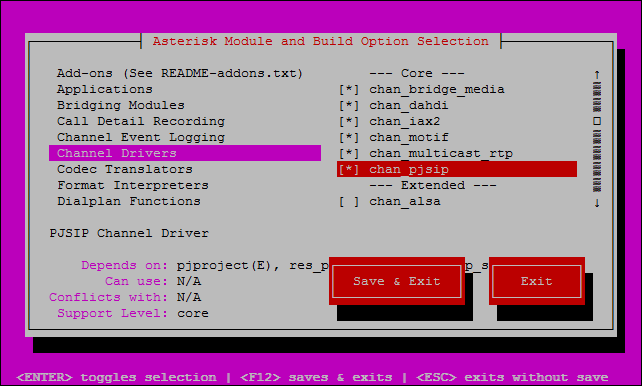
    Recently the Asterisk project started using PJSIP as a replacement for the older chan_sip. If you want or need the classic Asterisk SIP module you’ll have to manually select it.

    To use the deprecated chan_sip, unselect the the PJSIP channel driver.
    asterisk13_chan_pjsip_default

    Next, select the chan_sip driver.
    asterisk13_chan_sip

    When you are done making any changes “Save & Exit” out of menuconfig.

    Now it is time to build Asterisk

    make

    You should get a message that the build completed successfully.

     +——— Asterisk Build Complete ———+
     + Asterisk has successfully been built, and +
     + can be installed by running:              +
     +                                           +
     +                make install               +
     +——————————————-+

    So let’s copy the newly built files into the right places on the system

    make install

    If everything went to plan, you should see a message that the install completed successfully.

     +—- Asterisk Installation Complete ——-+
     +                                           +
     +    YOU MUST READ THE SECURITY DOCUMENT    +
     +                                           +
     + Asterisk has successfully been installed. +
     + If you would like to install the sample   +
     + configuration files (overwriting any      +
     + existing config files), run:              +
     +                                           +
     +                make samples               +
     +                                           +
     +—————–  or ———————+
     +                                           +
     + You can go ahead and install the asterisk +
     + program documentation now or later run:   +
     +                                           +
     +               make progdocs               +
     +                                           +
     + **Note** This requires that you have      +
     + doxygen installed on your local system    +
     +——————————————-+

    Copy the init startup scripts to make asterisk start on boot

    make config
     Adding system startup for /etc/init.d/asterisk …
       /etc/rc0.d/K91asterisk -> ../init.d/asterisk
       /etc/rc1.d/K91asterisk -> ../init.d/asterisk
       /etc/rc6.d/K91asterisk -> ../init.d/asterisk
       /etc/rc2.d/S50asterisk -> ../init.d/asterisk
       /etc/rc3.d/S50asterisk -> ../init.d/asterisk
       /etc/rc4.d/S50asterisk -> ../init.d/asterisk
       /etc/rc5.d/S50asterisk -> ../init.d/asterisk

    And you’re done.

  • YAC Caller ID Server for Asterisk

    YAC Caller ID Server for Asterisk

    I recently upgraded the firmware of the IP phones in a small office using my Grandstream HTTP configuration pusher. One of the users complained that the Caller ID display under the new firmware was too small to be legible. I’m not convinced that the size of the font actually changed, but I wanted to offer some kind of solution. The ever helpful (although often outdated) voip-info.org wiki lists several options for call notifications under asterisk (the PBX in use in the office):

    http://www.voip-info.org/wiki/view/Asterisk+call+notification

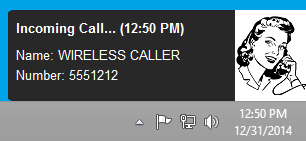
    I liked the look of YAC: Yet Another Caller ID Program, by Jensen Harris the best. It is intended for use with a Caller ID capable modem, but works fine for my purpose as well. YAC has two pieces, a YAC listener, which runs on workstations that want to see incoming Caller ID, and a YAC server which collects Caller ID and sends to the listener(s). I’m using just the listener side and have written my own YAC server portion that collects its information through the Asterisk Management Interface. I used the SiComponents Resource Builder 3 resource editor to replace the yak graphic normally shown in YAC with the office’s logo inside of the yak.exe binary (a fake example is shown below).

    yac_sample

    Here is my YAC Caller ID server for Asterisk:

    #!/bin/bash

    extensions=(1100[192.168.1.100] 1101[192.168.1.101] 1102[192.168.1.102])

    ami_user="admin"
    ami_pass="elastix456"
    server="127.0.0.1"
    port="5038"

    if [ "$1" == "–detach" ] ; then
            $0 >/dev/null &
            exit
    fi

    exec 3<>/dev/tcp/$server/$port

    ami_write() {
            echo "$@" >&3
    }

    ami_read() {
            read -t1 server_out  <&3
            # strip CR 0x0d line terminator
            server_out="${server_out%$’\x0d’*}"
            echo "$server_out"

    }

    ami_get_response() {
            while [ 1 ]
            do
                    response="$(ami_read)"
                    if [ "${response:0:10}" == "Response: " ]; then
                            response="${response:10}"
                            echo "$response"
                            break
                    fi
            done
    }

    ami_logout() {
            if [ -n "$connected" ]; then
                    ami_write "Action: Logoff"
                    ami_write ""
                    if [ "$(ami_get_response)" == "Goodbye" ]; then
                            echo "Logged out."
                    fi
            fi
    }

    trap "ami_logout; exit" EXIT SIGTERM

    ami_login() {
            ami_write "Action: Login"
            ami_write "Username: $ami_user"
            ami_write "Secret: $ami_pass"
            ami_write ""
            if [ "$(ami_get_response)" != "Success" ]; then
                    echo "Login failed." >&2
                    exit
            else
                    echo "Logged in."
                    connected=1
            fi
    }

    ami_login

    echo "Waiting for calls…"

    while [ 1 ];
    do
            line="$(ami_read)"

            if [ "${line:0:11}" == "Event: Dial" ]; then
                    while [ -n "$line" ]
                    do
                            line="$(ami_read)"
                            if [ "${line:0:13}" == "CallerIDNum: " ]; then
                                    callerid="~${line:13}"
                            fi
                            if [ "${line:0:14}" == "CallerIDName: " ]; then
                                    callerid="${line:14} $callerid"
                            fi
                            if [ "${line:0:12}" == "Dialstring: " ]; then
                                    called_extension="${line:12}"
                            fi
                    done
            fi

            if [ -n "$called_extension" ] && [ -n "$callerid" ]; then
                    for extension in ${extensions[@]}
                    do
                            ip="${extension##*'[‘}"
                            ip="${ip//]/}"
                            extension="${extension%%'[‘*}"
                            if [ "$extension" == "$called_extension" ]; then
                                    echo "New call to $extension from $callerid"
                                    exec 4<>/dev/tcp/$ip/10629
                                    echo "@CALL$callerid" >&4
                                    exec 4>&
                            fi

                    done
                    unset called_extension
                    unset callerid
            fi
    done

    exec 3>&
    echo "Quit."

    You’ll need to replace the server, port, user and password with the correct information for your AMI setup. The “extensions” variable includes the internal extension and the IP address of the associated desktop/workstation that is running the YAC listener. The format is 1100[192.168.1.100] where 1100 is the extension, and 192.168.1.100 is the This way people see the Caller ID destined for their extension on their desktop. In environments with dynamically assigned desktop IP addresses this will require some additional effort to keep updated. Ideally I’d like to see something like YAC that logs in to a SIP server to monitor calls that way, seems like less to deal with, but many offerings like that included too many other features for my liking (click to call functionality, dial pad, etc).

    The server captures SIGTERM and tries to logoff the AMI server before exiting

    [root@phone ~]# ./yac-d.sh
    Logged in.
    Waiting for calls…
    New call to 1100 from WIRELESS CALLER ~5551212"
    ^C
    Logged out.

    You can start the script into the background by using the –detach switch.

    [root@phone ~]# ./yac-d.sh –detach
  • Santa Hatifyer v1.0

    Santa Hatifyer v1.0

    Well, it’s Christmas time again. I really haven’t had a lot of blog posts since last Christmas, so my 2013 desk-decorations (deskorations?) are still fresh on my mind. I cheated this year, and didn’t stick to stuff I had on hand (although at the core is a Raspberry Pi, which the office had available).

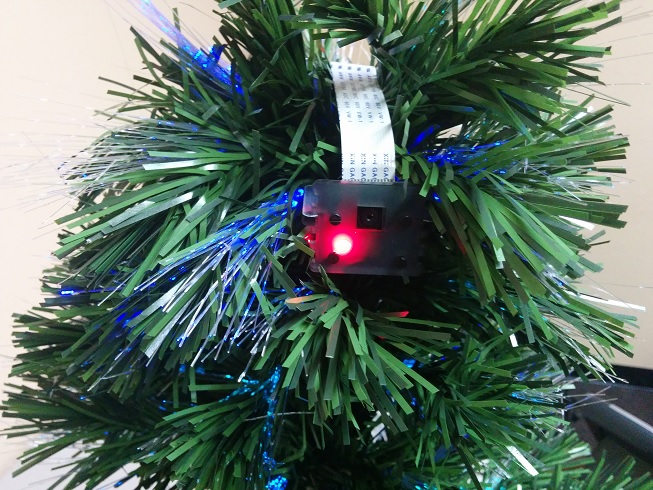
    I purchased one of those cool new Raspberry Pi camera modules and stuck it in a [faux] Christmas tree. These use the Pi’s camera serial interface (CSI) port which may provide better frame rates than processing from some USB webcams. I didn’t benefit from any of that efficiency in my project, but that’s my own fault.

    rpi_cam_xmas_tree

    I used a 60 LED 1 meter “Neopixel” WS2812B series from Adafruit to decorate the folding table holding my tree and greeting cards. My coworker Eric programmed a Larson scanner sequence (think of the lights on the KITT car from the television show Knight Rider, or the cylons from Battlestar Galactica). He wrote some other sequences as well, but they were all pretty hard to capture with my camera due to the brightness of the LEDs.

    christmas_cylon

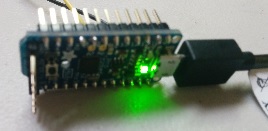
    We drove these with an Arduino compatible “Trinket Pro” also from Adafruit, although they could have been driven by the Pi itself with some extra effort. The Trinket route was pretty straight forward thanks to the Adafruit Neopixel library.

    arduino_trinket

    A monitor connected to the Raspberry Pi displays a festive youtube video of a fire and falling snow. This 2 hour long video plays on a loop, unless it is interrupted.

    While the video plays a Python script takes images from the Raspberry Pi camera module and uses OpenCV to detect faces. When a face is found a Santa hat is placed on the subject’s head (or thereabouts) and the picture is displayed to the viewer in a greeting card-esque format. The hat is scaled to fit the head of the individual subject, and multiple subjects are supported. The photos are of course saved for future embarrassment.

    xmascam_eric

    The script is ugly, and as I said earlier pretty inefficient (unnecessary disk I/O and format conversions for starters). The slowness is amplified by the limited resources available on the Pi. No doubt this can be done better, quicker, and probably as a real-time video. Here it is regardless. The background comes from scigola’s contribution over at openclipart.org (thank-you).

    https://github.com/ethertubes/santa_hatifyer

    xmasvision.py

    #!/usr/bin/env python

    # vim: tabstop=8 expandtab shiftwidth=4 softtabstop=4
    import cv2
    import sys
    import io
    import time
    import picamera
    import picamera.array
    import os
    import pygame

    CAMERA_WIDTH = 640
    CAMERA_HEIGHT = 480

    # Taken from "Capturing to an OpenCV object"
    # http://picamera.readthedocs.org/en/latest/recipes1.html

    # Create the in-memory stream
    stream = io.BytesIO()

    face = 0
    while face == 0:
        # Acquiring pic
        with picamera.PiCamera() as camera:
            camera.resolution = (CAMERA_WIDTH, CAMERA_HEIGHT)
            camera.vflip = True
            time.sleep(1)
            with picamera.array.PiRGBArray(camera) as stream:
                camera.capture(stream, format=‘bgr’)
                # At this point the image is available as stream.array
                image = stream.array

        # Adapted from "Haar-cascade Detection in OpenCV"
        # http://docs.opencv.org/trunk/doc/py_tutorials/py_objdetect/py_face_detection/py_face_detection.html
        face_cascade = cv2.CascadeClassifier(‘haarcascade_frontalface_default.xml’)

        # Got pic, checking for faces
        gray = cv2.cvtColor(image, cv2.COLOR_BGR2GRAY)
        faces = face_cascade.detectMultiScale(image, 1.3, 5)

        if len(faces) > 0:
            face = 1
            print "Found Face! "
            cv2.imwrite(‘foundface.jpg’, image)

    cv2.destroyAllWindows()

    # driver selection routine borrowed from:
    # https://web.archive.org/web/20130601053413/http://www.karoltomala.com/blog/?p=679

    screen = None;

    drivers = [‘fbcon’, ‘directfb’, ‘svgalib’]

    for driver in drivers:
        if not os.getenv(‘SDL_VIDEODRIVER’):
            os.putenv(‘SDL_VIDEODRIVER’, driver)
        try:
            print "trying: " + driver
            pygame.display.init()
        except pygame.error:
            print ‘Driver: {0} failed.’.format(driver)
            continue
        found = True
        break

        if not found:
            raise Exception(‘No suitable video driver found!’)

    original_width = pygame.display.Info().current_w
    original_height = pygame.display.Info().current_h

    # match camera/image resolution
    width = CAMERA_WIDTH
    height = CAMERA_HEIGHT

    # Use the face photo as our canvas
    screen = pygame.display.set_mode((width, height))
    pygame.mouse.set_visible(False)
    bg = pygame.image.load(‘foundface.jpg’)
    bg = pygame.transform.scale(bg, (width, height))
    screen.blit(bg, bg.get_rect())

    # hat is longer on the right than the wearable
    # area (because of the little puff ball) tweak
    # value for your own hats
    hat_offset = 330

    # put the hat on the cat
    if len(faces) > 0:
        for (x,y,w,h) in faces:
            hat = pygame.image.load(‘hat.png’).convert_alpha()
            hat_size = int((hat.get_width() – hat_offset) / w)
            if hat_size < 1:
                hat_size = 1
            hat_offset = int(hat_offset * (1.0 / hat_size))
            hat = pygame.transform.scale(hat, (int(hat.get_width() * (1.0 / hat_size)), int(hat.get_height() * (1.0 / hat_size))))
            hat_w = hat.get_width()
            hat_h = hat.get_height()
            #pygame.draw.rect(screen, (255, 0, 0), (x, y – hat_h, hat_w, hat_h), 1) # hat border, helpful for debugging
            print "x: " + str(x)
            print "y: " + str(y)
            # fudge placement a little to put hat on, rather than over
            fx = int(x * 0.96)
            fy = int(y * 1.04)
            screen.blit(hat, (fx, fy – hat_h, hat_w, hat_h)) # fudge placement a little to put hat on, rather than over
            #pygame.draw.rect(screen, (0, 255, 0), (x, y, w, h), 1) # face border

    # Uncomment if you want to see the intermediary face + hat photo
    #pygame.display.update()
    pygame.image.save(screen, ‘hatted.png’)

    # Resize canvas to fit monitor
    width = original_width
    height = original_height

    # load background and photo (with hat) into objects
    # display background over photo, allowing transparent region to
    # show the photo behind it.
    screen = pygame.display.set_mode((width, height))
    bg = pygame.image.load(‘xmascam.png’).convert_alpha()
    bg = pygame.transform.scale(bg, (width, height))
    photo = pygame.image.load(‘hatted.png’)
    photo = pygame.transform.scale(photo, (int(1.339 * photo.get_width()), int(1.339 * photo.get_height())))
    screen.blit(photo, (622, 115, photo.get_width(), photo.get_height()))
    screen.blit(bg, bg.get_rect())
    pygame.display.update()

    time.sleep(10)
    sys.exit

    pygame.display.quit()

    This script is ran, the photos archived, and the fire video started/stopped by the following bash script

    watcher.sh

    #!/bin/bash

    facewatch() {
            if ! [ -d "./archive" ]; then
                    mkdir "./archive"
            fi

            while [ 1 ]
            do
                    ./xmasvision.py
                    stamp="$(date +%s)"
                    if [ -f "foundface.jpg" ]; then
                            mv foundface.jpg ./archive/foundface_$stamp.jpg
                    fi
                    if [ -f "hatted.png" ]; then
                            mv hatted.png ./archive/hatted_$stamp.png
                    fi
            done
    }

    facewatch &
    while [ 1 ]
    do
            # if "hatted.png" exists then the thing should display soon
            # so stop the fire video
            if [ -f "hatted.png" ]; then
                    if ! [ -z "$(ps aux |grep -i omxplayer.bin |grep -v grep)" ]; then
                            killall omxplayer.bin
                    fi
            fi
            # start the fire video if needed
            if [ -z "$(ps aux |grep omxplayer.bin |grep -v grep)" ]; then
                    omxplayer video/Christmas\ Yule\ Log\ Fireplace\ with\ Snow\ and\ Crackling\ Fire\ Sounds\ \(HD\)-y_VD92xKS5w.mp4 &
            fi
            sleep 1
    done

    Happy Holidays